 Did we miss anything on this map? Is there something we didn't discover? Let us know!
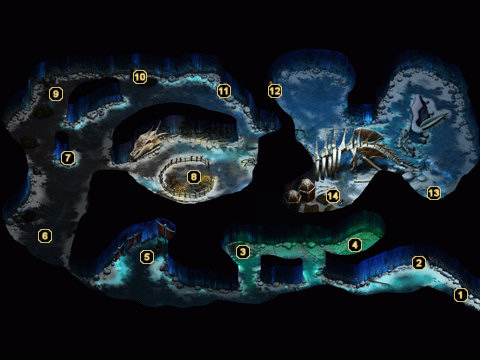
1 - Arrival
Did we miss anything on this map? Is there something we didn't discover? Let us know!
1 - Arrival
Seven Winter Wolves charge your party when you enter these frozen caverns. Try to keep your party separated as their Cone of Cold breath can be pretty devastating.
2 - First Tunnel
This tunnel will bring your party to area #13.
3 - Shrine
Search through this skull-adorned shrine to find a scroll of Symbol of Pain, a
Potion of Power, a
Red Potion, two
Potions of Healing, a
Ring of Holiness, and a cursed set of gloves called the
Gauntlets of Infernal Damnation.
4 - White Wyrms
Several White Wyrms inhabit this section of the caverns. The one named Frostbite will indulge you in conversation, and you'll learn that the White Wyrms have been feasting on humans. If you proclaim that such a travesty cannot go on, Frostbite and the other White Wyrms will attack.
When the creatures have been slain, search through the bones to find two caches of items. The first contains some gold and eleven gems, while the second contains a larger amount of gold, a couple of nonmagical rings, some broken armor, a suit of
Mithral Field Plate Armor +2, a musical instrument called
The Cittern of War, and a
Long Bow of Marksmanship.
5 - Joril
Joril Frostbeard is the leader of the Frost Giants here in these caverns. He also happens to be one of the lieutenants working for "the master", and therefore carries one of the six badges you need to acquire within Dorn's Deep. Well, technically his father Kreg Frostbeard is one of the six lieutenants, but the tables have turned since his son killed him and took the badge.
If the character speaking has a Charisma of 12 or more, you can imply that you're working for "the master" and are here to collect the badge (since Joril had no right in taking it). This will trick Joril into simply handing the badge over to you without a fight, earning your party 80,000 experience points. Additionally, if you talk to Joril with a Paladin, you can demand that he free the slaves. This will reveal your party as impostors, but it will earn you 180,000 experience points.
If you insult Joril or demand that he free the slaves, you'll find yourself having to do battle with the Frost Giant leader, two Frost Giant bodyguards, and a Winter Wolf. The battle really shouldn't be all that tough for you at this point in the game, though. When they've all been slain, search Joril's remains to find his badge (if you didn't already trick him to hand it over), a gem, some
Chainmail +2,
Joril's Axe, and a random magic weapon (such as
Redemption or a
Fire Flail +3). All of the creatures within these caverns will become hostile after this battle, so tread carefully.
6 - Loot!
Search through the two giant sacks on either side of this hallway to uncover five potions and a scroll of Raise Dead.
7 - Loot!
Three more giant sacks lie on the floor in this vicinity. Sift through their contents to find a scroll of Insect Plague, six potions, a
Wand of Heaven, and thirteen
Darts of Stunning.
8 - Slaves
Seven slaves are being held in a makeshift pen in this area of the caverns. Their leader, Davin Berenson, seems to think that your party is working for the Frost Giants. Convince him otherwise and he'll tell you that the Frost Giants use the slaves as food for a White Wyrm named Frostbite. If you slay Frostbite at area #4, you can let Davin know that there will be no more sacrifices for 120,000 experience points.
What Davin and his fellow slaves really want is their freedom, though. Davin seems to think that if you "removed" the single Frost Giant near the slave pen that the lot of them could escape to the tunnel at area #11. Of course, the slaves have no idea what awaits them on the other side, so Davin recommends that you remove any "hazards" before initiating the escape plan.
When you've dealt with the Glacier Yeti, Greater Ice Trolls, Snow Trolls, Black Ice Knights, and Kontik (all of which reside on the other side of the tunnel), return to Davin and let him know that you're ready to slay the Frost Giant overseeing the pen. Speak with Gorg and he will scoff at your party, threatening to hang your carcasses on the wall as trophies. Demonstrate your battle prowess on the large fellow and then let Davin know that the path is clear for he and the slaves to make their escape. This will earn you 180,000 experience points.
Believe it or not, killing Gorg does not cause the rest of the Frost Giants to become hostile. You can actually use this to your advantage, if (and only if) you haven't already had any dealings with Joril at area #5. As long as a Paladin does the speaking, you can talk to Joril and demand that the slaves be released (even though they're already long gone) for another 180,000 experience points. Of course, this does lead to combat, so only do so if you're ready for a fight.
9 - Loot!
One of the Frost Giant's beds and two more giant sacks can be plundered for scrolls of Spike Stones and Champion's Strength, six potions, a
Dagger of Venom, a
Cloak of Protection +2, some
Leather Armor +2, and a
Dagger +2, Longtooth.
10 - Loot!
The giant sack along this wall contains two more potions, a
Blur Deck, and a
Scimitar +3, Frostbrand.
11 - Second Tunnel
This tunnel will bring your party to area #12.
12 - Second Tunnel Exit
When you emerge from the tunnel, you'll be surrounded by Glacier Yeti. More Yeti and Trolls await you as you move farther toward the massive dragon skeleton.
13 - First Tunnel Exit
Several Greater Ice Trolls and Snow Trolls await your party on the other side of this tunnel, so be prepared wen
14 - Kontik
Pass beneath the ribcage of the long-dead dragon to meet Kontik, a follower of Auril the Frostmaiden. Kontik will tell you that she specifically journeyed to these caves to avenge the death of Lysan (the barmaid you killed in the
Vale of Shadows) for his goddess. Since your party is responsible, you'll soon realize that a battle is inevitable.
Kontik is flanked by five Black Ice Knights, but the mage herself obviously poses the most danger. Focus all of your attacks on her and she will most likely fall before she has a chance to get off more than one spell. The Black Ice Knights hit hard, but can be dealt with fairly easily if you use a little discretion.
When the battle is over, you'll find 100 gold pieces on each of the dead Black Ice Knights. Kontik, however, has much more treasure for the taking - a
Robe of the Evil Archmagi, a
Ring of Protection +2,
Kontik's Ring of Wizardry, the
Breath of Auril, and a random magic weapon (such as a
Bastard Sword of Greater Phasing or a
Static Short Sword +3). The two little huts to the west can also be searched to uncover scrolls of Chain Lightning, Otiluke's Freezing Sphere, and Invulnerability, as well as four potions and the Barrel of Pure Water that Valestis needs on
the fourth floor of Corellon Tower in the Severed Hand.


