 Did we miss anything in this section? Is there something we didn't discover?
Let us know!
Walkthrough
Did we miss anything in this section? Is there something we didn't discover?
Let us know!
Walkthrough
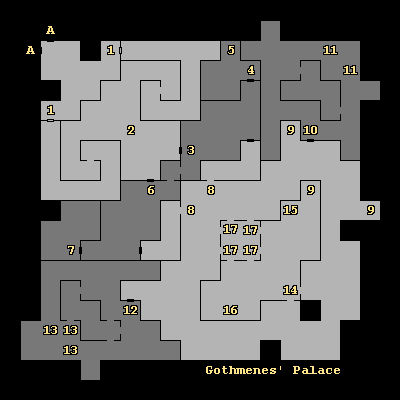
You'll begin in the outer palace (at Exit A). The first time you "look" or "search" (which you'll have to do to discover the nearby secret doors, #1), you'll be forced to decide who will carry each of the objects of power: the Crystal Ring (from Kalistes in Kalistes' Parlor), the Horn of Doom (from Thorne in Thorne's Cave), and the Talisman of Bane (from Tanetal in Moander's Heart). If you don't have some of the objects yet, then you should go out and fetch them, because you won't be able to finish this map (and the game) without them. Right now it doesn't really matter which characters hold which objects, or if one character holds them all, or if a character wears the ring.
As you explore the palace, you'll have a bunch of tough fights, including a group of Rakshasas pretending to be Sasha and her Phlanarian bodyguards (#2). Most of the enemies will either be immune or all-but-immune to magic (like Beholders and Rakshasas) or they'll be immune to fire damage (like red Minions of Bane and Salamanders). That means you won't be able to just cast Delayed Blast Fireballs on everything; you'll have to use alternate spells like Cone of Cold and Lightning Bolt, and you'll have to rely on your equipment, which probably won't be great, even if you cleaned out Dark Phlan. You'll also probably need to buff up before the fixed battles, including using Haste here and there. Chances are you'll get interrupted if you try to rest in the palace (except at #7), but if you need to you can always return to Dark Phlan or Limbo and rest there.
Eventually you'll reach the inner palace, where you'll meet a Rakshasa pretending to be Elminster (#8). After defeating him, you'll learn that Gothmenes is heading out to grab the real Elminster, and that you'll only have about two hours before he gets back (or less time if you revealed Elminster's location to one of the Rakshasas). The Tantalus Clock (#15) will count down the time remaining. You won't be able to return to the outer palace at this point -- if you try then you'll have to fight so many battles that it won't be worthwhile -- so you'll need to press forward without resting.
Your goal while Gothmenes is gone is to locate the special crystal that is supplying him with power. You'll find it in the nearby rock garden (#17). To grab the crystal, you'll need to use the character with the Crystal Ring, and the character will need to be wearing the ring. Otherwise, the character trying to retrieve the crystal will take about 20 points of damage. If needed, you can use the "look" command to have a character put on the Crystal Ring.
When you take hold of Bane's Crystal, Gothmenes will realize what's happened, and he'll start making his way back to the palace. You'll then have 13 turns to make your preparations (or perhaps less depending on the status of the clock). What we'd recommend is that you do whatever you want for most of that time, but then buff up your party with every buff spell you have available on the last turn. When Gothmenes returns, you'll have to fight three of the toughest battles in the game back-to-back-to-back, and so any bonus you can give your party is a good idea.
Note: If you run out of time before acquiring the crystal, then you'll get about five turns after Gothmenes returns to pick it up (coinciding with the turns he's busy with Elminster). Gothmenes will summon you to the pool (#17) when he arrives, so you should be able to grab the crystal on the first turn. If you take too many turns, then Gothmenes will grab the crystal himself, and he'll kill your party in one shot.
When Gothmenes returns to the palace, he'll have (the real) Elminster with him, and he'll demand that you trade the crystal for the wizard. Even if you think this is a good idea (which it isn't), Elminster won't let you do it. That's because Elminster will quickly escape from his bindings, and he'll start battling Gothmenes. This will leave you with the task of defeating Xohan and his assorted minions, which will take two battles.
Before the first battle, a horde of creatures will emerge from the rock pool (#17), but the character wearing the Crystal Ring will be able to reduce their numbers at the cost of most of his health. You should make this trade, even though the character might die (if not right away, then possibly when the Dracoliches start breathing). If you don't, then you'll have to fight 40 tough creatures instead of 29 (including six more Dracoliches), which will probably kill somebody anyway.
Note: Using the Crystal Ring will cause somewhere in the neighborhood of 130 damage to the wearer. We used our cleric for this. He had enough health to cover the damage, and then we just had him cast Heal on himself during the first round of the battle.
Another Note: If you happen to have the Ring of Electrical Immunity from Secret of the Silver Blades, then giving it to the character with the Crystal Ring will increase his odds of survival considerably.
In the first battle you'll have to fight five Dracoliches, four Bits o Moander (Medium), eleven Minions of Bane (Blue), and nine Pets of Kalistes. The Dracoliches and Pets are the most dangerous, so we'd recommend having your casters use Delayed Blast Fireballs on the Pets (and Minions) while your fighters target the Dracoliches. This battle can get ugly in a hurry, so be prepared to load your game and try again a few times.
Note: After completing the battle, don't immediately move on. Give your cleric a chance to heal the wounded.
In the second battle, you'll have to fight Xohan (an Elder Orb) plus four Beholders and two Death Tyrants. Spells won't affect the orbs, and you won't be able to disrupt their casting, so you'll just need to kill them one at a time. We'd advise starting with the Elder Orb and then moving to the Death Tyrants before mopping up the Beholders. That's because the tougher the orb is, the better chance it has of succeeding with its spells. Obviously, this is another battle that can go badly in a hurry. If some Death Rays or Flesh to Stone spells happen to succeed, then you might as load your game right away because you'll need all of your characters to survive the final battle against Gothmenes.
Note: At the end of the battle, once again don't leave the battlefield right away. You might not have much in the way of healing spells remaining, but you should cast a Haste spell to counteract the Slow spells the orbs probably cast on you. If you don't, then your party will be slowed for the final battle, which isn't a recipe for success.
After defeating Xohan, Gothmenes will toss Elminster into the rock pool and turn on you. However, after seeing all of the damage that you've caused, he'll try to offer you a deal. You should decline (if you say "panajuxid" like he wants then you'll die). This will make Gothmenes even more nervous, and he'll call out to Bane for help. At first it will look like Bane might ignore him, but then he'll drain away all of your memorized spells, and you'll be forced to fight Gothmenes without any casting ability.
For the final battle you'll have to fight Gothmenes plus two Bits o Moander (Large), two Green Dragons, and seven Minions of Bane (Blue). Gothmenes and the Dragons are the most dangerous opponents here, so try to take them down as quickly as possible and then mop up the Bits and Minions. Also remember that the blue Minions are lethal to melee fighters (because of their reflected lightning damage), so try to use ranged attacks against them as much as possible.
Note: The final trio of battles required for defeating Gothmenes is stupidly difficult. There are just way too many one-shot things that can go wrong, including stoning, poison, death, and disintegration -- none of which can be corrected while you're in battle -- that your odds of finishing the battles successfully is exceedingly low. After failing dozens of times to complete the battles, we finally got frustrated enough to switch the game difficulty to "novice," where we were finally able to succeed (but even that took a few tries). You can change the game difficulty in the "encamp" menu.
When you defeat Gothmenes, he'll crawl away to the rock pool and beg Bane for more help, but Bane won't be forgiving for such failure, and he'll incinerate Gothmenes. Then Bane's Crystal will turn to dust, and everything will return to how it was before Bane started his invasion. You'll automatically return to the original
Phlan (your equipment from Bane's Dimension will survive the trip), and everything will be exactly how it was the first day you arrived. You'll re-meet some of the NPCs from the game (like Priam and Shal), but nobody will remember any of your adventures.
At this point you're essentially done with the game, but if you'd like to do more then you can explore the peaceful version of the
Realms Dimension, including previously cratered cities like Melvaunt and Hillsfar, and you can try your hand at
Dave's Challenge. You'll find your old
Realms Dimension equipment with Rolf at the docks in the northeastern corner of
Phlan.
1 - Secret Doors
You'll have to look or search at these locations to discover the secret doors.
2 - Fake Sasha
At this spot, a Rakshasa pretending to be Sasha will ask you questions about Elminster. If you answer him, then you'll help Gothmenes, and the Rakshasas will ambush you. If you don't answer, then you'll have the initiative in the battle. But either way, you'll have to fight two Rakshasa Mahs and seven Rakshasa Rajahs.
If you went through
Myth Drannor earlier in the game, then you should already be familiar with Rakshasas. Otherwise, you should realize that they are immune to spells under level 8 (not including Fire Touch), and that you'll need +3 or +4 weapons to damage them fully. In other words, you're probably going to have a tough time against the Rakshasas, so you should definitely buff up before the battle. If you don't normally use the Haste spell because of the aging penalty, this is a good place to splurge a little.
After completing the battle you'll find 10 Arrows +4, a Hammer +5, two Javelins +4, a Two-Handed Sword +4, 12 platinum, 4 gems, and 3 pieces of jewelry.
3 - Minion Battle
At this spot you'll encounter a "legion" of minions: eight Minions of Bane (Black), five Minions of Bane (Blue), six Minions of Bane (Red), and five Pets of Kalistes. If your character with the Talisman of Bane brandishes it (use the "look" command to be given this option), then the minions will start out farther away, and they won't attack during the first round of the battle.
4 - Beholder Lair
In this room you'll encounter four Beholders (immune to magic), 11 Great Margoyles, and six Salamanders (immune to fire damage). Monster Summoning is a useful spell for this battle, because you'll probably gate in Minions of Bane (Black), which cast Ice Storm. The minions will also give the Beholders extra targets for their disintegrations and death rays.
5 - Prior Victims
At this spot you'll find 30 Arrows +3, 10 Arrows +4, a Helm +4, Pate Mail +4, a Ring of Protection +4, a Staff Sling +2, 20 platinum, 3 gems, and 2 pieces of jewelry.
6 - Dragons
At this spot you'll encounter five Black Dragons, two Blue Dragons, five Dracoliches (immune to fire and lightning spells), and four Red Dragons. If your character with the Horn of Doom blows it (use the "look" command to be given this option), then the dragons will start out farther away, and they won't attack during the first round of the battle.
7 - "Empty" Chamber
This chamber will look empty, but it's not. If you rest in it (which you should be able to do safely), then the next step you take in the room will start a battle, and you'll have to face eight Electric Spiders, three Pets of Kalistes, five Pyro Snakes, and six Salamanders. Then the next step you take after that will lead to a fight against ten Cryo Snakes, two Electric Spiders, four Pyro Snakes, and two Salamanders. After the second battle the chamber should be completely safe to rest in.
8 - Inner Palace / Fake Elminster
9 - Underlings
In these three places you can encounter some of Gothmenes' underlings. Nothing good will come of talking to them or attacking them. If they offer you a box, it will just release Banshees who will attack you.
10 - Library
Most of the books in the library will crumble to dust if you try to examine them. The only place where you'll find treasure is in the banner room to the north (#11).
11 - Banner Room
If you look through the banners here, then you'll find 20 Arrows +3, two Daggers +3, two Javelins +3, a Sling +3, and 5 gems.
12 - Exhibit Hall
Most of the places you search here won't provide anything of use, but in two random places you'll find some random equipment, mostly in the form of +1/+2/+3 ranged weapons and ammunition.
13 - Spectres
At one of these spots you'll encounter four Banshees, two Liches, a dozen Spectres, and a Vampire Mage. They'll demand that you leave, and if you don't then they'll attack. They're not guarding anything (unless the random loot in the hall happens to be behind them), so there isn't any reason to fight them.
14 - Gothmenes' Chamber
When you enter this chamber, the beholder Xohan (who you should have heard talking to Gothmenes earlier) will flee to the northwest.
15 - Tantalus Clock
The Tantalus Clock will count down the time until Gothmenes returns. If you successfully "stop" the clock (which is a rare occurrence), then you'll have to survive four large battles against Liches, Medusae, and Skeletons. Since the clock isn't really important, and since there isn't a whole lot to do in the inner palace anyway, it's better to just ignore the clock.
16 - Tapestries
You'll see some minions "clutching something" near this spot. To fight them, you'll need to "torch" the tapestries. This will trigger a battle against Fire Elementals, Minions of Bane (Red), and Pyro Snakes, but afterwards you'll find Leather Armor +4, a Potion of Healing, Scale Mail +4, a Sling +4, and 3 pieces of jewelry.
17 - Rock Garden / Dark Pool / Bane's Crystal
Exits
- Exit to
Dark Phlan.


