 Did we miss anything in this task? Is there something we didn't discover? Let us know!
Important Note
Did we miss anything in this task? Is there something we didn't discover? Let us know!
Important Note
Completing this task will put important events in motion. Some people will die and others will disappear. So make sure you've completed as many optional tasks as possible before proceeding. Also, make sure you have Kim with you. If you approach Ruby (#6) without him, then you'll die, and you'll have to load your game ("Cop Dies under the Boardwalk"). Finally, meeting Ruby can severely damage your Health, so make sure you have plenty of healing supplies.
Background
You'll trigger this task at the end of the task
Ask about Ruby in the Village.
Walkthrough
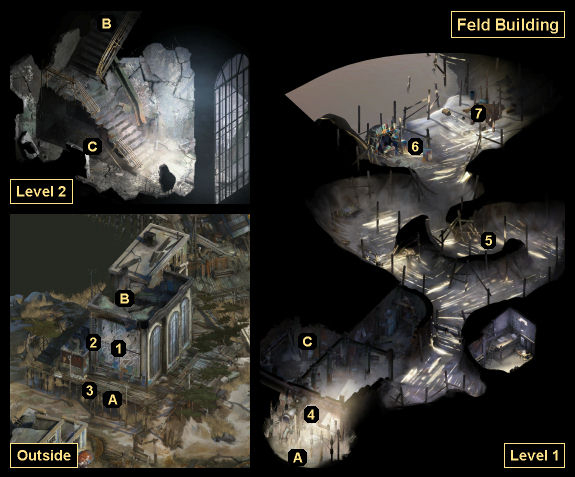
The first thing you'll need to do for this task is examine the mural (#1) on the
Feld Building. You'll get the same "impossible" Shivers check that you just saw at the end of the task
Ask about Ruby in the Village, complete with the same bonuses for finishing tasks in
Martinaise West. If you fail the check, then you'll trigger the task
Work with the Children of the Big Sea, which will give you an Encylopedia check that you can pass instead.
After passing the Shivers check (from this task) or the Encyclopedia check (from the task
Work with the Children of the Big Sea), you'll realize that Ruby must be inside the
Feld Building. Moreover, you'll notice a ladder next to the mural (#2). When you examine the ladder, you'll see that it's in bad shape, and so you'll decide that maybe you can teleport to the roof instead. This will give you a "challenging" Savoir Faire check. If you pass the check, then you'll end up on the roof, where you'll find a staircase leading down into the building (Exit B). If you fail the check, then you'll lose Morale.
If teleporting up ladders isn't your thing, then with a mere 2 Perception, you'll also detect a drainage pipe beneath your feet (#3). When you examine it, you'll be presented with a "heroic" Physical Instrument check. If you pass the check, then you'll make your way through some foliage (Exit A) and pry open a maintenance door (#4), which will grant you access to the building.
As you make your way through the building, you'll start feeling a buzzing sensation, culminating with a Pain Threshold thought orb (#5). When you click on the orb, Kim will tell you that he doesn't feel anything, but he'll speculate that you're about to "set in motion events we have no control over." With 4 Logic, you'll also learn that you're about to "destabilize" the strike between the Wild Pines Group and the Dockworkers' Union. This is all a friendly warning for the Important Note at the top of the page.
When you get close to Ruby (#6), she'll trap you with a "pale latitude compressor," which will overwhelm you with radio waves. You're guaranteed to lose at least one Health during this encounter, and you can lose up to five more beyond that, so be prepared. Or be polite, so Ruby doesn't crank up the intensity and deal extra damage.
While you're trapped, Ruby will allow you to question her about the murder. Interestingly, her version of events will be almost exactly the same as Klaasje's -- just with their roles reversed. Ruby will insist that Klaasje was the calm one who orchestrated the cover-up, and that she was just helping out. She'll also point out that the shot couldn't have come from the roof since no one heard it, which means neither she nor Klaasje could have committed the crime.
Note: Be sure to ask Ruby why she's been hiding in the
Feld Building. She'll claim that it's because of you, since you're with La Puta Madre. This bit of dialogue is required for you to unlock the task
Are You La Puta Madre's Peone? later in the game.
While talking to Ruby, you'll get a red "medium" Pain Threshold check. Attempting this check will end your conversation with Ruby, so you should exhaust all conversation options with her before attempting it. There are three possible outcomes:
- You ignore the check. Ruby will immediately flee the scene.
- You fail the check. You'll fall to the ground and take Health damage. Ruby will warn you that the tribunal is imminent, and that a new mercenary has joined the other two, giving you three to worry about. Then she'll flee the scene.
- You pass the check. Ruby will pull out her gun and aim it at her head. You'll then get a "challenging" Rhetoric check to keep her from committing suicide. If you ignore the check, fail the check, or tell Ruby that you have to "follow protocol," then she'll kill herself, and you'll find a
Nachtwey A80 Pepperbox Pistol on her corpse. If you pass the check and let Ruby go, then she'll flee the scene.
Note: If Ruby dies and you decide that you no longer want to be a cop, then the game will end ("Police Officer, Responsible for Suicide of Suspect, Renounces the RCM").
That is, no matter what you do, Ruby will disappear from the game. To learn more about her, you should head over to her camp (#7). You'll find
Ruby's Journal in the tent, plus
Drouamine (to recoup three of your lost Health charges) and money in the other containers. Reading the journal will complete the task and earn you 70 xp, plus trigger the task
Return to the Whirling-in-Rags. Just be aware that when you get close to the
Whirling-in-Rags, you'll get ambushed by the mercenaries, which will start their tribunal.
1 - Mural
2 - Ladder
3 - Drainage Pipe
4 - Maintenance Door
5 - Thought Orb
6 - Ruby
7 - Ruby's Camp
Exits
- Foliage.
- Stairs between the Roof and Level 2.
- Stairs between Levels 1 and 2.


