 Did we miss anything in this location? Is there something we didn't discover? Let us know!
Overview
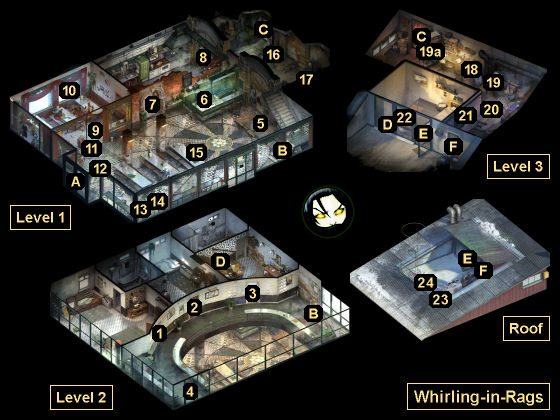
1 - Your Room
Did we miss anything in this location? Is there something we didn't discover? Let us know!
Overview
1 - Your Room
This is where you'll begin in the game. When you search your room, you'll find a collection of clothing: a
Disco-Ass Blazer,
Flare-Cut Trousers, a
Green Shoe (Left Foot), a
Horrific Necktie (after passing a "medium" Savoir Faire check with the ceiling fan), and a
White Satin Shirt. Turning on the light attached to the ceiling fan will cause you Health damage. Turning off the fan itself will make it easier to grab the tie. If you have a high enough Perception, then you'll spot an
Empty Cassette Case, which isn't used for anything. If you have the
Yellow Plastic Bag "Frittte!" (found outside in
Martinaise East), then you'll be able to pick up several empty bottles (aka
Glass Tare) in your room. These can be redeemed in the Frittte store for 10 cents each.
If you examine the broken window in your room, and if you pass an "easy" Visual Calculus check, then you'll realize that you broke the window by throwing one of your shoes through it. If you've already picked up your
Green Shoe (Left Foot), then this will trigger the task
Find Your Other Shoe.
When you examine the mirror in your bathroom, you'll finally see your face, which will update your portrait in the interface. You'll also get three skill checks. If you pass a "formidable" Encyclopedia check, then you'll gain the thought
Guillaume le Million. If you pass an "impossible" Electrochemistry check, then you'll stop making "the expression" (which will change your portrait). If you pass a "challenging" Interfacing check (made easier by picking up the
Chaincutters from Kim's car outside), then you'll fix the faucet (which will make the Electrochemistry check easier).
To leave your room, you'll need to pick up your
Flare-Cut Trousers, which will cause a Perception thought orb to appear over your head. When you click on the orb, you'll find the key to your room, which will allow you to open the door. The label on the key will inform you that you're in the Whirling-in-Rags. You'll stop limping when you open the door, so you might want to do that right away.
2 - Kim's Room
Kim's room will start out locked, and it will remain locked until you've completed the task
Return to the Whirling-in-Rags (aka the mercenary tribunal), which won't happen until near the end of the game. You won't find anything interesting inside. If you feel so inclined, then you can knock on Kim's door after he's gone to bed for the night, but this won't lead to anything.
3 - Klaasje's Room
The first time you pass by this room, you'll meet Klaasje Amandou out front. She'll reveal that you're a police officer, and that you've been in the Whirling-in-Rags hostel for three days. She'll also tell you a bit about the case you're investigating -- a hanged mercenary located behind the hostel. If you proposition Klaasje, then she'll decline your advances, even if you pass the "challenging" Suggestion check. In fact, if you pass the check, then Klaasje will just walk away, and you'll learn less from her than if you fail the check. At the end of the conversation, Klaasje might mention that you're going to have to interrogate her at some point, but that no, she didn't do it.
Note: Before walking away, Klaasje will discard her cigarette into a nearby ashtray. With enough Electrochemistry, you'll trigger the task
Find Smokes and Smoke Them.
You'll only be allowed to enter Klaasje's room after completing the task
Prove Your Authority to Titus Hardie. Inside, if you search the medicine cabinet in the bathroom, and if you pass a "medium" Electrochemistry check, then you'll find
PREPTIDE. If you pass a "medium" Interfacing check, then you'll take the drug without Kim noticing. If you fail the check, then you'll still get the drug, but Kim will notice and think less highly of you.
4 - Balcony
On the balcony outside, you'll find your
Green Shoe (Right Foot).
5 - Karaoke Stage
If you examine the speaker next to the stage, then you'll trigger the task
Sing Karaoke.
6 - Lawrence Garte
Garte is the cafeteria manager. He won't have much to say to you at first, but when you return to him after meeting with Kim (#12), he'll mention that Sylvie, the regular bartender, hasn't been at work for the past couple of days. He'll also speculate that she might be the one who called the police. This will trigger the task
Who Made the Call Reporting the Crime?
If you have enough Rhetoric, then you'll be able to press Garte about Sylvie, and he'll reveal that she might be staying away because he asked her out on a date, and not because of the murder. This will give you a chance to name yourself a feminist, which will unlock the thought
Inexplicable Feminist Agenda. If you have enough Reaction Speed, then you'll catch Garte saying "they" when referring to the killer, and he'll reveal that everybody seems to think that the Dockworkers' Union was responsible.
As you're finishing up with Garte, he'll inform you that you owe him 130 real for the time you've stayed in the hostel, the alcohol you've drunk, and the damage you've done to your room. This will trigger the task
Pay for Damages. You won't be able to sleep in your room until you've completed the task.
After talking to Garte, a thought orb will appear over your head. Clicking on it will start an internal dialogue about where your home might be located. If you take the "hobocop" dialogue option, then you'll unlock the thought
Hobocop. If you take the "trace" option, then you'll unlock the thought
Lonesome Long Way Home.
When you first see Garte, he'll be trying to repair a stuffed skua (bird). When you later talk to Sylvie (using the radio in Kim's car), you'll trigger one of two tasks:
Talk to Garte for Sylvie or
Talk to Garte, Lieutenant Love. Between Sylvie and the task, you'll learn that you're the one who broke the skua. Later (in
Martinaise West), you'll get a chance to replace it. See the task
Take Stuffed Bird to Garte for details.
Garte is involved in numerous other tasks as well, including
The Doomed Hostel,
Explore the Whirling's Secret Passages,
Find Money for Rent and Pay Garte,
Find Out Who Is in the Union Box,
Open Trash Container, and
Sing Karaoke.
Note: You can pick up some
Nosaphed from the counter next to Garte.
7 - Kitchen
The kitchen won't open until 13:00 on Day 1. After that, it'll open every morning at 7:30. Inside the kitchen, you'll meet a cook. He's involved in the task
The *Special* Borscht.
8 - Locked Blue Door
This door will start out locked. When you examine it, you'll trigger the task
Explore the Whirling's Secret Passages. To unlock the door, you'll need to find the key hanging behind the window in the private mess hall (#9).
9 - Private Mess Hall
Despite what the sign next to the mess hall says, it won't open until the morning of Day 2. At that point, you'll meet Titus Hardie and the Hardie Boys inside. They're involved in several tasks, including
Interrogate the Vigilantes,
Confront Hardie Boys about Drug Trade,
Doorgunner Megamix,
Get the Whole Story from Titus,
Prove Your Authority to Titus Hardie, and
Speak to the Assault Victim. Once the mess hall opens up, it'll remain open for the rest of the game.
10 - Window
When you examine the window here, you'll get a Perception check, but it'll include a -12 penalty because "it's not time yet." This penalty will go away after you've completed the task
Prove Your Authority to Titus Hardie. If you manage to pass the Perception check before completing that task, then you won't really pass it; the game will just tell you try again later. When you pass the Perception check for real, you'll spot a key hanging from the hawthorn bush just outside the window, and you'll end up receiving the Spare Key for Workshop. This key will unlock the blue door in the kitchen (#8).
11 - Lena
Lena won't talk to you until after you've met with Kim (#12). At that point, if you mention your amnesia, then she'll give you a quiz to test your memory. If you know that you're in the Whirling-in-Rags hostel (learned from finding your keys in your room, #1), or that the hostel is in Revachol (learned from Klaasje upstairs, #3, or from Elizabeth outside), or that the year is '51 (learned from the calendar next to Kim's room, #2, or from Klaasje, #3), then she'll give you the
Kind Green Ape Pen. Regardless of how you do in the quiz, you'll receive the task
Get a Reality Lowdown.
After learning from Garte (#6) that you owe him money, you can ask Lena for a donation. If you pass a Suggestion check, then she'll give you a
Commemorative Pin, which you can sell at the pawnshop. If you fail the Suggestion check, then all of your remaining dialogue options will lead to you losing a point of Morale. Acquiring the pin can lead to two possible tasks:
Pay Lena Back for Pin or
Return Lena's Pin.
On Day 2, Lena will move closer to the bar. When you talk to her there, she'll tell you that her husband Morell and his assistant Gary are missing, and she'll ask you to look for them. This will trigger the task
Find Morell, the Cryptozoologist. Lena will also mention that the Whirling's phones aren't working. When you ask Garte (#6) about this, he'll admit that someone "messed with the wiring," and he'll ask you to find out who did it. This won't lead to a task or a reward, but later you'll learn that Klaasje was responsible.
12 - Lt. Kim Kitsuragi
This is where you'll first meet Kim. He'll act as your partner for the case. He'll give you some background information about what you're investigating -- namely, the hanged man behind the Whirling-in-Rags -- and then he'll begin following you around. Your conversation with him will trigger three tasks:
Inspect Victim's Body,
Interview the Cafeteria Manager, and
Report Your Badge Missing.
After your initial conversation, if you talk to Kim again, then you can get even more background information out of him. This can trigger four more tasks:
Ask Kim to Tell You about the Case (if you ask him about the case),
Call Your Station's Lazareth (if you claim your amnesia is caused by "major brain damage"),
End-of-Day Debrief with Kim (if you tell him that you don't remember anything, including what the RCM is), and
The Pissing Competition (if you ask him why officers from two precincts are working together).
Note: When you first talk to Kim, he'll ask you for your name. If you fail the Conceptualization check, then you'll be able to introduce yourself as Raphael Ambrosius Costeau. If you subsequently keep referring to yourself as Detective Costeau (even after learning your real name), then you'll unlock the thought
Detective Costeau.
13 - Overturned Rum Bottle
If you examine the bottle here, then you'll trigger the task
Find Booze and Drink It.
14 - Sleeping Dockworker
You can steal
Magnesium from the dockworker here. With enough Interfacing, you'll also notice that he's carrying a
Dockworker Shift Card. By passing a second Interfacing check, you'll be able to steal the card plus 5 real. The card isn't used for anything, but you can give it to Call-Me-Manana (at the harbor entrance) later and earn 5 xp for your trouble.
If you pass the Physical Instrument check to wake up the dockworker, then he'll tell you about the strike between Wild Pines and the Dockworkers' Union.
15 - Horse-Faced Woman and Man with Sunglasses
Starting on Day 3, you'll meet two RCM officers here. The horse-faced woman (Judit Minot) will pity you, and the man with sunglasses (Jean Vicquemare, your partner) will insult you. They're in disguise trying to check on your mental health, but nothing useful will come from talking to them.
16 - White Deora Pinball Machine
If you ask Kim about this pinball machine, then you'll discover that he doesn’t really enjoy pinball, although he'll deny it. If you pass an Encyclopedia check, then you'll realize that he's Kim "Pinball" Kitsuragi (aka "The Kimball"). This will lead to Kim telling you about how he infiltrated a "pinball ring" to earn his stripes with the RCM. But still, he'll tell you that pinball is lame, and he won't allow you to call him Kimball or Pinball.
17 - Cornelius Gurdi Pinball Machine
You'll discover that this pinball machine is still working, but it'll cost you 1 real to play. If you pass a Reaction Speed check at the end, then you'll beat the previous high score, which will heal a point of your Morale. Kim will also be impressed. "That is a monumental achievement, detective."
18 - Dresser
Inside the dresser here, you'll find a
Pinball Maker's Coat.
19 - Gutted Pinball Machine / Shelf
If you examine the gutted pinball machine here (#19) after examining the nearby shelf (#19a), then a Logic orb will appear over your head. When you click on it, if you've spoken to the novelty dicemaker in the
Doomed Commercial Area about all of the businesses that went bankrupt there, then you'll realize that this used to be the location of the East Delta Pinball arcade, which means the Whirling-in-Rags is a part of the
Doomed Commercial Area, which means it is doomed as well. This will trigger the task
The Doomed Hostel?
20 - Footprints
You'll discover recent footprints here. You'll need to examine them for the task
Explore the Whirling's Secret Passages.
21 - Peephole
This peephole will allow you to look into Klaasje's bedroom.
22 - Clear Window
This window is involved in two tasks:
Determine Where the Shot Came From and
Inspect the Window in Klaasje's Bedroom. With 3 Perception, you'll notice that it was recently replaced.
23 - Dried Flowers
With 3 Perception, you'll notice some dried flowers here. With 2 Hand/Eye Coordination, examining the flowers will cause a thought orb to appear over your head. If you click on it, then you'll get a "medium" -- but red -- Hand/Eye Coordination check to grab the flowers before they blow away. If you succeed, then you'll receive
Dried May Bells. If you fail, then you won't get anything. You'll need the
Dried May Bells for the task
Ask the Petanque Player about May Bells.
24 - Klaasje Amandou
You won't be able to meet Klaasje up here until you've completed the task
Prove Your Authority to Titus Hardie. When you talk to Klaasje, she'll tell you lots of things about herself, the case, and the hanged man. She's involved in several tasks, including
Ask Klaasje about Sunday Night,
Doorgunner Megamix,
Get the Whole Story from Titus,
Question Klaasje about the Dead Man,
Question Klaasje about the Tape,
Speak to the Assault Victim, and
Who Made the Call Reporting the Crime?
If you ask Klaasje about her room and her drugs, then you'll be able discourage her from participating in "narcomania." This will unlock the thought
Opioid Receptor Antagonist. If you pass a "legendary" Volition check with Klaasje, then Volition will warn you that most of your skills -- including Drama, Logic and Suggestion -- have been compromised by her, and that it's possible she's been lying to you.
After completing the task
Get the Whole Story from Titus, you'll get a "legendary" Drama check with Klaasje. If you pass it, then you'll get a chance to confront her about some of the lies she's told you. You'll learn that her real name is Katarzine Alasije. You'll learn that she hid her passport in a buoy in
Martinaise West. This will trigger the task
Inspect Klaasje's Buoy. And you'll decide that she might have committed the murder. This will allow you to arrest her. See the task
Arrest Klaasje for the ramifications of this.
Exits
- Exit to
Martinaise East.
- Stairs between Levels 1 and 2.
- Freight elevator between Levels 1 and 3.
- Staircase between Levels 2 and 3.
- Exit to the roof.
- Barred door. If you're inside the Whirling-in-Rags, then you'll just need to unbar this door to open it. If you're outside on the roof, then you'll need to pass a "heroic" Physical Instrument check to break it open. If you fail the check, then you'll damage your Health.


