 Did we miss anything in this location? Is there something we didn't discover? Let us know!
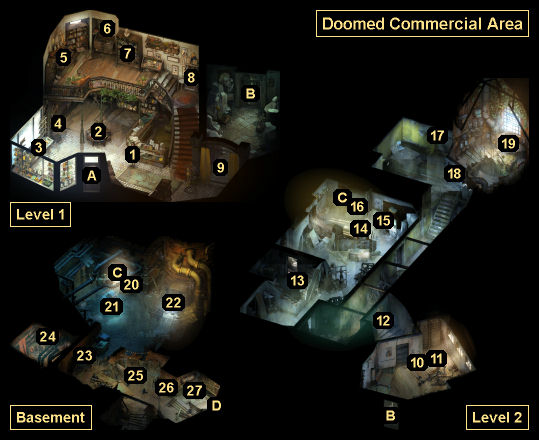
Overview
1 - Plaisance
Did we miss anything in this location? Is there something we didn't discover? Let us know!
Overview
1 - Plaisance
Plaisance is the owner of the bookstore (aka Crime, Romance, and Biographies of Famous People). She's the mother of Annette, whom you might have met just outside the main entrance (Exit A). If you talked to Annette earlier and noticed that she bites her nails, then you'll be able to convince Plaisance that she's overworking her daughter, and Plaisance will invite Annette inside out of the cold. Annette will appreciate this, and the next time you talk to her (#4) she'll give you
Dick Mullen's Hat.
If you talked to Annette earlier, then you might have learned that the Doomed Commercial Area is cursed. To get Plaisance to talk about the curse, you'll need to examine the nearby curtains (#9). The more you fiddle with them, the more agitated Plaisance will become, until eventually she invites you over for a quiet talk. If you pass a Drama check with Plaisance, then she'll give you the task
Investigate the Doomed Commercial Area, and she'll give you the key to the warded door (Exit C). If you don't get the task from Plaisance, then you'll have to pass a Pain Threshold check to break down the door. This will damage your health, whether you're successful or not. But after passing through the door, if you return to Plaisance, then she'll relent, and she'll give you the task.
Plaisance is also involved in the task
Inform Plaisance about the Source of Doom.
2 - Board Games
Inside these shelves, you'll find the board games
Suzerainty and
Wirral. If you buy the
Suzerainty game, and if you pass a challenging Suggestion check, then you'll be able to play it with Kim. You won't actually win anything if you're victorious, but if you want to beat Kim anyway, then you should fulfil contracts three times and then build the victory column at the end. Opening up the
Suzerainty game will also heal your Morale.
If you buy the
Wirral game, then you'll find the
Figurine Set "Revolutionary" and a
Standard Wirral Die inside. You'll need figurines for the task
Offer Figurines to Dolores Dei.
3 - Man from Hjelmdall Books
Inside this display case, you'll find the books
Hjelmdallermann: The Man from Hjelmdall (always) and
The Man from Hjelmdall and the Devil Woman (if you have enough Pain Threshold).
4 - Annette
This is where Annette will sit, once she's invited inside.
5 - Paranormal Books
Inside this display case, you'll find the book
Medicinal Purposes of the Pale (if you have enough Inland Empire). If you read about hangovers in the book, then you'll be allowed to combine three ingredients together to see if they form something useful. This can give you some amusing dialogue (especially if you have 4 Electrochemistry), but it won't lead to anything.
6 - Maps
On the bulletin board here, you'll find a
Map of Martinaise (which you can buy or steal, if you have enough Interfacing). If you acquire the map, then you'll put it in your journal, and it'll show you where missed white checks can be found. The map will also allow you to fast travel. To do this, you'll need to open up the map while you're standing at one of the fast travel points and then select the other point you'd like to travel to. Since there are only three fast travel points
(
Whirling-in-Rags, fishing village, and
Dolorian Church of Humanity), the system has only limited use.
7 - Biographies
Inside this bookcase, you'll find the book
The Greatest Innocence.
8 - Dick Mullen Mysteries
Inside this bookcase, you'll find the book
Dick Mullen and the Mistaken Identity (if you have enough Reaction Speed).
9 - Curtains
10 - Shot Put Ball
You'll find a
Shot Put Ball on the ground here. You might need it for the task
Replace Lost Boule.
11 - Barbell
You'll find a barbell on the floor here. It won't have collars for its weights, making it a safety hazard. If you pass a Physical Instrument check, then you'll feel so proud of yourself that you'll heal your Morale. If you fail the check, then you'll damage your Health. If you follow up your failure by swearing at the barbell, then you'll damage your Morale as well.
12 - Darkness
From this point on in Level 2, it'll be dark, and you'll need a
Flashlight to see anything. You can pick up a
Flashlight from Kim's car outside the
Whirling-in-Rags.
13 - Filament Memory
Inside the desk here, you'll find
"Production Schedule" Filament Memory. You'll learn more about it when you meet Soona in the
Dolorian Church of Humanity and work through her task
Help Soona with Her Project.
14 - Mainframe
The mainframe here, as well as the nearby chalkboard (#15) and fireplace (#16), belonged to the software company Fortress Accident, which tried to make a radiocomputer RPG before going bankrupt. If you put a filament memory into the mainframe and press "play," then you'll automatically contact Yvonne at the East-Insulindian Repeater Station, and she'll ask you for the password, which you probably won't know. You'll learn the password for the
"Production Schedule" Filament Memory (#13) in the
Dolorian Church of Humanity.
15 - Project Dread Board
If you examine the chalkboard here, then you'll learn more about welkins (see #14).
16 - Fireplace
On this fireplace, you'll see a blue-and-red diagram of computer frequencies (see #14).
17 - Postcard
Inside a can here, you'll find the postcard
La Delta '51.
18 - Safety Curtains
These curtains will start out closed. If you knock on them "even harder," then you'll damage your health. To get the curtains open, you'll need to yell into the furnace in the basement (see #22).
19 - Novelty Dicemaker
At this spot, you'll meet Neha the novelty dicemaker. She won't know anything about the hanged man, but she'll have all sorts of information about the businesses that have gone bankrupt in the Doomed Commercial Area. This will help you with the task
Investigate the Doomed Commercial Area. After learning about the businesses, if you pass a Shivers check with Neha, then you'll unlock the thought
The Precarious World.
You can also purchase dice from Neha. It will take her the rest of the day (not 8 hours) to complete your order, and you'll only be able to order one set of dice, so choose wisely. The dice are listed below:
- "I want a die for the Wirral setting, sweet and basic." You'll only get this dialogue option if you purchased -- and examined -- the
Board Game "Wirral" from the bookstore downstairs (#2). Neha will produce a
Standard Wirral Die for 7 real. You can also get this die from inside the board game. It isn't possible to carry two copies of the die, so if you have one, then you should sell it at the pawnshop before picking up the other. Or buy a different die.
- "Do you know the Wirral Untethered setting?" You'll only get this dialogue option if you learned about Forrest Accident's radiocomputer project (see #14). Neha will produce a
Standard Anti-Wirral Die for 7 real.
- "Do you have any cursed dice?" Neha will produce a
Cursed Iilmaraan Die for 7 real.
- "Tell me about your most extraordinary die!" Neha will produce
The Magnetic Dice Set for 10 real.
- "I'm sorry, I don't actually know what die I want." Neha will produce an
Amber Die with a Mosquito for 7 real.
- "Just a normal die for me, please." Neha doesn't make normal dice, so she'll ask you to choose again.
- "I'm looking for something to help with my work." If you ask for this, then Neha will toss you two dice for free. If you pass a Hand/Eye Coordination check, then you'll catch them, and you'll receive the icosahedral dice set
Sirens. Otherwise, you'll miss one of the dice and only receive an
Icosahedral Red Die. Since Neha won't have to craft these dice for you, you'll still be able to order a set from her (provided you ask for these dice first).
When you place your order, you'll trigger the task
Pick up Dice from the Dicemaker.
Neha is also involved in the task
Inform Dicemaker about the Source of Doom.
20 - Magnesium
You'll find
Magnesium (and money) in the overturned desk here.
21 - Ice Bear Fridge
Inside this refrigerator, you'll find a
Handwritten Note from the Fridge, which will reveal that the
"Off-Site Copy" Filament Memory was hidden in the ice cream maker (#25) because the "ginger kid" (aka Cuno) kept stealing stuff. You'll need the
"Off-Site Copy" Filament Memory for the task
Help Soona with Her Project. The fridge is also involved in the task
Fridge the Victim's Body.
22 - Central Furnace
If you pass a Physical Instrument check here, then you'll yell into the furnace, which will cause the novelty dicemaker upstairs (#19) to open the safety curtains (#18). If you fail the check, then nothing (bad) will happen. You can make the check easier by kicking the furnace (which will damage your Health) or by smearing soot on your hands and face (which requires Conceptualization).
Note: You won't be able to yell into the furnace until you've triggered the task
Investigate the Doomed Commercial Area (see #1).
23 - Hidden Doorway
If you shine your Flashlight here, then you'll detect a hidden doorway, which will allow you to enter the room beyond.
24 - Hole in the Wall
Inside this hole, you'll find an
Antique Belle-Magrave Rifle.
25 - Ice Cream Maker
This ice cream maker is involved in the task
Help Soona with Her Project. You'll only be able to open it during that task. Inside, you'll find the
"Off-Site Copy" Filament Memory. In a shelf next to the ice cream maker, you'll find
Nosaphed (and money).
26 - Breaker Box
You can use this to turn off the ice bear fridge (#21) or the ice cream maker (#25).
27 - Desk
Inside the desk here, you'll find an
Insane Mesh Tank Top.
Exits
- Main entrance.
- Warded door. This door will start out locked. If you convince Plaisance (#1) to let you investigate the curse, then she’ll give you the key. Otherwise, you'll have to pass a Pain Threshold check to break it open. Ramming the door, whether you pass the check or not, will damage your Health.
- Stairs.
- Basement entrance.


