 Did we miss anything in this task? Is there something we didn't discover? Let us know!
Background
Did we miss anything in this task? Is there something we didn't discover? Let us know!
Background
During the task
Help Ravers Start a Nightclub, you'll be given the option of evicting Soona from the
Dolorian Church of Humanity (#1) or helping her with her research project. If you choose the latter option, then you'll trigger this task.
Walkthrough
Soona will tell you that she needs the
"Off-Site Copy" Filament Memory from the Fortress Accident offices in the
Doomed Commercial Area (#3). This might require you to at least trigger the task
Investigate the Doomed Commercial Area so you can reach the closed part of the building. To help you out, Soona will give you a
Kvalsund KR+2 Multi-Tool, a super powerful prybar.
In the Fortress Accident offices, you'll find another computer and the
"Production Schedule" Filament Memory. If you're curious, you can put this filament memory into the computer and press "play," and when Yvonne asks you for the password, you can use "after life death," the same password you learned in the church. When you subsequently press "print," you'll learn how Soona was blamed for the data loss that sank Fortress Accident, and how she vowed to find the anomaly that caused it.
Note: At this point, you won't need the
"Production Schedule" Filament Memory for anything else, and you can sell it in the pawnshop for 50 real.
To find the
"Off-Site Copy" Filament Memory, you'll need to descend into the basement of the
Doomed Commercial Area. Inside the ice bear fridge, you'll discover a
Handwritten Note from the Fridge, which will indicate that the filament memory was moved to the ice cream maker to protect it from "the illiterate ginger kid" (aka Cuno).
Note: If you read the note previously, then you might need to read it again to update the task.
You'll find the ice cream maker to the south of the fridge, but when you check it, it'll be completely frozen over. To open it up, you'll need to equip the
Kvalsund KR+2 Multi-Tool and pass a "heroic" Physical Instrument check. You can make the check easier by wearing gloves and by cutting power to the ice cream maker (by unplugging the black cable from the nearby breaker box).
When you open the ice cream maker, you'll find the
"Off-Site Copy" Filament Memory. You can take this one to the computer in the Fortress Accident offices as well, but when you press "play" and contact Yvonne, you'll discover that the password you used before doesn't work with it. However, if you used Visual Calculus to reconstruct the stained glass window in the church, and if you have 4 Conceptualization, then you'll figure out that the Off-Site Copy's password is the next part of the motto from the window: "after death life again." However, when you use this as the password and press "print," you'll just get pages covered in black ink. If you pass a "medium" Perception check, then you'll notice a single white dot in the blackness.
When you give the
"Off-Site Copy" Filament Memory to Soona (#1), she'll print it out, and she'll spot the same white dot that you might have noticed earlier. This will allow her to pinpoint the location of the anomaly -- right in the silent part of the church. Soona will then ask you to help her out again, this time by moving a pair of the bowls (aka hydrotransducers) around the anomaly. You won't need to remember her instructions -- you won't know which bowls are the "third" and "fourth" anyway -- you'll just need to head over to the bowls and interact with them. Your only two options will be the moves that Soona wants.
When you return to Soona, she'll unmute the anomaly, but nothing will happen. Soona will then give you her headphones and let you listen for yourself. To get anything to happen, you'll need to pass a "legendary" Perception check. You can make this check easier by triggering and working through the first half of the task
Make van Eyck's Jam Harder Core, or by researching the thought
Col Do Ma Ma Daqua.
When you pass the Perception check, you won't detect anything, either, but you'll ponder whether the sound might be too low for you to hear, which means you'd need a better sound system to pick it up. When you relay this to Soona, you'll end up making a deal with her, where she'll let the ravers use the church, provided they let her use their audio equipment.
When you tell the raver Andre (#2) about the deal, he'll be thrilled, and he and the other ravers (including Acele) will immediately pack up their gear and move into the church. When you return to Soona, she'll tell you that she needs help from the raver Egg Head, but that he only speaks nonsense. If you've not yet completed the task
Solve the Egg Head Puzzle, then you'll need to do that, which will allow you to ask him to plug Soona's cable into the auxiliary port of his sound system. After some confusion about cable sizes, Egg Head will complete the request.
When you return to Soona, she'll ask Egg Head to turn down the volume, but he won't be able to because the volume of his sound system is fixed on maximum. So Soona will go with the flow and unmute the speakers -- and the church will start to shake itself to pieces. Luckily, Egg Head will pull the plug and stop the experiment before anything bad happens. But Soona will get a recording of the anomaly, which will make her happy. This will complete the task and earn you 70 xp.
Afterwards, you'll try to come up with a theory about what you just experienced. This will require you to pass a "godly" Logic check with Soona. You'll have a much easier time with the check if you complete the task
Talk to Joyce about the Pale without Kim. You'll also get bonuses for being a Cop of the Apocalypse, for completing the task
Investigate the Doomed Commercial Area, and for unlocking the thought
Motorway South.
When you pass the Logic check, you'll surmise that the anomaly in the church is due to an influx of the Pale, which is currently devouring all sound and data -- and also causing businesses to fail in the
Doomed Commercial Area. This will trigger the tasks
Inform Dicemaker about the Source of Doom and
Inform Plaisance about the Source of Doom, plus unlock the thought
Cleaning Out the Rooms.
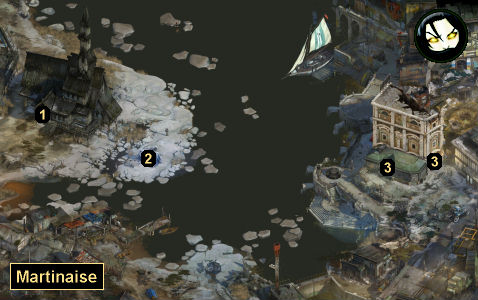
1 - Dolorian Church of Humanity
2 - Blue Tent
3 - Doomed Commercial Area


