 Did we miss anything in this task? Is there something we didn't discover? Let us know!
Background
Did we miss anything in this task? Is there something we didn't discover? Let us know!
Background
You'll trigger this task at the end of the task
Look for Ruby on the Coast.
Walkthrough
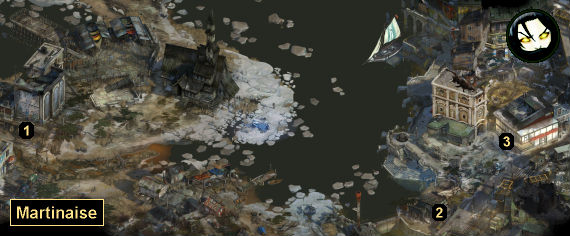
When you walk to the
Whirling-in-Rags (#3) from the
Feld Building (#1) -- fast traveling won't be possible -- you'll get an Inland Empire thought orb when you reach the pawnshop (#2). If you click on the orb, then Inland Empire will warn you about the upcoming tribunal, and it'll recommend that you equip a weapon, such as your
Villiers 9mm Pepperbox Pistol (gained during the task
Confront the Pigs and Get Your Gun Back), Ruby's
Nachtwey A80 Pepperbox Pistol (gained during the task
Look for Ruby on the Coast), or the
Spirit Bomb (gained during the task
Spirit Is Eternal). However, this isn't actually necessary. As long as you have a weapon in your inventory, you'll be able to use it.
When you walk past the pawnshop, the tribunal will start up. There will be two groups of combatants: the three mercenaries led by "Korty" Kortenaer (aka the scab leader) on one side, and the seven Hardie Boys plus Elizabeth on the other side. No matter what you might want to do, your only option will be to step in between the two groups and try to settle things down. The mercenaries won't really care about you; they'll just want to kill people. So no matter what you say or do, violence will break out, but you'll at least be able to control what happens -- or not -- depending on your skills.
At the start of the tribunal, you should talk to the mercenaries. This won't resolve anything, but several of the dialogue options will give you bonuses for later skill checks, and so they're worth pursuing. Just be aware that some of the things you say can also get people killed or save their lives, which might be good or bad depending on how much you like the Dockworkers' Union. See the summary tables at the end of the walkthrough for details about this.
Eventually, the tribunal will become violent. If you have a weapon with you, then you'll get a Hand/Eye Coordination check to attack Kortenaer. If you have the
Spirit Bomb, then it will take priority, and the check will be "challenging." Otherwise, you'll use a gun, and the check will be "legendary" (that is, tougher). If you don't have a weapon, then you'll only be able to "just stand there," which means you won't attack Kortenaer at all, and the battle will start with Ruud (see below).
If you pass the H/EC check, then you'll hit Kortenaer. This attack will eventually kill him, but not right away. If you fail the H/EC check, then you won't deal any damage to Kortenaer. If this failure is with a gun, and if you have a second bullet, then Kortenaer will let you shoot again, but you'll face the same difficulty as before, only now with a -2 penalty attached. You'll also get an option to throw your gun at Kortenaer. You'll always hit him with it, but it won't do any damage. It won't make any difference if you lose your weapon or use all of your bullets here.
Next up, the mercenary Ruud will take aim at you, and you'll be given a "challenging" Reaction Speed check. If you pass the check, then you'll dodge the shot. If you fail the check, then Ruud will hit you in the shoulder, dealing 2 damage to your Health, unless you're wearing the
Fairweather T-500 Cuirass, and then you won't take any damage. Either way, Kim will retaliate by shooting Ruud in the face, wounding him but not necessarily killing him. At the same time, de Paule will shoot at Kim but miss him and kill Glen.
Finally, Kortenaer will take aim at you, even if you hit him earlier. You'll be given an "impossible" Reaction Speed check. You'll fail this check no matter what, and Kortenaer will hit you in the leg. You'll fall down, barely staying conscious. If you missed Kortenaer earlier, then he'll shoot and kill Titus, and Ruud will survive his wound. If you hit Kartenaer earlier, then the Hardie Boys will swarm over him and Ruud, and both mercenaries will die.
Meanwhile, Kim will bend down to check on you. Seeing an easy target, Kortenaer (if he's still alive) or de Paule (otherwise) will take aim at him. If you pass a "medium" Authority check, then you'll warn Kim, who will shoot the assailant. If you have a gun equipped, and if you still have a bullet, then you'll toss your gun to Kim, and he'll use it for the shot. Otherwise, he'll use his own gun. If Kortenaer is the shooter, then he'll get wounded but survive, and de Paule will get killed later. If de Paule is the shooter, then she'll get killed by Kim's shot. Meanwhile, if you fail the Authority check, then Kim will get shot, which will send him to the hospital for the rest of the game, and the shooter will survive. Either way, you'll finally pass out.
Two days later, you'll wake up in your room in the
Whirling-in-Rags (#3). It'll be clean and free now, thanks to Garte. If Kim is still healthy, then he'll be there with you. Otherwise, Cuno will be there, and he'll become available as your new partner. The person with you will answer your questions about the tribunal, and you'll learn who lived and died. This will complete the task and earn you 70 xp, and also trigger the task
Inspect the Window in Klaasje's Bedroom.
Note: Lots of things will change as a result of this task. You'll finally be allowed to enter Kim's room at the
Whirling-in-Rags (using the door in your bathroom). The harbor will be closed, so you'll no longer be able to talk to Evrart Claire. Joyce Messier will sail away. Lena and Morell will return home. Klaasje will flee. This will narrow down what you can do as you approach the end of the game.
If you're curious about how people live or die during the tribunal, this information is summarized in the tables below.
| Dockworkers' Union |
| Alain |
He'll always survive. |
| Angus |
He'll always get killed after you pass out. |
| Elizabeth |
When you tell Kortenaer that the Hardie Boys didn't kill the hanged man, he won't believe you, and he'll point his gun at Elizabeth. If you pass a "medium" Logic check, then Kortenaer will miss. Otherwise, he'll hit her and kill her. |
| Eugene |
He'll always survive. |
| Glen |
He'll always get shot and killed by de Paule. |
| Shanky |
If you bring up Joyce Messier, the Wild Pines rep, then Shanky will run away and survive. Otherwise, he'll get killed after you pass out. |
| Theo |
He'll always get killed after you pass out. |
| Titus |
If you miss Kortenaer with your weapon, or if you don't use a weapon, then Kortenaer will shoot and kill Titus. Otherwise, Titus will survive. |
| Mercenaries |
| De Paule |
After you get shot by Kortenaer, Kortenaer or de Paule will take aim at Kim. If you pass a "medium" Authority check, then you'll warn Kim about the attack, and he'll shoot first. Regardless of the assailant, de Paule will get killed. If you fail the Authority check, then de Paule will get away. |
| Kortenaer |
At the start of the battle, you'll get a Hand/Eye Coordination check to hit Kortenaer with a weapon. If you pass the check, then Kortenaer will eventually die. Otherwise, he'll survive and get away. |
| Ruud |
After you attack Kortenaer (or not) at the start of the battle, Ruud will take aim at you. No matter if his shot hits you or not, Kim will shoot him in the face. If Kortenaer survives, then Ruud will also survive. Otherwise, Ruud will die. |
| Police |
| You |
You'll always get shot once or twice, but you'll survive. |
| Kim |
After you get shot by Kortenaer, either Kortenaer or de Paule will take aim at Kim. If you pass a "medium" Authority check, then Kim will shoot his assailant first and survive unscathed. Otherwise, he'll get shot and end up in the hospital for the rest of the game. |
1 - Feld Building
2 - Pawnshop
3 - Whirling-in-Rags


