 Did we miss anything in this location? Is there something we didn't discover? Let us know!
Overview
Did we miss anything in this location? Is there something we didn't discover? Let us know!
Overview
Note: If you complete the task
Help Ravers Start a Nightclub, then the ravers (Acele, Andre, Egg Head, and Noid) will move into this church. However, we're not showing them here. See their entries in
Martinaise West for more information about them.
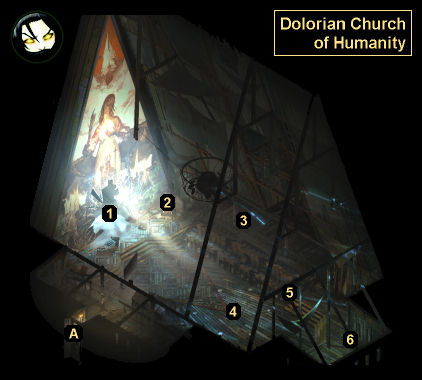
1 - Stained Glass Window
This window contains an image of Her Innocence Dolores Dei. When you examine it, you'll get two skill checks:
- If you pass the "medium" Encyclopedia check, then you'll learn (lots) more about Dolores Dei. This can lead to you triggering the task
Offer Figurines to Dolores Dei.
- If you pass a "challenging" Visual Calculus check, then you'll make out the motto inscribed in the glass: "After life, death. After death, life again. After the world, the pale. After the pale, the world again." However, you won't be able to determine what broke the window -- except, amazingly enough, that you didn't do it. Learning the motto will help you with an optional part of the task
Help Soona with Her Project.
2 - Mainframe / Soona Luukanen-Kilde
You'll find a radiocomputer here. When you press "play," you'll contact Yvonne at the East-Insulindian Repeater Station, and she'll ask you for the password, which you probably won't know. You'll learn the password from Tiago (#5).
When you tell Yvonne the password, you'll be allowed to press "print," which will display Soona's journal. You'll then see some information about what happened to Fortress Accident, the bankrupt software developer from the
Doomed Commercial Area, and you'll learn about a "data loss" and "the swallow," the silent part of the church (#4). When you get to the final journal entry, Soona will enter the church and shoo you away from her computer.
When you talk to Soona, she'll tell you what she's doing in the church, but mostly she'll try to get you to be quiet so she can work. You'll then have to help her out before she'll say more. See the tasks
Help Ravers Start Nightclub and
Help Soona with Her Project for more information.
After completing Soona's task, you'll get a "godly" Logic check with her. Passing the check will trigger the tasks
Inform Dicemaker about the Source of Doom and
Inform Plaisance about the Source of Doom, plus unlock the thought
Cleaning Out the Rooms. Soona is also involved in the task
Take on *La Responsibilite*.
3 - Shoes
You'll find
Mesque Banger's Red Brogues on the table here.
4 - Silence
When you step here, a Perception thought orb will appear over your head. When you click on it, you'll realize that this part of the church is almost completely silent, no matter how much noise you try to make. When you attempt the red Perception check here, Tiago (aka the Crab-Man) will reveal himself (#5). If you pass the check, then you'll see him descending from the ceiling. If you fail the check, then he'll just suddenly appear.
5 - Tiago / Crab-Man
Tiago (aka the Crab-Man) will appear here after you've experienced the silence below (#4). He'll tell you that he's a saeraff (seraph) for the Mother of Silence, and he'll try to get you to stop drinking. Kim will concur. After you've examined the nearby radiocomputer (#2), Tiago will tell you the password for it: "after life death." That's the only required bit of dialogue from him, so once he's said that, he'll disappear back up into the rafters, and you won't see him again.
6 - Scarf
You'll find a
Mesque Banger's Silk Scarf hanging on the beam here.
Exits
- Exit to
Martinaise West.


