 Did we miss anything in this location? Is there something we didn't discover? Let us know!
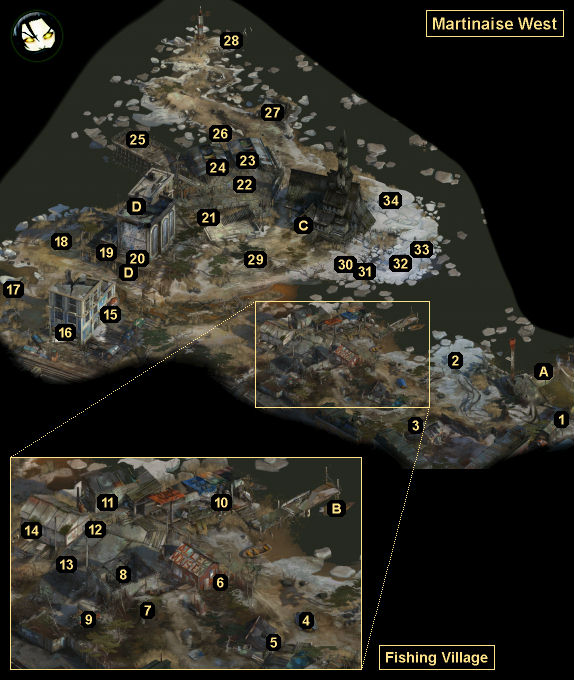
Overview
1 - Containers
Did we miss anything in this location? Is there something we didn't discover? Let us know!
Overview
1 - Containers
You'll discover two containers here. The first requires Perception to detect, and inside you'll find
Magnesium. The second requires
Chaincutters or a
Prybar to open, and inside you'll find
Jamrock Biker-Cop Sunnies.
2 - Sunken Motor Carriage
No matter what time it is when you examine the wrecked car here, you'll have to wait for low tide before you can do anything with it. This will take two hours, and there isn't any way to avoid it. But while you're waiting, you'll get to talk to Kim. If you pass a Drama check, then you'll whistle a tune, which will heal your Morale. If you fail, then Kim will whistle something instead, which will have the same effect.
Eventually, the tide will recede, and you'll realize that the car is yours. This will cost you a point of Morale, plus complete the task
Find the Traffic Hooligan. You won't be able to salvage your car, but inside it you'll find
RCM Badge "LTN-2JFR Du Bois" -- that is, your badge, which you'll need for the task
Track Down Your Badge -- plus an
RCM Commander's Jacket.
On the ground right next to the wreck, you'll find a
Banged-Up Fuel Canister. You'll need it for the task
Add Even More Beauty to the Wall.
3 - Tarpaulin
Under the tarpaulin here, you'll find the tape
Smallest Church in Saint-Saens, which you'll need for the task
Sing Karaoke.
4 - Boat
You'll find a boat under a tarpaulin here. With enough Visual Calculus, you'll decide that you could sleep in it, but this isn't actually possible. For a free place to stay, see Isobel (#12) and her shack (#11).
5 - Shack
Inside this shack, you'll find a
Bow Knot and the postcard
Coal City '08.
6 - Sack
Inside this sack, you'll find
Interisolary Trousers.
7 - Bench
You'll find a bench here. It's exactly like the bench in
Martinaise East. If Kim isn't with you, then you'll be able to sit on the bench and pass some time (up to an hour).
8 - Unfinished House
You'll discover a crate inside this house. You'll need
Chaincutters or a
Prybar to open it. Inside, you'll find
Magnesium and money. Behind the house, if you've completed the task
Find Speed and Sniff it, then you'll find
PREPTIDE! in a barrel.
9 - Drunks (aka the Union of Moribund Alcoholics)
At this camp, you'll meet a trio of drunks:
- Don't Call Abigail. He'll just tell you not to call Abigail, no matter what you say to him.
- Idiot Doom Spiral (aka George). After you've examined your wrecked car (#2), he'll tell you in great detail how you crashed it, then christened yourself Tequila Sunset, and then partied with him and his friends for the rest of the night. If you give Idiot Doom Spiral alcohol, then he'll tell you up to three more stories: the Tale of How He Got His Name, the Tale of the Headless FALN Rider, and the Tale of the Cocaine Skull. After hearing the first story, if you ask Idiot Doom Spiral why he keeps losing things, then he'll mention he also lost his jacket. If you offer to look for it, then you'll trigger the task
Find Idiot Doom Spiral's Jacket.
Idiot Doom Spiral is also involved in the tasks
Get Two Signatures for Evrart and
Become a Man of Plenty.
- Rosemary. He'll sell you
Alcohol "Potent Pilsner" and
Smokes "Astra" for prices cheaper than the Frittte shop in
Martinaise East. He'll also have a
Speed Bottle and a
Blue Medicinal Spirit available, although he'll try to charge you 300 real for the latter. If you ask Rosemary why the
Blue Medicinal Spirit is so expensive, and if you let him ramble on about it for a while, then eventually he'll offer it to you for only 3 real. You'll need the spirit for the task
Spirit Is Eternal.
Note: Your
Horrific Necktie will love the drunks here, and it'll interject itself into your conversations with them in several places.
10 - Lilienne Carter
You'll meet Lilienne here. She'll be taking a break from tarring her skiff (which will eventually turn into Exit B). If you pass a Suggestion check with her, then you'll trigger the task
Meet Lilienne at Land's End. You'll have an easier time with the check if Kim isn't with you, if you explore Land's End (the northern part of the map) first, and if you're wearing a
Bow Knot, an
Interisolary Dress Shirt, and
Interisolary Trousers (which will give you Dresscode: Man of Charms).
Lilienne is also involved in the tasks
Get Two Signatures for Evrart and
Go to the Island.
In the bucket right behind Lilienne, you'll find
Franconigerian Cavalry Boots.
11 - Isobel's Shack
This shack will start out locked. You'll only be able to enter it (and sleep in it) if Isobel (#12) gives you the key. Inside, you'll find a mirror (exactly like the one in the
Whirling-in-Rags), a washbasin, and a
Korojev Jacket. Interacting with the washbasin will allow you to shave, provided you can beat a Hand/Eye Coordination check. Nothing in the game will really change if you shave yourself, other than your character model and your portrait. However, if you ask Kim about your new look, then he'll tell you that he liked the mutton chops better.
When you walk around in the shack, you might get a Perception thought orb letting you know that the floorboards are creaky. Then when you examine items in the shack, you might get a Shivers thought orb telling you to "look under the floorboards." This is all misleading. You'll only be able to search under the floorboards during the task
Ask about Ruby in the Village, at which point you'll find a
9mm Bullet.
12 - Washerwoman (aka Isobel Sadie)
Isobel will tell you about the area, and if you ask her if there's any place to stay, then she'll give you the Key to Shack on the Coast (#11), and she'll allow you to use it for free. This will give you a place to sleep at night other than the
Whirling-in-Rags. Isobel is also involved in the tasks
Ask about Ruby in the Village,
Find Idiot Doom Spiral's Jacket, and
Get Two Signatures for Evrart.
13 - Twins
You'll meet Lilienne's (#10) twin boys here. They're involved in the tasks
Ask Lilienne's Twins about the Island and
Work with the Children of the Big Sea.
14 - Lilienne's House
Inside this house, you'll meet Lilienne's (#10) daughter, Little Lily. If you ask her permission to take the
Ruffed Grouse Taxidermy hanging from the ceiling, then she'll grant it, which will trigger the task
Take Stuffed Bird to Garte. You can also just steal the grouse and give it to Garte. If you ask Lily about the toy she's holding, and if you notice that it looks soft, then she'll let you touch it, which will heal a point of your Morale. Lily is also involved in the task
Find the Armoured Gloves.
Just outside the house, if you have 7 Perception, then you'll find the book
A Primer for Small Kids.
15 - Box
Inside this box, you'll find a
FALN "Pipo" Pipo.
16 - Bullet-Ridden Wall
If you pass a Visual Calculus check with this wall, then you'll recognize that executions were performed here.
17 - Boathouse
Inside this boathouse, you'll find
Magnesium and
Oversized Superstar Sunglasses.
18 - Morell and Gary
At this spot, you'll meet Morell the Cryptozoologist and Gary the Cryptofascist:
19 - Grates
In the two grates here, you'll find
Nosaphed and some money. To open the grates, you'll need
Chaincutters or a
Prybar.
20 - Trant Heidelstam / Mural
You'll meet Trant Heidelstam and his son Mikael here. They'll be admiring the
Feld Building and the mural on its southern wall. Trant will tell you about Feld Electrical and the tape computer it was developing. Mikael won't say much of anything. Your conversation with Trant will eventually lead to the Wompty-Dompty Dom Centre. With Encyclopedia 2, you'll be able to ask him for details about it, which will unlock the thought
Wompty-Dompty Dom Centre.
21 - Payphone
You'll be able to make random phone calls here for ten cents each. After four calls, you'll have to pass a "medium" Interfacing check to continue. From that point on, you'll only dial the (extremely long) number for your ex, Dora. Dora might tell you a few things about herself, but you'll also detect that she's with another man, and many of your dialogue options will lead to you losing Morale. If you keep calling Dora, then eventually she'll stop answering. Afterwards, if you punch the payphone, then you'll lose Health, unless you have 4 Electrochemistry, and then you'll gain Health.
22 - Jacket
You'll find a
Filthy Jacket hanging on the fence here. You'll need it for the task
Find Idiot Doom Spiral's Jacket. If you interact with the jacket, then you'll lose a point of Morale.
23 - Box
Inside this box, you'll find
Mega-Bino's Prescription Lenses.
24 - Box
You'll need
Chaincutters or a
Prybar to open this box. Inside, you'll find the postcard
Couron '33.
25 - Working Class Corpse
You'll find a dead man here. When you examine him, you'll find a
Folded Library Card in his pocket, and you'll determine that he died when he fell through some weak boards in the boardwalk and hit his head on the nearby metal bench. You won't learn anything useful from the trash can next to him. If you've triggered the task
Find Working Class Husband, then you'll recognize the corpse from his wife's description, which will complete the task. If you haven't yet triggered the task, then finding the corpse here will prevent you from doing so.
After examining the corpse, you'll have to decide if you want to identify it on your own, or if you want officers from Kim's precinct to deal with it. This will trigger one of two tasks:
Dead Body on the Boardwalk (for the former) or
Report the Dead Body to the Station (for the latter). If Kim isn't with you, then you'll have to complete the task
Return to the Dead Body with Kim first.
26 - Box
Inside this box, you'll find a
White Polo Shirt and some money.
27 - Depot
You won't be able to open the door to this depot, even if you pass the "impossible" Interfacing check attached to it. With 4 Conceptualization, attempting (and failing) to open the door will unlock the thought
One More Door.
28 - Box
Inside this box, you'll find a
Scented Scarf.
29 - Shivers Thought Orb
If it's snowing when you enter this part of the map (which seems to encompass just about everything between the
Feld Building, Exit D, and the
Dolorian Church of Humanity, Exit C), and if you have at least 5 Shivers, then you should get a Shivers thought orb above your head. If you click on it, then you'll receive information about the regions surrounding Martinaise. If you ask what’s below you, then you'll learn that someone hid a
Polar Anorak inside the
Feld Building. Receiving this hint is the only way you'll be able to find the garment when you visit the
Feld Building later in the game.
30 - Posts
With at least 5 Perception, you'll be able to examine a post here. You'll discover that it has holes in it filled with change. This will allow you to loot all of the posts nearby, which will net you
Alcohol "Potent Pilsner" plus
Magnesium and nearly 5 real.
31 - Pile of Eternite
If you push the eternite over, then you'll create a bridge giving you easier access to the tent (#32).
32 - Tent / Ravers
You'll meet three "music venue organizers" inside this tent:
- Andre. He's the leader of the group. He'll tell you about the
Dolorian Church of Humanity (Exit C), and he'll ask you to clear it out so he and his fellow ravers can start a nightclub there. This will trigger the task
Help Ravers Start a Nightclub.
After examining all of the potential drug ingredients in the tent, you should ask Andre about them. When you get to the Nosaphed Ultra, you can ask him for some, and he'll give you
Nosaphed. Afterwards, if you pass a "godly" Logic check, then you'll be able to confront Andre about the ingredients, and you'll learn that he wants to use the church as a drug lab as well as a nightclub. This will give you several options: you can blackmail the ravers, you can arrest them, you can evict them, you can force them to run their nightclub without the drug lab, or you can let them proceed as they intended (as a "partner" or not). If you evict or arrest the ravers, then they'll disappear from the game, and you'll miss out on several tasks. All of the other options will allow the ravers to continue with their nightclub, and you won't miss out on anything.
Note: If you become a partner (after asking for two bribes first), then you won't actually get any extra money out the ravers. The game will end before they start making a profit, so it won't make any difference what percentage you ask for.
- Egg Head. He'll spout some variation of "hard core" every time you talk to him. To get him to use actual sentences, not to mention respond to what you're saying, you'll need to complete the task
Solve the Egg Head Puzzle. Afterwards, you'll be able to help him improve the music that he's playing. This covered in the task
Make van Eyck's Jam Harder Core. Working through that task will unlock the thought
Arno van Eyck. Finally, if you ask Egg Head if he's a thought reader, then you'll be able to convert him to one of your political beliefs. This can heal your Morale.
Egg Head is also involved in the task
Help Soona with Her Project.
- Noid. His main task is
Sync Sines with Noid. After completing that task, you'll be able to discuss a lot of topics with Noid, including Dolores Dei, architecture, his name (which is short for Paranoid), and his clothes. If you ask him what he's most suspicious of, then he'll point out the "left-right complex." This will lead to him mentioning "true lives" and "hard core life." When you ask him to elaborate on those topics, you'll get a "godly" Conceptualization check. Passing the check will unlock the thought
Hardcore Aesthetic.
Noid is also involved in the task
Take on *La Responsibilite*.
Note: You should talk to Acele (#33) before talking to the ravers here. Otherwise, you'll miss out on the task
What Is Anodic Music?
Another Note: After completing the task
Help Ravers Start a Nightclub, the ravers will move into the
Dolorian Church of Humanity (Exit C).
33 - Acele Berger
You'll meet Acele here. She'll tell you that she's using a contact mic to record sounds in the ice. If you have 4 Encyclopedia, then you'll be able to tell her about the boxer Contact Mike, and encourage her to be more like him. This will unlock the thought
The Litany of Contact Mike. Talking to Acele can also trigger the task
What Is Anodic Music?
You'll also notice that Acele is out in the cold without a hat. If you try to get her to wear one, and if she swears at you, then you'll get a red "heroic" Authority check to yell at her about her language. If you pass the check, then she'll apologize. If you fail the check, then you'll go on a major rant and start crying, which will cause Acele to apologize and also trigger a conversation between you and Kim about your feelings. At some point, you might also give Acele the hat that you're wearing. If you do this, then you'll lose the hat for good (so wear some hat you don't like when you approach her). Giving away your hat won't gain you anything.
After talking to Acele's friends in the nearby tent (#32), you'll be able to ask her about them, which will trigger the task
Get Acele to Talk about Her Associates. Afterwards, you'll be able to ask Acele about herself. She'll call herself a "silver bird," but she'll stop there. To learn more about her, you'll need to pass a "legendary" Reaction Speed check. When you succeed, Acele will reveal that her father was in organized crime, and that when he died, she and her mother had to go into hiding. She'll also mention that she told the Dockworkers' Union about the ravers' plan to build a drug lab, and that they gave their consent. This will trigger the task
Ask Evrart about Acele and the Drug Lab.
If you complete the task
Help Ravers Start a Nightclub, then Acele and the ravers will move into the
Dolorian Church of Humanity (Exit C).
34 - Seagull
With a high enough Endurance, a thought orb will appear over your head when you reach this part of the map. If you click on it, then Endurance will compare you to a nearby seagull. If you agree that you are like a seagull, then you'll heal a point of Health and Morale.
Exits
- Water Lock / Canal Bridge. This bridge will connect you to
Martinaise East.
- Lilienne's skiff. This is how you'll eventually reach the
Island to the north. However, you won't be able to use the skiff until you've triggered the task
Go to the Island, which won't happen until late in the game.
- Entrance to the
Dolorian Church of Humanity. When you examine the door, you'll notice a sticker on the padlock. If you pass an "easy" Interfacing check, and if you put the sticker on or in your ledger, then you'll complete the task
Style Your Paperwork.
You'll also get a Physical Instrument check to force open the padlock. Equipping a
Prybar will make this check easier, but beware! If you pass the check, then you'll break the
Prybar (even if you didn't have it equipped), and it'll disappear from your inventory. Failing the check won't harm anything. To enter the church, you'll need to get the key from the ravers in the nearby tent (#32).
- Entrances to the
Feld Building. You won't be able to enter this building until you've triggered the task
Look for Ruby on the Coast, which won't happen until late in the game.


