 Did we miss anything in this quest? Is there something we didn't discover? Let us know!
Walkthrough
Did we miss anything in this quest? Is there something we didn't discover? Let us know!
Walkthrough
When you pay 15,000 gp to Gaelan Bayle in his house in the
Slums District, each character in your party will earn 45,000 xp. Bayle will happily accept your payment, and he'll direct you to meet with Shadowmaster Aran Linvail in the
Shadow Thief Guildhall in the
Docks District. He'll also give you a Shadow Thief Cellar Key.
You'll find Aran on Level 3 of the guildhall. The cellar key will allow you to reach him. When you talk to Aran, he'll tell you that he's already put your payment to good use, and he'll give you an
Amulet of Power and a
Ring of Protection +2: The Guard's Ring as a token of good faith. But he'll inform you that the guild war with Bodhi has hampered what his thieves can do, and so he'll ask you to complete three tasks for him, which will allow him to focus the guild more towards rescuing Imoen. These tasks are described below.
Task 1: Guarding the Docks
Aran will tell you that the guild takes in deliveries at the docks, but that lately these shipments -- and frequently the people sent to collect them -- have disappeared. So he'll ask you to head over to the docks at night and meet with one of his lieutenants, a woman named Mook, and provide her with whatever support she needs.
You'll find Mook at the dock at the southern edge of the
Docks District. She'll tell you that she's seen a man in disguise watching her. Soon enough, the man will come around again, and he'll reveal himself to be the vampire Lassal. He'll kill Mook and attack you, but then he'll transform into a mist and flee once you've done enough damage to him (get used to it when fighting vampires).
When you return to Aran and tell him what happened, each character in your party will earn 28,500 xp. Aran will then decide that you must discover the location of the rival guild.
Task 2: Questioning the Traitors
Aran will tell you that two of his thieves, Jaylos and Caehan, have decided to join the opposition, and that they're planning to meet their contact at the Five Flagons Inn in the
Bridge District. He'll then ask you to go there yourself and pose as fellow converts, and learn what you can.
You'll find the thieves inside one of the upstairs rooms at the inn. When they see you, they'll demand to know who you are. You'll get a few ways to respond, but no matter what you say, you'll end up having to kill them plus their contact, Gracen. You'll earn 4200 xp for defeating the trio in battle, and you'll find a Contact's Note on Gracen's corpse. The note will point you to the crypts in the
Graveyard District, and also mention Pai'Na in the
Lower Tombs, whom you might have encountered previously.
When you report in to Aran, each character in your party will earn 18,500 xp. Aran will then decide that you should destroy the rival guild, including their vampire leader Bodhi. He'll give you four
Wooden Stakes to help you out, and he'll tell you to meet one his mages in the
Lower Tombs beneath the
Graveyard District.
Note:
Wooden Stakes can't be equipped. You'll just need to carry them in your inventory. If you somehow lose your stakes, you can always buy more at certain shops, like the Temple of Lathander in the
Temple District. You'll also find a few stakes in Bodhi's lair (near Exit B).
Task 3: Defeating Bodhi and Her Guild
You'll meet the mage Haz in the northern part of the
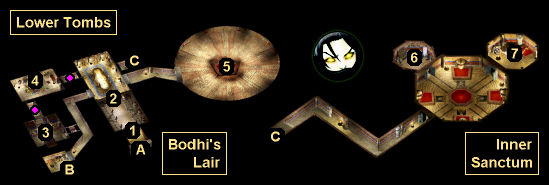
Lower Tombs (#1), near the heavy blue doors leading to Bodhi's lair (#2). When Haz spots you, he'll send his flesh golem to open the doors, which will cause two grimwarders and two grimward archers (worth 4000 xp each) to attack you. Haz and his golem will help you during the fight, but then they'll depart. Lassal will also show up when the fight starts, but he'll just taunt you a bit before departing.
As you explore the lair, you'll encounter a variety of undead creatures, including several vampires. Some of the named vampires -- like Durst (#4) and Gellal (near #2) -- will flee to the coffin room (#3) once you've defeated them in battle. To finish them off, you'll need to interact with their coffin while carrying a
Wooden Stake in your inventory. Each time you do this, you'll make the world a better place. And you'll earn 9000 xp.
Eventually, you'll encounter Lassal again (#7). He'll challenge you to a fight in the blood-letting chamber (#5). However, when you show up in the chamber, Lassal will be way in the back, and you'll have to walk through several undetectable traps to get to him. So we wouldn't recommend charging at him with your entire party. Instead, send your tank to Lassal, and then lure him back to the rest of your party. Lassal only has 76 hit points, so it shouldn't take you long to kill him. You'll earn 11,500 xp when he goes down.
Of course, Lassal won't be dead yet. Like other named vampires, he'll transform into a mist and retreat to his coffin in the coffin room (#3). When you follow him there and finish him off with a
Wooden Stake (worth 9000 xp), Bodhi will show up. She'll reveal a few things to you -- like that she's Irenicus' sister, and that the Shadow Thieves know your parentage -- and then she'll attack you. Bodhi won't be much tougher than Lassal, and once you've done enough damage to her, she'll transform into a bat and fly away. This will earn you 18,750 xp. You'll see Bodhi again later, of course.
When you return to Aran, each character in your party will earn 50,000 xp. Aran will then tell you that Imoen -- and Irenicus -- are being held in an asylum called
Spellhold, and that he's used the gold you gave him to book you passage there. When tell Aran that you're ready to depart, you'll end the chapter and head to
Brynnlaw, the island where
Spellhold is located. You'll be away from Athkatla for a while, so be sure to go shopping first to clear your inventory space. You might also want to take Yoshimo will you on the trip. Doing so will earn you a significant reward later.
Note: You'll return to Athkatla in Chapter 6, so you don't need to complete every side quest in your journal before departing.
1 - Haz
2 - Heavy Blue Doors
3 - Coffin Room
You'll encounter a clay golem in this room. You'll need bludgeoning weapons in order to damage it.
4 - Blood Pool
If you reach into this blood pool, then you'll find the
Mace of Disruption +1, an excellent weapon for fighting vampires and other undead creatures (since it can kill them outright). But be careful. The character grabbing the mace might take damage.
5 - Blood-Letting Chamber
As you approach this chamber, you'll encounter a vampire mage named Tanova. She'll cast some annoying spells like Maze, Simulacrum, and Symbol, Stun, but if you keep whacking away at her, then eventually she'll go down, and you'll earn 10,000 xp.
Inside the chamber, you'll discover numerous spike traps, but you won't be able to detect them or disarm them, so it's best to avoid the chamber as much as possible.
6 - Organ Storage Room
Inside the (locked and trapped) chest here, you'll find
Ashen Scales +2 and a
Katana +2.
7 - Gondola Room
Exits
- Passage to the southern part of the
Lower Tombs.
- Exit to the
Graveyard District. In the containers by the exit, you'll find two
Wooden Stakes.
- Stairs to the Inner Sanctum.


