Did we miss anything in this location? Is there something we didn't discover? Let us know!
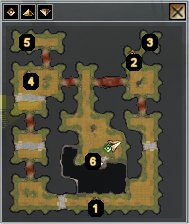
Snow Globe |
1 - TELEPORTER
Use the teleporter to get back to Lillian's Room at the Drinking House. You will need to get back a couple of times and turn the globe, to reverse the factions at the snow Globe and be able to talk with both the dryads and the dwarves.
2 - ARWYL'S FOUNTAIN
Before entering the Globe you have the option to rotate it. Doing so affects the whole world inside, so if you need to talk with the Dryads but there are hostile to you, exit the Globe turn it and reenter. You can then talk with the leader of the Dryads in this world, Arwyl. From her saying it seems that the Dryads and Dwarves in this world have been caught in the middle of an endless and meaningless war and both sides are not sure for the cause anymore. After you enter the cave from area #6 and get the Amulet of Ages you will need the help of both the Dryads and the Dwarves to fix it. After talking with Hodd the leader of the Dwarves and convinced him to fix the amulet come here and talk to Arwyl again (you will again need to exit and rotate to globe). She will then recharge the Amulet for you to use against their so called Master the Guardian White Dragon inside the cave.
3 - DRYAD RESPAWN POOL
Each dryad, even Arwyl, killed by you when they are hostile they will respawn from the portal here in an endless loop. For those with enough patients you can exploit this fact and earn tons of experience points.
4 - HODD'S CAMP
Hodd the leader of the Dwarves says just about the same with Arwyl and blames the Dryads for this mess but you cannot do anything at the moment. When you have the broken Amulet of Ages from inside the cave return back to Hodd and convince him to mend it for you but you will still have to recharge it. This is a job for the Dryads though. The Amulet was once forged to defeat their master the White Dragon that resides in the cave. And you will most probably need it to defeat the Dragon (the Amulet, when fixed, grants you a considerable damage reduction ability).
5 - DWARF RESPAWN POOL
As with the portal in area #3 the portal here will constantly respawn any Dwarf you kill and can again be exploited to earn large amounts of experience points, though the Dwarves can deal much more damage with their Battleaxes than the Dryads.
6 - ENTRANCE TO THE WHITE DRAGON CAVE
Use this entrance to get inside the cave and meet up with the master of the Dwarves and Dryads, the Guardian White Dragon.
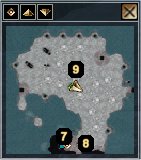
Snow Globe Cave |
7 - EXIT BACK TO SNOW GLOBE MAIN AREA
You can use the exit from here to return to the main area of the Snow Globe any time you like as long as you don't kill the Dragon. Killing the Dragon destroys the world inside the Snow Globe and you can only exit the Globe from the portal that will appear next to you once the Dragon is dead (See area #8 for more details).
8 - AMULET OF AGES
On the book piles here you will find the broken Amulet of Ages. With the help of the Dryads and the Dwarves you can fix the amulet and use it against the Guardian White Dragon at area #9. The amulet grants some nice damage reduction ability so it might be worth to fix it and will probably make things easier when you have to defeat the Dragon.
9 - GUARDIAN WHITE DRAGON
When you first arrive in the cave you can actually meet up and talk with the Dragon. If you don't push your luck with him, the White Dragon with this railroad name, Ma'fel'no'sei'kedeh'naar or simply Winter Fang can willingly give you some information about the Words of Power and how he used the power of the Word to create this world inside the Snow Globe.
After fixing the Amulet of Ages, if you decided to fix it, getting near to the Dragon will trigger a fight with him. Be prepared for an almost impossible fight, the dragon has a nasty AC and a variety of some really destructive abilities. For the fighting classes this could be even harder, you can't last long in a melee combat against such an impressive creature so you will have to stay away from him and snipe him down with ranged weapons. Keeping him busy with your henchmen or animal companions will give you some time to score a few hits on him. Hot-keying the Stone of Recall, if you haven't already, could prove pretty handy as well if things turn bad during the fight. Now for the spellcasters things might be a little easier if you have a tank henchmen at the front to take the damage. If you are a Cleric however you do not have to trouble yourself too much as long as you can cast the all mighty Harm spell. With a successful cast of this spell you will bring the Dragon down to 1d4 hit points and it won't take much time after that to finish him. Lying traps and stoneskins can also help a lot in this fight.
When you finally manage to defeat the Dragon you will have the chance to loot the Dragon's treasure from the nearby chest. Amongst some major treasures with one or two magic items and 1500 gold pieces you will also find one of the Words of Power. As soon as the Word is in your possession Haedraline (her projection) will appear. If this is the first Word you find Haedraline, an ancient member of the Creator Race and the leader of the Word Slaves, will first ask you who you serve. Despite the few options given to answer this is a pretty straight forward conversation and after Haedraline asks you a couple more questions, her projection will fade soon after giving you one last advise, to find the remaining Words of Power before Maugrim does. After Haedraline disappears a portal will visualize near the chest. Since with the destruction of the Dragon, the Snow Globe world seized to exist as well you can no longer exit the cave and you have to use the portal to get back to the Drinking House at Beorunna's Well. You can then return the Word to Aarin for a hefty reward.


