Did we miss anything in this location? Is there something we didn't discover? Let us know!
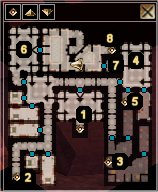
Helm's Hold 1 |
1 - EXIT TO COURTYARD
The doors from here will get you back to the Courtyard.
Once you enter this room you will find 4 neutral Guardian Armors and a pedestal in the middle of the room. If you try to leave the Guardian Armors will attack and they are not the easiest opponents to deal with better yet four of them. You can either try to best them and choose an easier way. Place the etched gem you picked up from a corpse from the Courtyard and the guardians will then be activated but will not attack you. Instead they will roam the Hold and search and destroy all your enemies there. This action will also reward you with 50 experience points.
2 - EXIT TO HELM'S HOLD BASEMENT
Use the door from here to get back to the basement of the Hold.
3 - EXIT TO COURTYARD
The exit from here will take you back to the Courtyard. You can also dispatch a few undead lurking around the small rooms here for some experience and loot.
4 - STRANGE ALTAR
You can do a lot thing with the Altar here. You can either choose the evil way or the good way though.
Evil Way:
First you need the Black Grimoire from area #5 to complete the ritual here or banish Chaohinon of the Void. If you choose to complete the ritual you will be rewarded with 225 experience points and Chaohinon will offer you a boon as well. You can choose between a cloak, Cloak of movement, a double axe, Ascorian Double Axe, or a temporary buff.
Good Way:
First, you need the Black Grimoire not to complete the ritual but instead banish Chaohinon. For banishing the demon you will be rewarded with 375 experience points. You will also need the Book of Helm, which can be obtained from area #7, in order to summon the Guardian Spirit of Helm. You can then ask the Spirit for a boon as well. You can choose between a magic item, Ring of Elemental resistance, a magic weapon, Elven Court Bow, a temporary buff or an insight on the events that have occurred and things to come.
Eventually the Spirit will depart but not before he gives you a Periapt of Wisdom +1. You will also be rewarded with another 375 experience points.
5 - BLACK GRIMOIRE
Inside the bookshelf here you will find a book called Black Grimoire. The book is to be used at the altar at area #4 to either complete the ritual or banish Chaohinon of the void.
6 - MORE UNDEAD
A couple of skeleton mages a wraith and several corpses are located here. The problem is the corpses will rise and attack you too as soon as you get near. Be careful with the Zombie lords and should do fine.
7 - BOOK OF HELM
A False Helmite elite is guardian the room here. He is a tough opponent but nothing you can't handle. Once you defeat him take the Book of Helm from the heavily trapped bookshelf. You will need the book at area #4 if you want to summon the Guardian Spirit of Helm and restore the Hold.
8 - EXIT TO LEVEL 2 OF HELM'S HOLD
The stairs will take you upstairs where you will meet with Fenthick.
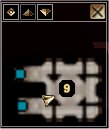
Helm's Hold 2 |
9 - FENTHICK
Once you get here Fenthick will approach you and talk. Apparently he can now clearly see that Desther betrayed him and his trust but the damage is already been done. The people of Neverwinter will want someone to blame and in their eyes both Desther and Fenthick are guilty. You can also ask Fenthick about the location of Desther and about Desther's cult. When done talking onward to confront Desther and reclaim the cure.
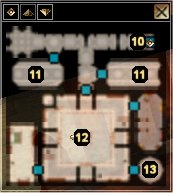
Helm's Hold 3 |
10 - STAIRS DOWN
These stairs can take you down to the lower levels of the Hold. However once here you cannot go back. A force field will prevent you from going back so you will have to keep going until Desther is brought to justice.
11 - UNDEAD MINIONS
These two rooms host several undead creatures. Some of them are powerful but nothing compared to what you will face at area #12. There are a few chests here containing some random loot as well.
12 - DESTHER
There are a couple of things to be done here before you can go up against Desther. First you will need to destroy the Ritual Golems that surround Desther and protect him from any harm. Be careful though because several other undead are inside as well. Do not forget your Stone of Recall is things get bad. Also Desther as you will soon notice has a HUGE amount of hit points and no matter what damage you deal to him he will be barely injured.
Don't panic because of this, though. The game wanted to ensure that Desther could not be killed by accident and he will surrender while at barely injured if you deal enough damage to him. When he does you will be able to talk to him but remember to loot the place before turning Desther in thus ending this Chapter. You will also gain 300 experience points for making Desther Surrender.
13 � TREASURES
Inside the Alchemist Apparacatus you will find several potions including a vial of Dragon Blood and a vial of Special Holy Water.


