 Did we miss anything in this section? Is there something we didn't discover?
Let us know!
Walkthrough
Did we miss anything in this section? Is there something we didn't discover?
Let us know!
Walkthrough
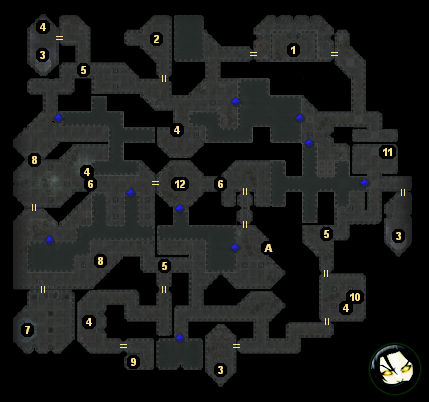
Your goal in the Skein is simply to reach the back staircase (Exit A) and escape to
Coveya Kurg'annis. There are two ways you can do this: you can repair and power up three Imaskari devices (#3), which will drain the flooded parts of the Skein and give you a route to the end, or you can kill a primal earth elemental (#7), which will cause the Skein to partially collapse and give you a different route to the end.
You'll get different rewards depending on what you choose. Killing the elemental will earn you a lot of gold plus some experience when you return to Fentomy, while draining the Skein will earn you the same amount of experience plus allow you to loot a lot of corpses for equipment.
If you want to, you can actually complete both options. To do this you'll need to split up your party so that one group (containing your main character) repairs devices and loots corpses while the other group waits in the elemental room and then defeats the elemental when you're ready to move on to Gulk'aush (#12). The door to the elemental room will close and lock when you power up the devices, but it will open up again after you've defeated the elemental, allowing you to gather your party together again. You can also just load your game to gather your party.
Note: Since loading your game will cause your companions to appear next to you, if you attempt to complete both escape options, then you'll need to do it without loading your game, or else your separated groups will all suddenly join back together again and not be able to complete their tasks.
It sounds like a good idea to try and complete both escape options, but it probably isn't, because it's a lot of work for not much extra reward, and if you complete both options then you won't be able to rescue the Sleeper's (#2). The game will also claim that you've failed Fentomy's quest (this will happen automatically when you power up the devices), but as long as you kill the elemental, Fentomy will be happy when you meet him again. If you're not sure about which path to follow, then we'd recommend fixing the devices and draining the Skein. That route is more complicated but gives a better reward.
1 - Starting Point (Exiled by Mistress)
This is where you'll start out if the Mistress from
Coveya Kurg'annis decided to exile you rather than let you face the Coven.
You'll find some corpses on the ground here, and, when you look at the top of the stairs, you'll see the reason for the corpses: five crazy misfits just waiting to relieve you of your equipment. No matter what you say to them, two of them will leave, but the other three will attack you. You probably won't find anything useful on their corpses.
2 - Sleeper's Room
When you enter this room, you'll first meet some of the Sleeper's followers. Their leader, Geiard Riverdweller, will tell you a little bit about the Sleeper and Gulk'aush (#12), and he'll warn you that you should not say Gulk'aush's name (if you do so too many times then all of the followers will attack you).
You'll also meet an exiled gnome here. He'll be carrying an
Imaskari Device Lever, which you'll need to acquire. If you talk to him and tell him how much you like the lever, then he'll offer to trade it to you for an axe that a duergar is carrying (#10). Since you'll probably end up killing that duergar anyway, you might as well accept the offer, but completing the deal won't give you any experience points or anything.
Finally, you'll also encounter the Sleeper here. The Sleeper is Gabi Avolov's grandmother, who you might remember hearing about in
Mulsantir in Act Two. However, when you try to talk to her, you'll discover that she's in a dream state, and you won't be able to do much with her. If you slay her, then she'll disappear and her followers will attack you, and you won't get any sort of reward. If you devour her soul (evil characters only), then you'll gain the Dream Haunting ability, but you'll get that ability shortly anyway (at #12). If One of Many is with you, then it will want to devour the Sleeper's soul, and if you let it, then it will gain the warlock class.
To rescue the Sleeper, you'll have to leave her be when you first meet her. Then later, after you've dealt with Gulk'aush and picked up the
Hag Eye (#12), you'll be able to enter the her dream. This will earn you 500 experience points, but when you get inside, no matter what you say, the Sleeper will just tell you how much the Coven is tormenting her, and she'll ask you to kill her.
Killing the Sleeper at this point will give you the exact same result as killing her earlier, but if you again leave her be and then destroy the Coven when you reach it in
Coveya Kurg'annis (via Exit A), then you'll earn 500 experience points for that act plus 1000 experience points and an Amulet of Wisdom +8 when you visit to the Sleeper (aka Skyla Avolov) in her house in
Mulsantir.
Note: If you kill the earth elemental (#7) rather than drain the Skein (see #3), then you won't be able to return to the Sleeper after defeating Gulk'aush.
3 - Imaskari Devices
You'll find three Imaskari devices in the Skein. They'll need to be repaired and powered up. If you have a high enough lore skill, or if Safiya is in your party, then clicking on a device will give you the instructions for repairing it. Otherwise, you can just keep reading here to see what you'll need to do.
To repair a device, you'll need to do a few things. First you'll need to take an
Empty Imaskari Globe from the device. Then you'll need to fill the globe with blood from a fresh corpse (#4). Then you'll need to fight an air elemental (#5). When the air elemental dies, it will drop some
Glowing Powder on the ground, and when you click on it, you'll mix it with the blood in the globe. If you've done everything correctly, then you should end up with an
Imaskari Globe of Energized Blood.
To finish the repairs, you'll need to place the energized globe back in the device, and then you'll need to find the lever for the device. One of the devices will start out with its lever already in place. For the other two, you'll need to find their levers, but there isn't anything complicated in this (see #2 and #7 for details). To power up the device, you'll then just need to put the lever into the device and use it. Both of these actions can be performed through dialogue after clicking on the device.
Each time you repair and power up a device, the nearest air elemental will be drawn to it, and it will stop spawning in the Skein. If you have Safiya in your party, then clicking on the device after powering it up will reveal some brilliant and pristine essences.
Powering up all three devices will reward you with 5000 experience points. The devices will also drain the flooded parts of the Skein, which will give you access to all of the floating corpses that had been just out of reach before. You'll find a lot of equipment on these corpses, including
Gloves of the Long Death +5, a
Bag of Holding, a
Hammer of the Lost Empire,
Storm Armor of the Earth's Children, a
Kukri of the Eclipse, a
Weather-Resistant Golem Torso, and more.
Finally, the drained part of the Skein will create paths to Gulk'aush (#12) and the dungeon exit (Exit A) by allowing you to bypass a pair of locked doors (#6), and so you'll finally be able to leave the area.
4 - Fresh Corpses
You'll need the blood from these corpses to power up the three Imaskari devices (#3). Each corpse can only be used once.
5 - Air Elementals
The air elementals re-spawn and wander around, so you might not find them exactly where we've indicated them on the map, but they'll appear frequently enough that you shouldn't have any trouble tracking some down. You won't get any experience for "killing" the air elementals, and they won't attack you if you don't attack them, so you might want to ignore them as much as possible.
6 - Locked Doors
These doors will start out locked, and they'll only open if you kill the earth elemental (#7). If you repair the Imaskari devices (#3), then you'll need to use previously-flooded passages to get around them.
7 - Primal Earth Elemental
This is the earth elemental that Fentomy in
Nightshore might have asked you to kill. To start the fight, simply use the lever that's already in the device next to the elemental, or just bash the device if you have other plans for the lever (it can be used to power up one of the Imaskari devices at #3). The elemental shouldn't be all that tough to kill, and it will drop a
Ring of the Untherite Generals when it dies.
However, you might want to skip killing the elemental, or at least wait until later. If you kill the elemental, then part of the Skein will collapse, causing rubble to block your path in two spots (#8) but also opening a pair of locked doorways (#6). The net result of these changes is that most of the Skein will become unavailable to you, but you'll be able to travel right to the big fight with Gulk'aush (#12).
Note: Killing the earth elemental will cause the doors to the device rooms (#3) to close and lock, preventing you from powering up any more of them. The rubble (#8) will also prevent you from rescuing the Sleeper (#2).
Also in this room you'll find a corpse carrying a
Staff of Defense and a golem carrying
Swift Golem Legs. You'll find a use for golem parts later in this Act.
8 - Rubble
If you kill the primal earth elemental (#7), then the Skein will begin to collapse, and rubble will fall on these two spots, blocking your passage.
9 - Starting Point (Side Entrance)
This is where you'll start out in the Skein if you entered via the side entrance in
Nightshore.
10 - Mad Axe-Wielding Duergar
The duergar will have some friends with him, but this isn't a battle that should cause you any problems. The duergar will drop a
Duergar Waraxe when he dies. This is the axe desired by the gnoll near the Sleeper (#2).
11 - Corpse
On the corpse here you'll find a
Charming Sling.
12 - Gulk'aush
When you approach Gulk'aush, she'll talk to you for a bit, and then she'll attack. During the battle, she'll possess one of your companions (she'll always pick Safiya if you have her in your party), and so you'll basically have to defeat her three times: once as herself, once as one of your companions, and then again as herself. But Gulk'aush isn't all that powerful aside from the possession trick, and so she shouldn't be too tough to defeat.
Once you've damaged Gulk'aush enough, she'll surrender, and she'll tell you about her "crimes." She'll tell you how she took a lover and had a child (Gann), and how she was exiled (and worse) for deceiving the Coven. If you have Gann in your party, then the two will recognize each other.
If you allow Gulk'aush to explain to Gann why she abandoned him, then you'll trigger a sequence of events where you and Gann might fall in love (if you're playing a female character), and you'll almost certainly gain influence with Gann. However, this choice will allow Gulk'aush to leave peaceably, and you won't be able to claim
Gulk'aush's Essence. If you instead devour Gulk'aush's soul, then just the opposite will happen. You'll lose influence with Gann but you'll gain
Gulk'aush's Essence.
Note: We played two games, and only one of our characters was given the option of devouring Gulk'aush's soul. So this dialogue option might only appear for evil or devourer characters or it might only appear if you have Gann in your party.
But regardless, you'll end up with a
Hag Eye at the end of the encounter. The
Hag Eye will allow you to enter other people's dreams (such as the Sleeper at #2).
Exits:
- Stairs to
Coveya Kurg'annis. You won't be able to return to the Skein after using the exit.


