 Did we miss anything in this section? Is there something we didn't discover?
Let us know!
Area Note
Did we miss anything in this section? Is there something we didn't discover?
Let us know!
Area Note
To reach this location, you'll have to set sail from
Mulsantir using the witchboat. However, after you've been here once, you'll be able to use the world map to return.
Walkthrough
When you first arrive at the front gate of the garrison (#1), you'll find it under attack by shambling mounds and blightspawned treants. After you've helped repulse the attack, a young witch named Nadaj will approach you. She'll tell you that for some reason the
Ashenwood has taken a dislike to the garrison, and that if you wish to explore it to find the Wood Man, you'll have to get permission from Dalenka, the head witch (#2).
When you reach Dalenka in her office, she'll make it clear that she doesn't like "your kind," and while she won't prevent you from entering the forest, she won't give you any help, either. However, when you exit the office, Nadaj will come up to you again, and she'll have a plan. She'll speculate that the Wood Man might be too weak to make an appearance, and that if you want to meet him, you'll first have to fix three problems in the
Ashenwood: the blight, a wildfire, and an incursion of frost giants. She'll also suggest that you go to
Immil Vale and speak with some spirit witches there, but that's something it's better to do after you've visited the
Ashenwood.
Once you've completed your conversation with Nadaj, the northern gate (#3) will open, and the berserkers who had been standing next to it will spread out around the camp, including one, named Odeysa (#4), who will turn into a shopkeeper.
After dealing with the three problems...
When you return to Nadaj, she'll have one more matter for you to deal with. She'll claim that Dalenka is a spy who has been sabotaging the garrison, and she'll ask you to lead a coup against her. However, Nadaj is lying, and if you agree with her plan, then you'll be forced to follow it to the very end and kill Dalenka. You won't be able to change your mind part way through.
If you decide to support Dalenka, then Nadaj will summon the berserkers in the garrison to attack you, and she'll flee into the
Ashenwood. Then, after the battle, Dalenka will burst from her office and demand to know what's going on. If you can convince her that you're on her side, then she'll join you as a follower. Otherwise she'll attack you.
If you decide to support Nadaj, then she'll tell you to gather the support of the berserkers in the garrison before confronting Dalenka. There are five berserkers that you can talk to, and if you're skilled in diplomacy, intimidation, or bluffing, then you'll be able to convince four of them to take your side (Kozlov will refuse no matter what). If you convince all four, then you'll receive 1000 experience points.
Then when you confront Dalenka (#2), she'll decide to leave her office and face you outside. There, no matter what you say to her, the conversation will end in a battle, and afterwards Nadaj will claim that
you're the traitor, and any remaining berserkers will attack you. Nadaj, meanwhile, will flee into the
Ashenwood.
In other words, from a results perspective, it doesn't really matter which side you take. Either way the berserkers will end up dead, and Nadaj will escape to the Ashenwood. It'll just change whether Dalenka is dead or alive, and whether she'll help you in the battle against Nadaj coming up.
After the battles, when you loot the bodies of the berserkers, you'll find some gold pieces, an
Amulet of Protected Dalliances, and more. If Dalenka is dead (either now or later), then you'll find a
Ring of Leeched Abjuration, a
Quarterstaff +5, and a
Robe of the Archmagi on her corpse.
In the Ashenwood...
You'll find Nadaj at the glowing ash tree in the center of the Ashenwood. When you talk to her, you'll discover that she has been possessed, and that she now serves as "the fury, the outrage, the vengeance" of the forest. No matter what you say to her, she'll attack you.
During the battle, the forest will continually spawn treants, elementals, and shambling mounds. To get these creatures to stop appearing, you'll need to attack the "genius loci" located on the trunks of five nearby trees (including the glowing ash tree itself). However, just like in the Okku battle at the end of Act One, you don't need to be in a hurry here. If the forest isn't damaging you very much, then you can just keep fighting it for extra experience points and essences. The fight will end once you've defeated the forest creatures, the genius loci, and Nadaj. From what we can tell, there isn't any way to save Nadaj.
After the battle, the Wood Man will appear, and you'll gain 3000 experience points. Nothing much will happen during the ensuing conversation, but at the end you'll have to make a decision. If you devour the Wood Man's spirit, then you'll gain the Spirit Gorge feat. Some of your companions might also attack you. Dalenka will always turn on you, and she'll summon some forest spirits to aid her. Okku will also be upset, and although there are some dialogue options to pacify him, in version 1.10 they didn't work, and he always attacked us (of course, if you're devouring the Wood Man's spirit then you probably won't have Okku with you).
If instead you channel your spirit energy to heal the Wood Man, then you'll gain the Bestow Life Force feat. You'll also completely fill your spirit energy bar (given the description of the feat, this seems like a bug), and your craving will drop all the way to 0% even if it had been up to 100%.
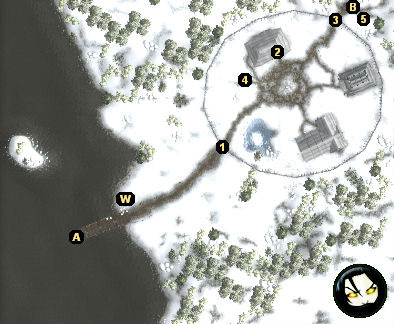
1 - Front Gate
2 - Dalenka's Office
3 - Back Gate
This gate won't open until after you have spoken to Dalenka (#2).
4 - Odesya
5 - Offering Pile
When you click on the offering pile, you'll receive the quest "Hunting Party." If you ask Nadaj (near #2) about the pile, she'll tell you that a group of hunters entered the
Ashenwood a few days ago, right after the attacks on the garrison began, and that they haven't been seen since. You'll learn more about the hunters in the
Ashenwood (this introduction to the quest is actually optional).
Exits:
- Witchboat to
Mulsantir.
- Path to the
Ashenwood.
- World exit.


