 Did we miss anything in this section? Is there something we didn't discover?
Let us know!
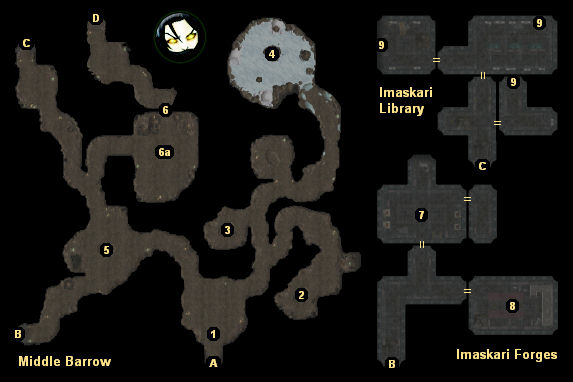
Walkthrough
1 - Nakata the Spirit Wolf
Did we miss anything in this section? Is there something we didn't discover?
Let us know!
Walkthrough
1 - Nakata the Spirit Wolf
When you enter this part of the barrow, you'll be confronted by a spirit wolf named Nakata. No matter what you say to her, the presence inside your body will rise up and consume her spirit, and a
Brilliant Spirit Essence will appear in your inventory.
2 - Ancient Offering Chest
Inside the chest you'll find a
Skin of Shadow.
3 - Ancient Wooden Box
Inside the box you'll find a
Telthori Totem and a
Potion of Greater Heroism.
4 - Orglash's Chamber
Orglash is an ice spirit. When you talk to him, he'll tell you that long ago he angered Okku, the lord of this barrow, and that as a punishment, Okku sentenced him to protect this chamber. There are two ways you can free Orglash: you can kill him, or you can continue the conversation with him until you get the option to name yourself his new master. Safiya won't like the latter option, but there isn't any downside to it, and if you claim Orglash as your own, you'll receive an
Orglash Crystal.
If you loot the two offering piles in the chamber, then you'll find a
Star Sapphire, a
Ring of the Frozen Falls, and a
Sacred Pouch. The pouch can be used to open up the route to the Upper Barrow (see #6).
5 - Ancient Wooden Chest
Inside the chest you'll find a
Frost Harpoon.
6 - Blocked Passage
When you get close to the blocked passage (#6), Safiya will let you know that the spirits are responsible for the damage, and that you might need to make them an offering to get through. There are three ways to deal with this situation: you can pick up the
Sacred Pouch (#4) and then click on the offering bowl to the south (#6a), or you can bash the bear skeleton next to the offering bowl and then fight the spirits who come to attack you, or you can hit the blocked passage (by clicking on it, not bashing it) with the
Imaskari Rod (#7). You'll get 1000 experience points regardless of your choice, but if you fight the spirits then you'll also receive about 2000 experience points for killing them, and if you use the rod then you'll attract a lich who will drop
Imaskari Battlemage Armor if you decide to kill him.
7 - Forge Room
If you examine the containers in this room, you'll find a
Breastplate of Hidden Imaskar, a random +3 weapon (which might be tuned to your character), some
Hellfire Powder, and more. The
Hellfire Powder can be used to strengthen the Imaskari Golem (see #8).
In the small room to the east, you can also pick up the rapier
Elemental's Ruin, the tower shield
Mage Protector, a
Belt of Frost Giant Strength, and an
Imaskari Rod.
8 - Golem Room
In this room you'll find a dormant Imaskari Golem. If you click on it, then Safiya will offer to awaken it, and if you let her then the golem will join your party -- but only while you're inside the barrow. When you leave the barrow, the golem will immediately stop working again.
Saifya will also mention that the golem is weak, and she'll tell you that if you had some
Hellfire Powder, then you could create a salve and use it to improve the golem's strength. You'll find the
Hellfire Powder in the nearby Forge Room (#7). To create the salve, have the character with the highest Craft Alchemy skill (probably Safiya) use the alchemy workbench in the room. If their skill is 30 or more, then they'll create a
Superior Rejuvenation Salve, which will increase the golem's strength by +4. If their skill is under 30, then they'll create a regular
Rejuvenation Salve, which will increase the golem's strength by +2. To apply the salve, simply talk to the golem.
Note: If you don't remember how to talk to companions, right click on them and hold the right mouse button down. A menu will shortly pop up with "talk to" as an option.
9 - Shelves
You'll find several spell scrolls in these shelves. Most of them will be useful to Safiya.
Exits:
- Exit to the
Lower Barrow.
- Exit to the Imaskari Forges.
- Exit to the Imaskari Library.
- Exit to the
Upper Barrow.


