 Did we miss anything in this section? Is there something we didn't discover?
Let us know!
Walkthrough
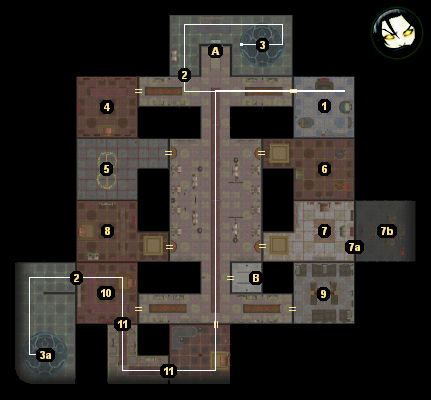
1 - Safiya's Room
Did we miss anything in this section? Is there something we didn't discover?
Let us know!
Walkthrough
1 - Safiya's Room
You'll find a
Galvanized Golem Torso and a
Scorching Gaze Golem Head here.
2 - Locked Doors
You'll need to pick up the key from the
Academy Headmistress' Tower to open these doors.
3 - Strange Apparatus
You should notice an
Activation Orb next to the strange apparatus (#3). When you touch the orb, a beam of light will shoot out of the nearby obelisk and go through the apparatus, hitting a mirror. Your goal for this puzzle is to adjust the mirrors on this floor of the Academy so that the beam of light eventually hits the destination apparatus (#3a). To make matters easier for you, it's possible to take the orb with you so that you can activate it from anywhere.
There aren't too many extra mirrors in the Academy, and so the path should mostly be obvious. We've indicated the proper course using a white line on the map above. The one tricky area comes at the southern end of the floor, where you'll need to bash some bookshelves (#11) to create a path for the beam.
When you have the mirrors in the correct positions, you'll need to move one character onto the starting apparatus (#3) and then activate the orb. This will create an image of the character at the destination apparatus (#3a), and you'll need to send that character over to it to talk to it. It doesn't matter which character you use for this. If you have One of Many in your party, then using it will create a bunch of images at the destination, and you'll have to fight most of them before you can talk to the real one. Also, interestingly, if you use Safiya, then she'll mistake her image for her mother.
If you've done everything correctly, then when you talk to the image, you should receive 2000 experience points and an
Incomplete Soul.
4 - Bedroom
You'll encounter a trio of elite guards in this bedroom. You'll also find some
Kitten Slippers in an armoire here.
5 - Pit Fiends
In this room you'll meet the pit fiends Oronock and Thael-ka. They're "facilitators of transactions." They won't have much in the way of equipment to sell you, but they'll have a variety of brilliant and pristine essences, which you might as well buy.
Note: For some reason, the essences from the pit fiends won't stack with your other essences. To get them to stack, you'll need to divide them and then re-combine them using the
Shaper's Alembic.
The pit fiends are also involved in two quests -- one for Ammon Jerro (#9) and one for Nefris' door (in the
Academy Headmistress' Tower). See those sections for more details.
6 - Summoning Room
In a bookshelf here you'll find the
Book of the Waves.
7 - Inarus' Quarters
In a chest here (#7) you'll find a teal
Soul Housing. You might need the soul here to trade for Ammon Jerro's soul (#9). In the back of the room (#7a), you'll also find a bookcase. If you bash the bookcase, then you'll reveal a door, but you'll need the key from Master Inarus (in the
Academy Classrooms) to get it open.
If you enter the hidden room (#7b), then you'll find a bunch of dead Red Wizards on the floor, and Master Inarus will attack you to keep his secret safe. When you kill him you'll earn over 2000 experience points, and you'll find a set of
Binder's Robes on his corpse.
8 - Bedroom
Inside this room you'll find a pink
Soul Housing and the warmace
Gnollgrip. You might need the soul here to trade for Ammon Jerro's soul (#9).
9 - Soulless Ward
You'll meet two patients in the soulless ward: Bebtu and Ammon Jerro.
Bebtu will tell you that Nefris gave him an item to keep safe for you -- an artificial soul. If you have the Devour Soul feat, then you can use it to collect the
Surrogate Soul, but this isn't the best solution since it will only net you 400 experience points.
The better way to solve the quest is to find Bebtu's real soul and then use it to "displace" the artificial one. Bebtu's real soul can be found in the soul depository (in the
Academy Classrooms). It's in
Soul Housing No. 346, which is located in one of the shelves. When you bring the soul to Bebtu, he'll reward you with the
Surrogate Soul and 2000 experience points, and he'll also give you a
Promissory Note, which you can use in the soul depository as a replacement for the soul you checked out.
Ammon Jerro, meanwhile, won't be in any condition to talk to you, but after clicking on him you'll be able to discuss his plight with the pit fiends (#5). They'll be in possession of his soul, but they'll demand three student souls plus 50,000 gold pieces to give it up. If you're skilled in enough in appraise, then you can reduce this price to two souls and 20,000 gold pieces (plus earn 500 experience points).
There are four places where you can get souls in the Academy: two on this level (at #7 and #8), one from Artesh (located in the
Academy Classrooms), and one from the soul depository (also in the
Academy Classrooms). There are five souls in the soul depository, but from what we can tell, only
Soul Housing No. 184 will work for this quest (some of the other souls are required for other quests, but we're not sure why
Soul Housing No. 223 doesn't also work).
When you bring the necessary souls to the pit fiends, they'll make the exchange, and you'll end up with
Ammon Jerro's Soul. If you don't get a dialogue option to make the trade, then that means either you don't have enough souls or you don't have the right souls.
When you return
Ammon Jerro's Soul to him, he'll wake up and talk to you, and he'll tell you some things about what happened to your companions at the end of the original campaign. Then if you ask him to, he'll join your party as a follower, and he'll stay with you for a time, but he'll only be level 20, and so he won't be as much help as you might expect.
If you have the Devour Soul feat, then you can also use Ammon Jerro to feed your hunger. You won't receive an essence for him, but you'll find the scimitar
The Forsaken Path, a
Cloak of Blackflame, a
Ring of Elemental Resistance, and a
Greater Amulet of Health on his corpse.
10 - Bedroom
In a chest here you'll find
Stout Golem Legs.
11 - Bookshelves / Hidden Doors
You'll need to bash the bookshelves here to reveal the doors behind them. You'll need the key from the
Academy Headmistress' Tower to open the hidden doors. You won't find anything in the corridor between the doors, but you'll need to clear this path to operate the strange apparatus (#3).
Exits:
- Stairs up to the
Academy Classrooms.
- Stairs up to the
Academy Headmistress' Tower.


