 Did we miss anything in this section? Is there something we didn't discover?
Let us know!
Overview
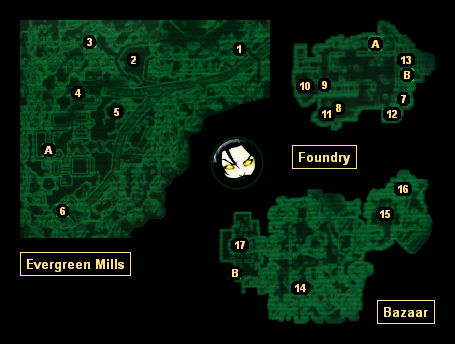
Evergreen Mills is a "town" for raiders, complete with shops (#15) and a brothel (#17). The only problem is that the raiders won't be happy to see you. Most of them will attack you on sight, and so you won't get to interact with anybody, other than with violence. But the location is still worth visiting because you can pick up
The Terrible Shotgun (#15) and the
Bobblehead - Barter doll (#16) while you're there.
1 - Watch Post
Overlooking the trail here you'll discover a watch post (if you're following the trail then you won't be able to get to it until later). Inside you'll find a first aid box, an ammunition box, and a mine box.
2 - Slave Pens
You'll find three slaves inside the slave pens. When you unlock the gate leading to the slaves, you'll gain karma, and the slaves will make a run for it. To open the pens, you'll either need to pick the "average" locks, or you'll need to use a key, which you can find in the guard house to the northwest (#3) or on a nearby raider.
3 - Guard House
Inside the guard house you'll find three ammunition boxes, a bed, and a key (inside the locker). You can use the key to free the slaves (#2).
4 - Northern Shack
Inside this shack you'll find five ammunition boxes, two first aid boxes, a bed, and a workbench.
5 - Super-Mutant Behemoth
You'll find a super-mutant behemoth trapped in an electrified cage here. If you try to open the cage (which isn't locked), then you'll get zapped. To disable the electrical current, you'll need to destroy the generator next to the cage door. However, the behemoth is much easier to kill if you leave it in the cage (since it won't be able to attack you from there), so you should probably leave the cage functional until it's dead.
6 - Southern Shack
Inside this shack you'll find two ammunition boxes, a mine box, two first aid boxes, a copy of
U.S. Army: 30 Handy Flamethrower Recipes, a
Missile Launcher, a raider with a
Flamer, and a bed.
7 - Supply Counter (Lower Level)
At the supply counter you'll find a safe, an ammunition box, two first aid boxes, and two mine boxes.
8 - Living Quarters (Lower Level)
You'll find several beds here, plus a gun cabinet and a safe.
9 - Duck and Cover (Middle Level)
You'll find a copy of
Duck and Cover here on the "roof" of the lower level. The only way to get to the book is to jump down to it from the catwalk.
10 - Room (Upper Level)
You'll find two beds and a first aid box here.
11 - Room (Upper Level)
You'll find a bed, a workbench, a wall safe, and a key (inside the desk) here. You can use the key to unlock the storage room (#12).
12 - Storage Room (Upper Level)
To open the storage room, you'll either have to pick its "average" lock, or you'll need to use a key (#10). Inside you'll find an ammunition box, a first aid box, a wall safe, and a
Fat Man.
13 - Camp (Upper Level)
You'll find three beds and a first aid box here.
14 - Bar
You'll find a first aid box and a bottle of
Nuka-Cola Quantum at the bar.
15 - Smiling Jack's Shop
Despite the trail of raider corpses that you left behind on the way to his shop, Smiling Jack probably won't start out hostile towards you when you approach him, and so you'll be able to do some trading. Smiling Jack offers lots of ammunition plus some other items.
Note: If you decide to trade with Jack, be sure to grab the nearby
Bobblehead - Barter doll (#16) first.
However, even if Jack is friendly towards you, you might want to kill him. That's because you'll find
The Terrible Shotgun on his corpse, and you'll also gain the key to his stash, which will net you lots of caps plus other items.
16 - Workbench
Behind the workbench in a shelf you'll find the
Bobblehead - Barter doll. Under the workbench you'll find a safe.
17 - Brothel
One of the raiders here will drop a key, which you can use to unlock all of the nearby locks, including a "cell" where you'll find a copy of
Nikola Tesla and You. You'll also find a first aid box and a safe in the brothel.
Exits:
- Entrance to the foundry.
- Doorway between the foundry and the bazaar.