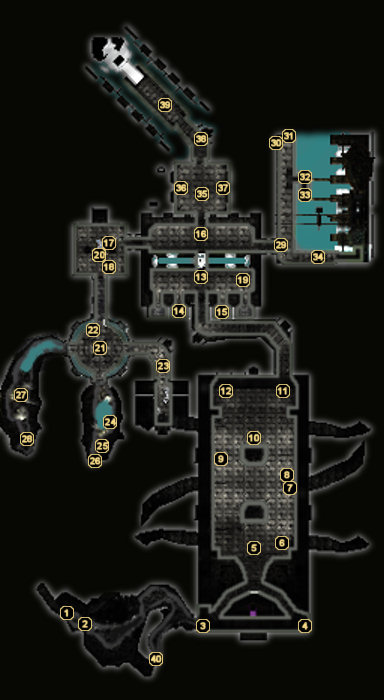
 Did we miss anything on this map? Is there something we didn't discover? Let us know!
This fortress was formed by members of the defunct Order of the Lotus and is now used as a headquarters for the Emperor's assassins. As a new recruit, you shouldn't expect to receive much respect from your fellow assassins. In fact, most of them will attempt to kill you with every chance they get. Prove yourself a better warrior while corrupting the Emperor's golem army and you'll finally get a firsthand look at Death's Hand himself.
1 - Arrival
Did we miss anything on this map? Is there something we didn't discover? Let us know!
This fortress was formed by members of the defunct Order of the Lotus and is now used as a headquarters for the Emperor's assassins. As a new recruit, you shouldn't expect to receive much respect from your fellow assassins. In fact, most of them will attempt to kill you with every chance they get. Prove yourself a better warrior while corrupting the Emperor's golem army and you'll finally get a firsthand look at Death's Hand himself.
1 - Arrival
Having made it through
The Necropolis and descended the pagoda's hidden stairway, you will have finally infiltrated the Lotus Assassin Fortress. You'll be met by The Watcher, a masked figure who gives you some background information about the fortress and the great golem army that is being assembled here. When the conversation is over, he will send you to Master Gang on the north side of the Hall of Induction.
2 - Bones
You'll have to backtrack a bit or wait until you leave the fortress later in the game to loot these bones. They contain 120 silver pieces and a random essence gem (such as an
Inferior Intuition Gem or a
Scholar's Gem of Fate).
3 - Jar
This oversized jar is empty, unfortunately.
4 - Focus Shrine
Meditating at a Focus Shrine will restore all of your character's Focus.
5 - Lotus Acolytes
Four acolytes are hanging out on the south side of the Hall of Induction. They're concerned about how difficult it is to be recognized now that a golem army is being constructed and will attempt to earn some much-needed honor by bringing you down. You'll only be facing Lotus Acolyte Jin Tao for now, but expect another meeting with Lotus Acolyte Du Gah and her two henchmen later on.
When the encounter is over, Sagacious Zu will emerge from a secret door in the base of the southern statue. He'll advise you to check in with your master and will mention that you'll ultimately want to reach Grand Inquisitor Jia. With that, he disappears once again.
6 - Lotus Assassin Sorcerer
Once Master Gang has given you the order to clear the Hall of Induction of all witnesses, you'll find a Lotus Assassin Sorcerer and two Lotus Acolytes hanging out in this corner. The sorcerer believes that he can summon "able minions from the void" that will be far more sufficient than golems for the Lotus Assassins. When he starts the incantation, however, something goes wrong and the Lotus Acolytes are engulfed in flame. Defend the sorcerer by killing the possessed acolytes, after which the would-be wizard will run off to continue his research before Grand Inquisitor Jia learns of his failure. Three more witnesses down.
7 - Ceramic Urn
283 silver pieces can be plucked from this urn.
8 - Merchant Kia Jong
Kia Jong doesn't want to sell you anything at first, but if you display a little personality he'll warm up to you fairly quickly. If you tell him that you know Kia Min from the
Two Rivers School, he'll ask you what she looks like. If you answer that "her hair was tied in many small knots", he'll believe your story and offer you a discount on his goods. If you have some silver to spend, you may want to pick up a couple of essence gems from him (his most notable gems are probably the
Superior Intimidation Gem and
Gem of Struggle). You can also purchase the
Dire Flame combat style from him, if you don't already have it.
During your plan to sabotage the golem press, Mold Masters Gi and Soto will mention that
Phoenix Oil can cause the press to break down. Ask Kia Jong for some oil and he gladly hand some over free of charge.
Kia Jong and his two slaves are still witnesses, though. You need to convince them to leave the Hall of Induction so that you can kill Master Shin without any extra eyeballs around. To do so, you can either give him 1000 silver pieces (200 experience points) or make a successful dialogue check (260 experience points). If you fail the dialogue check but have Henpecked Hou, Silk Fox, or The Black Whirlwind in your party, then they'll do the convincing for you.
9 - Mold Masters Gi and Soto
These two golem press workers are done for the day and are relaxing here in the Hall of Induction. In order to kill Master Shin without any witnesses, though, you need them to leave. If you're looking for Closed Fist points, simply provoke them into battle and slaughter them both. If you'd rather not receive any aligment shift, you can inquire about the golem press and what could cause it to break down. This will lead to them telling you about
Phoenix Oil, a viscous liquid acquired from craftsmen in the Golden Delta used to heat the press during its operation. Adding too much oil will apparently cause the machine to burn too hot.
With this information in hand, pay a visit to Kia Jong to the east and ask him for some oil. Once you have a vial of it, return to the golem press at area #32 and insert the oil into the machine. After the machine malfunctions and you've taken out the Clay Golem sentries, you can return to Gi and Soto to tell them about the problem. They'll rush off to fix the machine, earning you 200 experience points for removing two more witnesses from the Hall of Induction.
10 - Spirit Font
Meditating at a Spirit Font will restore all of your character's Health and Chi.
11 - Master Gang and Master Shin
This location will mark your first encounter with Master Gang and Master Shin. Shin will be disciplining Gang for falling behind on the Jade Golem production, after which Gang will turn to you and demand to know why you're here. When he realizes that you're a new recruit, he asks you to meet him in the chamber down to the north when you are ready to begin your indoctrination.
Later, once you've met all the requirements needed to carry out the murder plot on Master Shin, he will emerge from the north door and demand to know where his slaves and attendants are. Indulge him with some threatening dialogue and then begin the inevitable battle. Shin is very skilled with the Tempest combat style, making him the most powerful Lotus Assassin you've had to fight so far. Use whatever evasion techniques you feel comfortable with to avoid his area and ranged attacks. When his health is reduced to about half, he calls the two nearby Clay Golems to his aid.
When Shin and his two Clay Golem sentries have been defeated, you'll automatically be transported to the golem press where Shin's body will be crushed in a splattering of blood.
12 - Shin's Entourage Training Area
Once you've become Gang's trainer by defeating Guang at area #19, you'll be responsible for "training" Master Shin's personal entourage. Attendant Kitan is first in line to be slain, after which you can return to area #16 to challenge Kai Feng. He's the full Lotus Assassin disguised as a lowly attendant, so expect a tougher battle this time around.
When Feng falls, Teng and Cohong will approach you and issue a few threats for killing two of Shin's men. Follow them back down to area #16 and finish them (and their three acolyte friends) off once and for all.
13 - Master Gang
After your initial meeting with Gang at area #11, you'll begin reporting to him here. During your first visit, you'll witness a spirit killing a helpless slave, which sets the stage for you to prove your worth. Apparently someone shattered a spirit shard during training and now there are spirits overrunning the western chambers. Gang tells you to "occupy" them until he can get a "real" Lotus Assassin to clean them up.
As it turns out, Gang didn't actually expect you to be able to handle the ghosts. When he realizes that you're a competent warrior, he tells you that he'll overlook the fact that you haven't spent countless nights in a cell as part of the Lotus Assassins' recruitment tactics in exchange for two tasks. The first is to operate the Soul Extractor to the west and use it to construct a spirit shard of "exceptional quality" that will be used to power a new Jade Golem. The second is to kill Master Shin, Gang's superior.
The first task is pretty straightforward. Make your way to the Soul Extractor at area #21 and then use the elevator to reach the abandoned deep-level mine. Slay the spirit of Zeng Sai and then use his corpse to construct the corrupted
Golem Spirit Shard.
The second task requires a bit more preparation. Gang tells you that murder can be suspected, as long as it appears that Shin deserved his death due to incompetence. The most dangerous area of the fortress is the Golem Press Room to the east, but you must first speak with Lotus Acolyte Shi near the crane operation controls to learn how idiotic any Lotus Assassin would look if killed by the press or a dropped golem. Tell this to Master Gang and he'll agree that it would be a big disgrace, but he also thinks it will be very difficult to pull off. Master Shin would never be distracted enough to enter the press, so you'll have to kill him and place him there yourself.
To kill Master Shin without getting caught, you'll have to clear the Hall of Induction of all witnesses, convince the press operator to leave his post, and stop an incoming slave shipment. For the first task, refer to areas #6, #8, and #9. For the second task, refer to area #33. For the final area, refer to area #39 on our walkthrough for
The Necropolis. To wipe out Master Gang as well, you can use the golem press and crane operation to create a golem and set it up to drop on Gang when he verifies that Shin has been killed. You'll get an audience with Grand Inquisitor Jia either way, but getting rid of both of the backstabbing bastards is more rewarding.
14 - Keeper of the Archive
The Keeper of the Archive has been chronicling the Lotus Assassins' "rise to glory" for 20 years. Your rank entitles you to some of the information, including details about Master Li's kidnapping and Sagacious Zu's rebellion against Death's Hand and the rest of the order.
Once you've learned all that you care to know, there are two bookstands (
The Grand Inquisitor's Will and
The Way of the Lotus) and a scrollstand (
The Undeniable Fire) for you to read. A second scrollstand will provide you with the
Configuration of the Rabbit.
15 - Containers
The cabinet within this chamber is empty, but those of you playing the PC version of Jade Empire will have another container to search. Once you've defeated Grand Inquisitor Jia at area #39, you can return to this room as the fortress collapses and smash the jar along the south wall to uncover the
Ultimate Warrior Gem. Keep in mind that this essence gem does not exist in the Xbox version and the jar cannot be smashed until after Grand Inquisitor Jia falls.
16 - Attendants Kitan, Kai Feng, Teng, and Cohong
These four arrogant bastards make up Shin's personal entourage. Once you have the green light to start training them (having defeated Guang at area #19), you can begin by challenging Attendant Kitan to a bout. The fight will take place at area #12 out in the Hall of Induction, after which you can return here to move on to the next combatant.
Next in line is Kai Feng, who is actually a full Lotus Assassin disguised as a lowby attendant. This fight is slightly harder than the last, but it should still be fairly easy for you at this point in the game. After listening to Teng and Cohong's threats for killing Feng, walk back to this area where you'll be attacked by the last two attendants and three of their acolyte friends. When all five have been cleaned up, Gang will recognize you for having bested Shin's entourage so easily.
17 - Ghosts
The ghosts that Master Gang wanted you to "occupy" will immediately attack you when you first enter this chamber. There are three of them, though the PC version of Jade Empire also features a Ghost Lord in this battle. When the lot of them have been sent back to the void, return to Master Gang to report your success.
18 - Vase
Smash this vase to find a small pile of silver.
19 - Acolyte Trainer Guang
Once you've dealt with the ghosts at area #17, you'll find a new Lotus Assassin hanging out on the eastern end of this hallway. Her name is Guang and she is responsible for training all of Gang's Lotus Acolytes. When you initially speak to her, she asks that you spar her so she has a better idea of your combat prowess.
It's fairly simple to beat her, which will cause Gang to immediately appoint you as his new trainer and reduce Guang to just an advisor. Guang doesn't seem to mind, though, since all of the skilled trainers in the past have been killed by Master Shin to keep Master Gang in a weakened state. As the new trainer, you are now responsible for training Master Shin's personal entourage at area #16. Lucky for you, they're all expendable.
Before heading off to start training (or killing while acting like you're training...), ask Guang about the techniques she has learned since here time here at the fortress. This will allow you to purchase several nice items from her, including a
Gem of Mastery, the
Ice Shard style, and four unique techniques -
Eye of Inner Darkness,
Window to the Abyss,
Deadened Nerves, and
Fearsome Visage.
20 - Sagacious Zu and Lotus Acolyte Du Gah
After Master Gang has ordered you to build a spirit shard to power the Jade Golem, Sagacious Zu will sneak out from a secret door here and offer you some advice. He suggests that you can construct a chaotic spirit shard that will corrupt the golems, though he's not very specific how this can be done. He simply claims that something within the deepest mines will allow you to create such a shard.
Later, after you've constructed the
Golem Spirit Shard, you'll be confronted by Lotus Acolyte Du Gah and two others as you make your way back to Master Gang. She's not happy about your original encounter at area #5 and wants to remove Gang's favorite acolyte to ensure some recognition for herself. Demonstrate how ridiculously pathetic her attempt is by brutalizing the trio, then continue on as you were.
21 - The Soul Extractor
This machine is designed to brutally extract the souls from the many corpses within
The Necropolis. Lately, though, the Lotus Assassins have discovered that tossing living slaves into the machine has a more potent effect. All of the souls collected are then used to power the golem army.
The Soul Extractor is staffed by a Lotus Acolyte named Go Rin. Tell her that you're here to create a spirit shard for the Jade Golem and she'll recommend that you use the attached elevator to reach the slaves on the prison level. Regardless of whether or not you're pursuing an Open Palm or Closed Fist route, you won't be using any slaves. Instead, you can either leave them be, help them escape (Open Palm), or get most of them killed (Closed Fist). See area #23 for more information.
Your primary goal here is to take the elevator to the deep-level mine, where you'll confront an ancient Horselord spirit named Zeng Sai. Once his spirit is vanquished, bring his corpse here to the machine to construct the corrupted
Golem Spirit Shard. Before heading back to Gang, though, you may want to pay a quick visit to the near-surface mine level to grab some extra loot.
22 - Elevator Controls
Use these controls to reach this main level, the prison level, the near-surface mine level, or the abandoned deep-level mine.
23 - Slaves
You don't technically have to deal with the slaves, though it is another opportunity to earn an alignment shift. If you're going for Open Palm points, kill the guard here and open the gate. You'll then have to kill Go Rin so that the slaves have a clear route to escape. This will also earn you 500 experience points.
If you're going for Closed Fist points, kill the guard as before but then tell the slaves that they're going to have to fight for their freedom. The lot of them will charge into the Soul Extractor room, where all but one of them winds up getting killed by Go Rin before she finally falls herself. You'll only receive 100 experience points for choosing this route.
24 - Bones
These bones will sometimes contain a random essence gem (such as an
Inferior Intuition Gem.
25 - Jar
Crush this jar beneath your foot to find an
Iron Skin Gem.
26 - Escape Route
If you free the slaves at area #23, they'll use the small passage here to escape the fortress. Unfortunately, it's too small for anyone other than an "emaciated slave" to pass through.
27 - Zeng Sai, the Tree that Defies the Fire
Zeng Sai is the chaotic spirit Sagacious Zu alluded to earlier. He is a long-dead Horselord whose body makes the perfect specimen for the creation of a corrupted spirit shard. Once you've destroyed the dual-wielding spirit, Sagacious Zu will sneak into the chamber and offer some additional advice. Listen to what he has to say, then grab the body from the coffin to the south and return to the Soul Extractor.
28 - Ancient Coffin
Inside this coffin lies the body of Zeng Sai, the Tree that Defies the Fire. Grab the body and return to the Soul Extractor to construct the
Golem Spirit Shard for 250 experience points.
29 - Golem Press Room
Entering the Golem Press Room, you'll be treated to a short cutscene demonstrating just how dangerous the room can be. Sagacious Zu will once again sneak up to you and suggest that Master Gang's death could be arranged alongside Master Shin's. Why kill only one when you can kill both?
30 - Scrollstand
The text on this scrollstand is entitled
Jade Empire Bestiary, Volume 2.
31 - Chest
Some silver can be earned by opening this trapped chest.
32 - Golem Press
This machine will allow you to create a clay golem, which can then be moved with the nearby crane so that it hovers above the walkway to the south (area #34). You'll be able to use this golem to kill Master Gang as he strolls along the walkway to confirm Master Shin's death in the press.
Additionally, you can insert the
Phoenix Oil that Merchant Kia Jong gives you at area #8. Doing so will cause the golem press to malfunction, so don't insert the oil until you've created the clay golem necessary to kill Master Gang (though you don't have to kill Gang if you don't want to). Once the oil is inserted, you'll be attacked by three of the previously inactive Clay Golems at the bottom of the stairs. You can now return to Gi and Soto in the Hall of Induction and let them know about the malfunction to clear them from the room.
Once Master Shin has been killed at area #11, you'll automatically be transported here to crush his body in the press. Master Gang will enter the room to inspect the damage, providing you with an opportunity to crush him with a clay golem when he reaches area #34 on the walkway.
33 - Lotus Acolyte Shi and Crane Operation
Shi is reponsible for overseeing the golem press and crane. He'll offer you some instructions on how to use each set of controls and answer a few questions as well. If you ask him about whether or not the machines have claimed any lives, he tells you that it would take a "monumental fool" to fall victim to either the press or a dropped golem. With this information, you can return to Master Gang and let him know your plans for using the press to kill Master Shin.
Once you've formulated the plan to get rid of Master Shin, tell Shi that you need to relieve him of his post. He'll be reluctant at first, but once he hears that there's going to be at least one position opening up in the Lotus Assassin hierarchy, he agrees to tend to the golems elsewhere. This earns you 200 experience points.
The crane controls behind Shi can be used to move a newly created clay golem into a lethal position for later. Once a golem has been created, retrieve the golem from the press and then move the crane right. Do not drop the golem until after Master Shin has been placed in the press and Master Gang has confirmed his death. Timing is fairly important here, so a quick save before Master Gang strolls along the walkway might be a good idea.
If you kill Master Gang, you will automatically earn 300 experience points and will be asked to bring the
Golem Spirit Shard into the previously inaccessible northern room when you walk through the hallway to the west. With Master Gang out of the way, your end battle here in the fortress will be made a little easier. If you don't kill Master Gang, then he will ask that you meet him outside the same door to the west, where you'll learn that he's set up a meeting with Grand Inquisitor Jia to the north. Regardless of whether or not Gang is alive, you will have one last meeting with Sagacious Zu on your way to the final area of the fortress.
34 - Golem Drop Zone
Once Master Shin has been placed in the press and Master Gang has confirmed that he is indeed dead, you can drop a clay golem on your cowardly master at this location of the walkway. A violent death should be expected.
35 - Jade Golem and Grand Inquisitor Jia
Having obtained the
Golem Spirit Shard and killed Master Shin, you're finally granted access to the north area of the fortress. A couple of Lotus Assassins are waiting for you, and it won't be long before they insert your corrupted shard into the nearby Jade Golem. The Jade Golem and all of the Clay Golems linked to it will go berserk and start killing off all of the recruits while also attacking the fortress' very foundation.
When the carnage concludes, Grand Inquisitor Jia will enter the room and recognize you as Master Li's student. After taking off her mask, she'll explain what it is that they do here. Under Emperor Sun Hai's guidance, the Lotus Assassins have been building a massive army of golems. Unfortunately, not every golem was linked to the husk you just corrupted and Jia calls forth the two other Jade Golems in the room to kill you as she escapes to the north.
Along with the two Jade Golems, you'll also be facing Executioner Zogu and Master Gang (if you didn't kill him with the crane earlier). Using your Focus ability is crucial in this battle, as it'll keep you out of harm's way as the golems strike with their massive axes. When you've taken them all out, you will automatically earn the powerful
Jade Golem transformation style and will be free to search the room before heading north to confront Grand Inquisitor Jia.
36 - Scrollstand
The text on this scrollstand is entitled
Text of War. If you have read every other bookstand and scrollstand here in the Lotus Assassin Fortress, you will receive 1000 experience points and the
Legacy of Death's Hand technique.
37 - Chest
Ransack this chest for 1000 silver pieces and a random essence gem (such as a
Monk Gem or
Warrior Gem).
38 - Jar
A negligible amount of silver can be earned by smashing this jar.
39 - Grand Inquisitor Jia
When you reach this area, Grand Inquisitor Jia will march down the stairs before you and you'll find yourself locked in a very tough battle. Not only is she highly skilled with the Tempest style, she can also spawn a damage shield around her that will cause massive damage if you strike her while it's active. Utilize your Focus ability to stay alive long enough to bring her down.
When Jia's body slumps to the floor, you will automatically climb to her throne and claim another piece of the Dragon Amulet. While doing so, Death's Hand will slip into the room through a waterfall behind the throne and Sagacious Zu will make another appearance to save your life. Without going into detail, the end result is that the fortress will begin to collapse and you'll be forced to make a hasty escape.
Before heading toward the fortress' entrance, you will automatically receive a
Gem of Storm's Rage and a
Superior Scholar Gem. If you're playing the PC version of Jade Empire, then you will also receive the
Scale of the Viper plot item. If you sold Fuyao into slavery back on the
Lower Pirate Island, then this will be the last of the three doctrines you needed to collect for the
Viper combat style. If you instead helped Fuyao, then this doctrine really does you no good. If that's the case, you may still be able to earn the final
Iron Palm doctrine by becoming the champion of the
Imperial Arena.
Once you get your bearings again, start heading toward the fortress' exit at area #40. You will have to deal with the Keeper of the Archive and quite a few Lotus Acolytes, Lotus Assassins, and Clay Golems on your way out, so prepare accordingly. If you're playing the PC version of Jade Empire, don't forget about the
Ultimate Warrior Gem at area #15.
40 - Exit
Once Grand Inquisitor Jia has been defeated at area #39, you will be able to escape the fortress through this exit. You'll wind up at area #35 in
The Necropolis.


