 Did we miss anything on this map? Is there something we didn't discover? Let us know!
Whether the Greater Southern Forest is the last or first location you attempt to conquer in Chapter 2, your goal here remains the same - acquire the wind map by solving the mystery of the sickened forest. The ghosts in this forest are very tough, and you'll most likely find the Lost Spirits to be some of the hardest creatures you've had to fight yet in the game. Normal evasion tactics will help, but you'll need to issue quick attacks and use Spirit Thief whenever possible to put the spirits to rest without dying in the process.
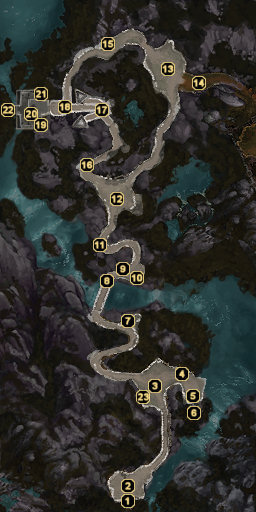
1 - Arrival
Did we miss anything on this map? Is there something we didn't discover? Let us know!
Whether the Greater Southern Forest is the last or first location you attempt to conquer in Chapter 2, your goal here remains the same - acquire the wind map by solving the mystery of the sickened forest. The ghosts in this forest are very tough, and you'll most likely find the Lost Spirits to be some of the hardest creatures you've had to fight yet in the game. Normal evasion tactics will help, but you'll need to issue quick attacks and use Spirit Thief whenever possible to put the spirits to rest without dying in the process.
1 - Arrival
The northern pathway in
Tien's Landing will bring you to the edge of the Great Southern Forset.
2 - Lord Yun
Immediately after entering the sickened forest, you'll be set upon by two Ghosts and a Lost Spirit. When the battle is over, Lord Yun and his men will approach you. When he learns that you need a wind map to reach the Imperial City, Yun offers you a proposal - he'll make you a copy of his wind map if you find out why his land sickens and is overrun by so many ghosts. Listen to what he has to say about the Forest Shadow and Spear Catches Leaf, then accept his offer and continue toward the north.
After slaying The Mother (Open Palm) or the Forest Shadow (Closed Fist), you can return here and report your success to Lord Yun. He gladly hands you a
Wind Map for your troubles, which is accompanied by a 1500 experience point bonus. If you haven't yet bought any of Spear Catches Leaf's merchandise, you can barter with him here before heading back to
Tien's Landing.
3 - More Spirits
When you first arrive in this clearing, you'll have to contend with another Ghost and two more Lost Spirits. Deal with them in the same manner as you did with the spirits near the entrance.
4 - Bones
Search the bones in this area to earn 50 silver pieces.
5 - Bladed Thesis
If you're pursuing the way of the Closed Fist and have the Zither of Discord quest from
Tien's Landing, you'll encounter a spirit called Bladed Thesis here. Though you're Closed Fist, there is actually a way for an Open Palm conclusion. When you learn that he wants to kill Scholar Six Heavens, answer his question but refuse to help, which enrages the ghost to attack. When he dies, you'll gain the
Zither Bridge, which will the last of the pieces needed to assemble the Zither of Discord. Return to
Tien's Landing with this final piece and tell Scholar Six Heavens that you killed Bladed Thesis to protect the weak. This earns you Open Palm points, which might be what you're looking for if you had a change of heart during the quest.
However, it's more likely you came here for the Closed Fist option. There are two, the first providing you with less of an alignment shift. Answer Thesis' question correctly, then refuse to help him as with the Open Palm option above. Return to Scholar Six Heavens after defeating Bladed Thesis and give him the final piece of the Zither of Discord for your promised reward.
Finally, for the most Closed Fist points, when Thesis asks you his question, answer with the second reply about a vain man. When you receive the bridge and give it to Scholar Six Heavens, Bladed Thesis appears and takes the Scholar's soul from him. This will earn you the
Chaotic Strains technique.
6 - Spirit Font
Meditating at a Spirit Font will restore all of your character's Health and Chi.
7 - Bones
This pile of bones contains a pile of silver and a random essence gem (such as a
Flawed Monk Gem or a
Flawed Scholar Gem).
8 - Pilgrim's Rest Inhabitant
As you cross this bridge, a lone man will come running in an attempt to escape two Lost Spirits. After defending him from certain death, the man beckons you to follow him to the
Pilgrim's Rest Inn. His pleas for help are cut off shortly, though, as a Fox Spirit will appear and turn him to stone. She'll then turn you to stone, but luckily your strong will is able to resist the effect. This whole scene isn't really what it appears to be, so don't make any hasty judgments about the Forest Shadow just yet.
In any event, you should still investigate the
Pilgrim's Rest Inn first before heading to the nearby temple.
9 - Headstone
Crush this headstone to find a handful of silver and a random essence gem (such as an
Inferior Charm Gem or
Inferior Intuition Gem).
10 - Headstone
This particular headstone contains 100 silver pieces.
11 - Headstone
Yet another headstone containing a small pile of silver.
12 - More Restless Spirits
This difficult fight is comprised of a couple of Ghosts and two Lost Spirits, with the addition of a Ghost Lord if you're playing the PC version of Jade Empire. Prepare accordingly.
13 - More Restless Spirits
The battle awaiting you here is similar to the previous one you faced, except that you'll have to deal with multiple waves of enemies (including two Ghosts capable of utilizing the Dire Flame style). If you're not careful and don't switch to Spirit Thief from time to time, you might find yourself lying in the dirt before the battle is over.
14 - Exit
These stairs lead up to the
Pilgrim's Rest Inn.
15 - Bones
140 silver pieces can be yours if you search through these bones.
16 - Headstone
Smash this headstone for a handful of silver and a random essence gem (such as a
Monk's Gem of Fate.
17 - The Ritual of Seasons
These switches are part of a ritual designed to open a portal to the Forest Shadow. To begin the ritual, you must first place the
Temple Crystal in the central pedestal. Once it descends into the ground, pull the regular furnace switches to the east and southeast for 200 experience points each.
Once they've been activated, you'll need to pull the two colored switches that Spear Catches Leaf mentioned during your previous conversation (blue and red). Pulling the wrong colored switches and then trying to activate the pedestal again will spawn a group of Lost Spirits that must be dispatched before trying again. This fight can be tough, so try not to pull any wrong switches.
When all the correct switches have been pulled and you've activated the pedestal, a beam of light will stream into the western temple and open a portal to
Heaven. This will earn you 1000 experience points.
18 - Spear Catches Leaf and The Black Whirlwind
When you first approach this area, you'll witness a burly man named The Black Whirlwind eagerly cutting down a handful of ghosts. When he's finished, he'll continue his brutal tirade by turning his attention on you. Reduce him to a minimal amount of health and he'll finally give in.
Once those formalities are out of the way, Spear Catches Leaf will explain that one of the key crystals needed for the ritual at area #17 is missing. This
Temple Crystal is being held by the sinister denizens of the
Pilgrim's Rest Inn and can be acquired with force or by agreeing to the Innkeeper's terms. However you acquire the gem, let Spear Catches Leaf know once you have it and he'll offer some advice on how to solve the puzzle needed to perform the "Ritual of Seasons." When the conversation is over, he will have revealed that you only need to worry about two seasons and the colors that represent them - winter (blue) and summer (red).
After learning all you can about the ritual, The Black Whirlwind will permanently join your party. He's fairly useful and will become an important part of the storyline once you reach the Imperial Arena's final battles later in the game.
Also worthy of note is that you can purchase a number of useful essence gems and techniques from Spear Catches Leaf. This can be done prior to acquiring the crystal or later on at the forest's entrance when you meet up with Lord Yun once again. Some of his more useful merchandise includes a
Slick Gem, the
Hunter's Spirit technique, and the
Legendary Strike style.
19 - Scrollstand
The text on this scrollstand is entitled
The Dragon of Storms.
20 - Focus Shrine
Meditating at a Focus Shrine will restore all of your character's Focus.
21 - Scrollstand
The text on this scrollstand is entitled
Temple Records.
22 - Exit
When the Ritual of Seasons has been completed at area #17, you'll find a portal to
Heaven at the top of these stairs.
23 - Cannibal Caves Escape
If you decided to confront The Mother for the Forest Shadow (or just for the sake of more slaughter), then you'll emerge from the collapsing
Cannibal Caves at this location. Should the Forest Shadow still be alive, she will appear and congratulate you on a job well done. You'll also receive Open Palm points, 1500 silver pieces, and a
Brilliant Gem of Balance.
At this point, you can return to Lord Yun and claim the
Wind Map. However, if the Great Southern Forest was the last of your three main tasks in
Tien's Landing (the Great Dam and Pirate Base being the other two), you'll have to face Inquisitor Lim at this clearing as well. He's accompanied by two Lotus Assassins and two Imperial Guards, so expect a fairly difficult battle. When he's dead, you can snatch up another piece of your Dragon Amulet and continue on your way.
If you've been following the walkthrough, get the Wind Map from Lord Yun and then either speak with either Minister Sheng in Tien's Landing about the flyer, Ru the Boatswain in the Tea House (if you've already spoken with Sheng), or go see Ru at the Tien's Landing docks (if you've already arranged transport to the pirate base with him).


