 Did we miss anything on this map? Is there something we didn't discover? Let us know!
Finally, you've arrived in the Imperial City and are ready to begin Chapter 3. There is a lot to do within the Imperial City, so take your time to experience everything it has to offer. Notable locations in this section of the city are the Imperial Arena and the Blacksmith Shop.
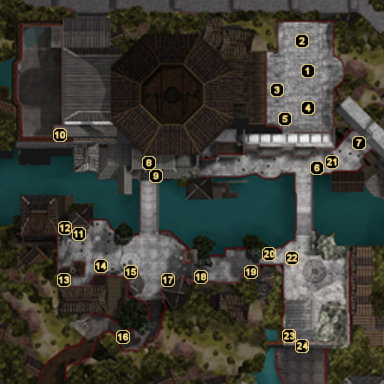
1 - Arrival
Did we miss anything on this map? Is there something we didn't discover? Let us know!
Finally, you've arrived in the Imperial City and are ready to begin Chapter 3. There is a lot to do within the Imperial City, so take your time to experience everything it has to offer. Notable locations in this section of the city are the Imperial Arena and the Blacksmith Shop.
1 - Arrival
Upon your initial arrival in the Imperial City, two Imperial Guards will approach you and demand your name and purpose for being here. When the guards suggest holding you in custody for your resemblance to the one causing so much trouble for Death's Hand and the Lotus Assassins, Princess Lian (Silk Fox) will show up and convince them that you're here on personal business for her.
Once you're free to go, Princess Lian offers some advice about what you should do next. If you're modest in your responses to her, you'll just receive the
Imperial Favor gem and the
Note from Princess Lian at the end of the converstaion. However, if you choose the most insulting response every time it's your turn to speak, Princess Lian's servants will faint one-by-one until none of them are left standing. When Lian finally leaves, a man will approach you and offer you the
Loutish Approval technique in addition to the previous two items.
2 - Follower Campsite
Whenever you visit the Imperial City, this is where your followers will wait for you. I'll offer the same advice as I did back in Tien's Landing - speak to them on a regular basis, as they all have semi-important information for you from time to time. Neglecting your followers
will result in missed side quests and the lack of any sort of follower romance. If you want to experience everything the game has to offer, make sure you chat with each and every follower after any major plot developments in the game.
Aside from learning about Hou's brutal wife, The Black Whirlwind's bloody diplomacy skills, and Wild Flower's inner struggles (which can lead to the addition of Ya Zhen to your available followers), you'll be able to participate in a rewarding side quest for Kang. It begins when you learn that he whipped up a wind map on his way here that apparently leads to some sort of clue that he previously left for himself. If you agree to explore where it leads, you'll participate in Kang's first
Flyer Mission. When it's finished, Kang will have built a lever called the Confoundable Minutia. Activating it immediately transports you to a heaven containing
Lord Lao's Furnace.
In your attempt to figure out Lord Lao's Furnace, you can talk with Kang about where to find the various configurations needed to make it work. He'll scribble a handful of notes for you, including the
Transcribed Gear Etchings,
Transcribed Post Carving,
Interpreted Furnace Movement, and
Patched Together Note. Which note you receive depends on your progress through the Imperial City, so keep checking back with Kang as you accomplish the city's various milestones.
After you've obtained either the
Lotus Executioner Seal or
Lotus Inquisitor Seal, you can return here to bring your followers up to speed. At this point, you can either pursue recognition with the other recruiter or you can head directly to the
Lotus Assassin Fortress. Whatever you decide, you'll discover that Sagacious Zu has snuck away from the campsite. You won't be seeing him again until you've started infiltrating the fortress.
Later, after you've infiltrated the fortress and slain Grand Inquisitor Jia, you can return here to report your findings to the rest of your followers. Your next task is to fire up the Marvelous Dragonfly and head to the
Imperial Palace, but keep in mind that you won't ever be coming back here. Therefore, you should clean up any pending quests here in the Imperial City and talk with all of your followers again before leaving.
3 - Lotus Inquisitor
Once you've spoken to Scholar Dongow about the Lotus Inquisitor recruiter in the
Scholars' Garden, you can return here for your one-on-one meeting with the facially scarred assassin. He'll tell you that you must perform a test for the Lotus Assassins to prove your loyalty. Apparently Judge Fang of the Ministry of Harmony wants nothing more to expose the Lotus Assassins and now Minister Sheng (of
Tien's Landing fame) is bringing a report that reveals some of the group's activities. The Lotus Assassins are concerned that Judge Fang will have the evidence he needs to cause real problems if Sheng's report makes it into his hands. Therefore, your test is simple - prevent Sheng's report from being delivered to Judge Fang.
There are a few ways that you can accomplish this task, though the Inquisitor warns that execution is not their style - they leave that to the Lotus Executioners. Instead, their philosophy is that disgrace is far worse than death. Sheng is staying in a new Ministry hostel in the
Golden Way and Judge Fang is commonly found watching the battles in the
Imperial Arena, so you'll want to pay a visit to either of those areas to carry out the Inquisitor's task.
When the conversation is over, Henpecked Hou shares a plan that he's come up with. Hou knows that Judge Fang will be expecting an honor gift from Minister Sheng, so he suggests that you replace the gift with something insulting. He provides you with some
Turtle Eggs for this purpose, convinced that Fang will be so outraged when he sees them that he'll refuse to even look at Sheng's report. If this method doesn't interest you (as it will earn you Closed Fist points), you can also stop by the
Imperial Arena and convince Gentle Breezes to help you obtain
Fang's Resignation.
As long as you keep the report from reaching Judge Fang and don't wind up killing anyone in the process, the recruiter deems your mission a success and awards you with the
Lotus Inquisitor Seal needed to access the
Lotus Assassin Fortress through the hidden entrance in
The Necropolis. If you took the resignation route, then you will also gain Open Palm points when the recruiter decides to replace Judge Fang's position with Minister Sheng.
4 - Mechanic Hin Goo
Hin Goo doesn't show up until you've caught the eye of the Lotus Assassins. Once he does, speak with him to learn that he supplies upgrades to people with flyers. He's ran into some trouble attaining parts, though, and needs your help tackling a few
Flyer Missions.
Hin Goo's missions are totally optional, but they will earn you a considerable amount of experience, thousands of silver, and access to powerful flyer upgrades. Therefore, it's a good idea to hammer through them when you get a chance.
5 - Bai the Outcrier
Bai is a friendly man with a fascination for flyers and a good sense of the Imperial City's layout. If this is the first time you've visited the Imperial City, then Bai will fill you in some of the notable locations and people in the illustrious capital.
6 - Lotus Assassin
This Assassin is attempting to recruit the aid of the Imperial City's citizens in order to track down the "Scourge of the South." This menace is actually
you, though luckily the Lotus Assassins know little about what you actually look like.
7 - Imperial Captain Sen and General Stone Kao
Sen is looking for some help in tracking down some "criminal scum." Both of these criminals have a bounty on their heads, so it's worth your time to at least hear what he has to say. Fading Moon is an arsonist that Sen tells you was last seen heading into
The Necropolis, while Creative Yukong is a notorious confidence man that has virtually disappeared. To begin searching for Yukong, Sen recommends that you speak to Lady Rento in the
Imperial Arena, since her husband is the last man that Yukong bilked.
During the course of your investigation, you'll come across Creative Yukong in the
Scholars' Garden and will learn that he's actually innocent. This will offer you a chance to take a few different Open Palm/Closed Fist routes, all of which have different silver rewards. Fading Moon is hiding out in
The Necropolis, as expected. When you've killed her, Sen will give you 2000 silver pieces as a reward and you'll earn 300 experience points.
If you haven't yet been to the
Black Leopard School, then you'll be approached by an old man at area #21 about a third bounty. If you wind up killing Aishi the Mournful Blade at the school, then you can return to Captain Sen for a 2500 silver piece reward, a
Gem of Mastery, and no alignment shift.
However, if you listen to Aishi's story, then you can bring her to Captain Sen so that she can avenge a long-dead boy. At this point, you can either protect Captain Sen for 5000 silver pieces (the coward doubles the bounty), the
Gem of Mastery, and Closed Fist points. If you'd rather pursue the opposite route, you can let her kill Captain Sen and then give her the honorable death she wants afterwards. This will get you a meeting with the Old Man again, where you'll earn a different reward and Open Palm points.
You won't run into General Kao unless you've agreed to Iron Soldier's proposal in the
Imperial Arena. If that's the case, then you can either kill him (as Soldier requested) or let him live. The latter approach puts an end to any negotiations you had with Soldier, so make sure you kill the General if you want a free shot at the Silver Division championship and some extra silver to boot.
8 - Imperial Arena
Pass through these double doors to reach the
Imperial Arena.
9 - Vase
Smash this vase to find a small pile of silver.
10 - Bamboo Cask
The bamboo cask sitting at this dead end contains a random essence gem (such as a
Charm Gem or a
Gem of Gentle Mind) and the
Configuration of the Dragon.
11 - Ren Feng
Ren Feng is the wife of Ren Ming, whose ghost now lies restless within
The Necropolis. If you've learned that Ren Ming believes that his wife poisoned him, you can come here and speak to her about the situation. If you just want to earn a few Closed Fist points, you can kill her right here and now. Otherwise, listen to her story to learn that she had bought some salmon and fed it to her husband on the same day that he died. The salmon must have been rotten and he died as a result.
She feels very guilty for what has happened, so you can offer to travel with her to Ren Ming to try and explain the situation to him. How the meeting goes is ultimately up to you, though.
12 - Vase
Smash this vase to find a small pile of silver.
13 - Bamboo Cask
This cask contains a
Gem of Foresight.
14 - Prefect Jitong, Chandler Ling, and Scholar Songtao
These three don't show up until you've caught the eye of the Lotus Assassins. Once you are able to speak with them, Jitong will tell you that it is his duty to ensure that convicted criminals are sentenced accordingly. He currently has two men in his custody - Chandler Ling and Scholar Songtao. Chandler Ling is a suspected slave trader, but a high ranking minister is trying to get him released. The minster wants Scholar Songtao charged with the crime, even though Jitong knows that he's innocent.
Your task here is to either find proof of Chandler Ling's guilt (Open Palm) or figure out a way to frame Scholar Songtao for the crime (Closed Fist). To begin either route, you need to speak with Zi Bao in the
Imperial Arena. Depending on whether or not you accepted Cao Zeng's offer, you'll be returning here with the
Slaver Documents or
Forged Slaver Documents. The former exonerates Songtao, while the latter frames him for a crime he didn't commit.
If you free Songtao, you'll earn some Open Palm points, 800 silver pieces, an
Aura of Calm Gem, and the ability to peruse his shop in the
Scholars' Garden. If you convict Songtao, you'll gain Closed Fist points and Chander Ling will give you a
Gem of Seductive Power. He'll also promise you a reward of silver (500) and a discount on his goods when you come to see him in the
Golden Way.
15 - Junda and Lina
It's pretty obvious that Junda and Lina are husband and wife. These two bickering bun-sellers will provide you with some basic information about the Imperial City and the surrounding area. Unless you really want to hear their banter, though, there's no real reason to even speak to them.
16 - Exit
Continue down this pathway to reach the
Black Leopard School.
17 - Blacksmith Shop
The mysterious blacksmith works away in a cloud of billowing smoke all day, so you won't ever actually get to lay eyes on him. He will tell you a bit about the
Black Leopard School through the slightly opened door, though, and offer a selection of items for sale. Included in his stock is the
Dragon Sword combat style, the
Warrior's Gem of Forethought essence gem, the
Craftsman's Litany technique, and
A Bar of Nickeled Iron.
Additionally, if you sacrificed yourself to save Mad Wen Zhi's daughter from the diseased liver in
The Necropolis, you'll be able to meet up with the two of them outside the blacksmith's shop. As a reward, Wen Zhi will teach you the
Theories of Medicine technique. You'll also earn 400 experience points.
18 - Vase
Smash this vase to find a small pile of silver.
19 - Tanner Fong
After you've dealt with the first three restless spirits for Gravedigger Shen in
The Necropolis, you'll be sent here to deal with a fourth. Tanner Fong's father supposedly died and was buried, but now he has returned home and his son wants you to get rid of him.
When you speak with the "elder" Tanner Fong, though, you'll realize that he is still alive. His son is just claiming that he's dead so that he can take over the tannery and have all his father's money. As with most of the other side quests in this game, there are multiple solutions to this problem. If you're looking for Closed Fist points, the quickest resolution is to just kill the elder Tanner Fong so that he'll never pester anyone again. This earns you 500 silver pieces from his son. For even more Closed Fist points (but no reward), you can have the two talk things over and then decide that you're going to kill them both. Evil.
If you'd rather follow the Open Palm route, you can convince elder Tanner Fong to talk things over with his son. When the son says that he never thought his father loved him, you can take either of side of the debate and, with a successful Intuition check, they will see the error of their ways. This still gets you a 500 silver piece reward.
There are a couple of other methods to handle this quest, so play around with it a bit if you want. For example, you can earn more of a reward with an Intimidation check or you can even bring the father and/or son to Gravedigger Shen. This can lead to elder Tanner Fong lying low for awhile or you can simply massacre all three of them. The choice is yours.
20 - Bookstand
The text on this bookstand is entitled
The History of Flight, Volume 4.
21 - Old Man
Once you've rounded up the first two criminals for Imperial Captain Sen at area #7 (and have yet to visit the
Black Leopard School), you'll be approached by an "Old Man" here who tells you about a third bounty. He goes on to explain that a woman called Aishi the Mournful Blade is wanted for "murder, theft, and worse" and is currently making her residence at the
Black Leopard School. Aside from sharing this small bit of information, the old man is particularly mum about the whole situation. He claims to just want to see some good come from the bad.
If you end up listening to Aishi's story and help her kill Captain Sen, then the Old Man will be waiting for you once again when you return. He reveals that he is Aishi's dead father and awards you with 2500 silver pieces and a
Gem of Unity. You'll also gain some Open Palm points for letting Aishi avenge the boy's death.
22 - Jinlin
Once you've acquired the
Lotus Executioner Seal or
Lotus Inquisitor Seal, you'll come across a young girl named Jinlin being scolded by a robed man named Purveyor Shouji. Apparently the girl's father owed the man some money and now the purveyor demands that the little girl travel into
The Necropolis and fetch an artifact from an emperor's tomb for him. If she doesn't retrieve the artifact, he plans to sell her mother to the slave traders to settle the debt.
The little girl doesn't ask for your help, but it's pretty tough to let her take on a dangerous task like this alone. If you have the time and are interested in a little extra experience and loot, then tell the girl that you'll help her obtain the artifact and start making your way to the northern end of
The Necropolis.
23 - Bookstand
The text on this bookstand is entitled
Guide to the Imperial City.
24 - Exit
This gate leads to the Imperial City's
Golden Way.


