 Did we miss anything on this map? Is there something we didn't discover? Let us know!
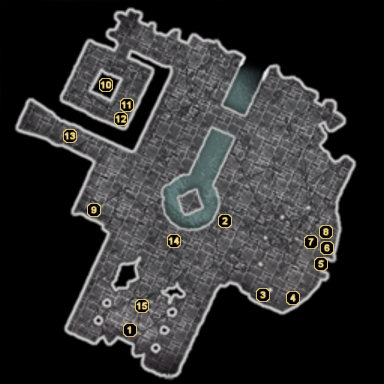
Chapter 6 begins with your return to the mortal world. This version of the Temple of Dirge offers a lot more to do and is a lot more rewarding than it was when you were dead, so make sure you explore it in its entirety.
1 - Arrival
Did we miss anything on this map? Is there something we didn't discover? Let us know!
Chapter 6 begins with your return to the mortal world. This version of the Temple of Dirge offers a lot more to do and is a lot more rewarding than it was when you were dead, so make sure you explore it in its entirety.
1 - Arrival
Making good on her promise, the Water Dragon has resurrected you, bringing you from the
Temple of Dirge in the spirit world to the very same temple in the mortal world.
The portal you passed through did not seal quickly enough, though, and maddened Horse Demons have followed you into the mortal world. Two of the demons initially show up, but more will follow as they're slain. To keep the demons from coming through, you can focus your attacks on the targetable "Disturbance" near the portal. However, if you keep battling the Horse Demons without closing the portal, you'll find that the tenth demon that passes through is a more powerful "Ancient Horse Demon." Defeating this creature will automatically kill off the rest of the demons and immediately close the portal. You will also be awarded the
Bone Splinter technique, should you take this route.
2 - Decaying Bodies
Sift through these corpses to find the
Replenishment of the Mind technique.
3 - Statue of Mah Tsung
Once you've obtained all five
Pages from the Tome of Release, you can visit either this statue or the Heavenly Gate Guardian statue to perform the ritual revealed within its text. If you choose this statue, then you will be releasing the spirits of the cursed Imperial Soldiers in order to grant them peace. This earns you some Open Palm points and a new technique called
The Turning Wheel.
4 - Bookstand
The text on this bookstand is entitled
Mantra of Inspiration. Reading it adds the
Mantra of Inspiration plot item to your inventory.
5 - Heavenly Gate Guardian Statue
Once you've obtained all five
Pages from the Tome of Release, you can visit either this statue or the statue of Mah Tsung to perform the ritual revealed within its text. If you choose this statue, then you will be severing the spirits of the cursed Imperial Soldiers from the Wheel of Life. This earns you some Closed Fist points and a new technique called
The Broken Wheel.
6 - Chest
156 silver pieces lie within this chest.
7 - Decaying Body
Search this body for 100 silver pieces.
8 - Bones
These bones contain one of five
Pages from the Tome of Release.
9 - Bookstand
The text on this bookstand is entitled
The Journal of Abbot Song.
10 - Well Lid
This well cover blocks the escape route your guardian used when you were an infant.
11 - Chest
The
Machined Cogs needed for the Meditation Wheels in the
Temple Courtyard are contained within this chest.
12 - Vase
Smashing this vase earns you 200 silver pieces.
13 - Exit
While you don't technically zone into a new area by leaving the temple (like you would have in the spirit world), we've chosen to cover the
Temnple Courtyard separately.
14 - Death's Hand
During your second day at Dirge, Sky will ring the temple's bell to call your attention inside. He'll tell you that "the trap is set, the signal sent", after which he explains that the Lotus Assassins approached him to betray you. He let them think he was willing to turn you over to them and has arranged for Death's Hand and a small contingent of Lotus Assassins to intercept you here in the temple. In an honorable move, though, he has placed several of Kang's explosive casks as a trap to kill off all of the assassins - leaving Death's Hand solo and vulnerable to your fighting skills.
Sky's trap works as planned. Falling debris wipes out all of the Lotus Assassins accompanying Death's Hand and you'll finally get to face the "will of the Emperor" in a one-on-one battle.
Death's Hand is a formidable foe, but he is certainly beatable. If you combine your Focus ability with a flurry of Chi-enhanced attacks from your favorite combat style, he won't prove to be all that difficult. The Jade Golem transformation style will also do a number on him, if you're proficient with it. Once slain, you'll be offered the chance to decide his fate at area #15.
15 - Sun Li and the Fate of Sun Kin/Death's Hand
Once Death's Hand has been defeated, Sun Li will show up and explain how and why Sun Kin was bound to his old armor. Because he is linked to the stolen power of the Water Dragon, Death's Hand is undefeatable. With a single command, Sun Li causes your fallen foe to rise up once again.
At this point, you can either make a successful dialogue check to convince Sun Li that further combat is unnecessary (for 100 experience points) or you can challenge him for control over Death's Hand. If you choose the latter route, then you will find yourself in a mental struggle with Li. The struggle pits Death's Hand (Li) against Prince Kin (you), with the victor assuming control over the spirit-bound armor.
You don't technically have to win this battle, but doing so cuts the strings to Li's puppet and provides you with two options. For Open Palm points, you can release Prince Kin from the armor and grant him peace. This earns you the
Way of the Open Palm essence gem. For Closed Fist points, you can bind Death's Hand to your will and utilize him as one of your followers. This route earns you the
Way of the Closed Fist essence gem.


