 Did we miss anything on this map? Is there something we didn't discover? Let us know!
Sun Li's army of Siege Golems, Jade Golems, Clay Golems, and Lotus Assassins are quickly approaching the temple's courtyard. You must assume control of your followers and cut off the army's advance so that your primary character has time to deal with the Glorious Strategist and Death's Hand.
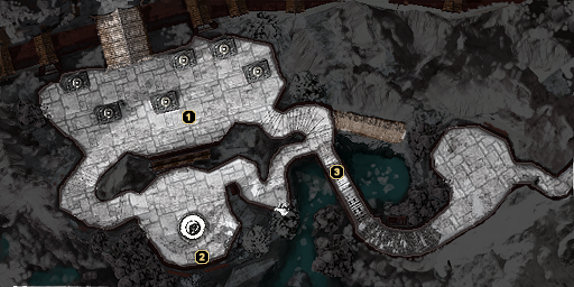
1 - Fortification Discussion
Did we miss anything on this map? Is there something we didn't discover? Let us know!
Sun Li's army of Siege Golems, Jade Golems, Clay Golems, and Lotus Assassins are quickly approaching the temple's courtyard. You must assume control of your followers and cut off the army's advance so that your primary character has time to deal with the Glorious Strategist and Death's Hand.
1 - Fortification Discussion
After awakening to the sound of war drums in the
Temple Courtyard, you and your followers will meet here in the outer courtyard to discuss your next course of action. For reasons unknown to you at the time, Sky will show up late after wandering off to check on the army's advance.
Eventually, the lot of you will decide that everyone needs to spread out - Dawn Star and Silk Fox will accompany Kang to the bridge for some explosive action, The Black Whirlwind and Henpecked Hou will take out any invaders in the courtyard, and Sky will be planting explosives in the temple itself (more about this later). You'll also have the option to take the Marvelous Dragonfly up for a flight designed to make a dent in the army before it even reaches you. This optional
Flyer Mission is pretty difficult and features one of the toughest flyer "bosses" in the game, so keep this in mind if you participate in it.
2 - Hidden Urn
Once you have control of either Dawn Star or Silk Fox, guide them back behind this fountain to discover a hidden urn. Inside is a more powerful version of the character's weapon style - Dawn Star receives Thorn and Shining Carp while Silk Fox receives Blade of the Broken Bough.
3 - Bridge Defense
The plan is to destroy this bridge so that a large portion of the Imperial Army cannot reach the temple. When you arrive, Kang will already have started wedging casks of dragon powder around it. Imperial Soldiers and Lotus Assassins will begin pouring in from the south side of the bridge, though, so you must utilize Dawn Star and Silk Fox to keep them away from Kang while he does his explosive work. Initially, the defense is only supposed to last a minute, but you'll wind up going for a full two minutes after one of the fuses comes loose.
The defense itself is pretty easy. If you picked up the new style from the hidden urn at area #2, then you'll find that almost every single foe you face dies in one or two hits. When the two minutes finally runs down, Kang will have finished his task and the bridge will explode just as a Siege Golem reaches the south side. With this task complete, you can exit through the gates to the north and assume the role of The Black Whirlwind within the
Temple Courtyard.


