 Did we miss anything in this section? Is there something we didn't discover?
Let us know!
Background
Did we miss anything in this section? Is there something we didn't discover?
Let us know!
Background
You'll receive this quest from Shani when you arrive at the Outskirts of Vizima (#1).
Walkthrough
To learn about the Salamandra, you'll first have to gain the trust of the people in the Outskirts of Vizima. To do this, you'll need to talk to the Reverend (#2) and get the
Eternal Fire Signet Ring from him, and then you'll need to complete quests for the Reverend, Haren (#3), Mikul (#4), and Odo (#5):
- Reverend. The Reverend's quest involves lighting the five Eternal Fire Shrines in the village. This is covered in the quest entry for
Of Monsters and Men.
- Haren Brogg. For Haren's quest, you'll need to protect his cargo from drowners. This is covered in the quest entry for
Strangers in the Night.
- Mikul. For Mikul's quest, you'll have to kill the "dead'uns" in the crypt. This is covered in the quest entry for
Buried Memories.
- Odo. Odo will ask you to help with his "gardening problem." This is covered in the quest entry for
Secret Garden.
Note: Completing these four quests will cause some changes in the village. Abigail will go into hiding (she'll go to the cave south of the village, but you won't be able to do anything with her there until later), Alvin will move in with the Reverend, and all of the inn shopkeepers (including the ones outside) will disappear, which means that you'll lose most of the places where you can sell things. So you might want to do some shopping before proceeding.
Another Note: If for some reason you can't get the
Eternal Fire Signet Ring from the Reverend, you can also acquire it from an old
beggar woman in the southern part of the village (#8). She'll trade you the ring
for some
White Gull, but only if you don't already have the ring.
Once you've completed all of the necessary quests, when you return to the Reverend, he'll tell you that the Salamandra are hiding out in one of the houses in the village (#7), but that you'll have to talk to Olaf in the inn (#6) to get the key. When you reach the inn, you'll find Olaf dead and Shani surrounded by five troublemakers. You'll have to kill the troublemakers (group style should make short work of them), and afterwards you'll find a key on Olaf's corpse.
You'll have to do more fighting at the hideout. Outside, a pair of lackeys will attack you, and inside, you'll get jumped by three lackeys and a boss. Once you've completed the battles, you should notice a trap door in the hideout. The first time you click on it, you'll witness a cut scene where Geralt will recognize the goods in the hideout as having come from Haren. The second time you click on it, you'll descend into a cave (provided you got the key from Olaf).
Inside the cave you'll encounter a few more Salamandra thugs, including another boss. The boss will talk to you for a bit before the fight starts, and among other things you'll learn that Berengar was involved with the Salamandra in some way, and that the Reverend sent Alvin to be used in the Salamandra's mutagen experiments. Unfortunately, you'll also learn that the mutagens have already been moved to the Salamandra base in Vizima, but after the battle when you loot the corpses and containers in the cave, you'll still find some useful things:
The Book of the Tawny Owl,
Diamond Dust, and a
Blue Meteorite.
Also, Alvin will come up to you after the fight, and he'll point out that part of the wall looks weak (you'll probably need to quaff a
Cat potion or wield a
Torch to see the weak spot yourself; it's located in the southeastern corner of the cave). When you use Aard on the wall, you'll break it down, and you'll find yourself in the cave south of the village -- with Abigail, and with an angry mob waiting outside.
Dealing with the mob is covered in the quest entry for
Of Monsters and Men. Regardless of the decisions you make, you'll end up with a
Letter of Safe Conduct from the Reverend (he'll either give it to you, or you'll collect it from his corpse). Then after picking up Shani at the inn, when you arrive at the Mill Gate (Exit A), you'll be arrested and tossed into jail, and that's how the quest (and the chapter) will end.
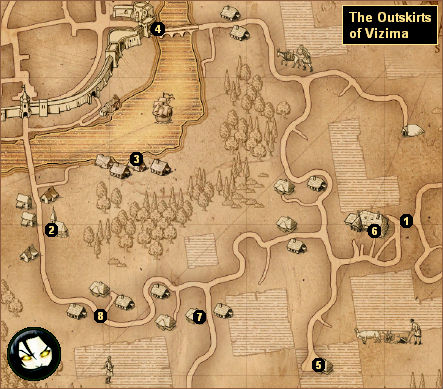
1 - Eastern Gate
2 - Reverend
3 - Haren
4 - Mikul
5 - Odo
6 - Country Inn
7 - Salamandra Hideout
8 - Beggar Woman
Exits:
- Mill Gate.


