 Did we miss anything in this section? Is there something we didn't discover?
Let us know!
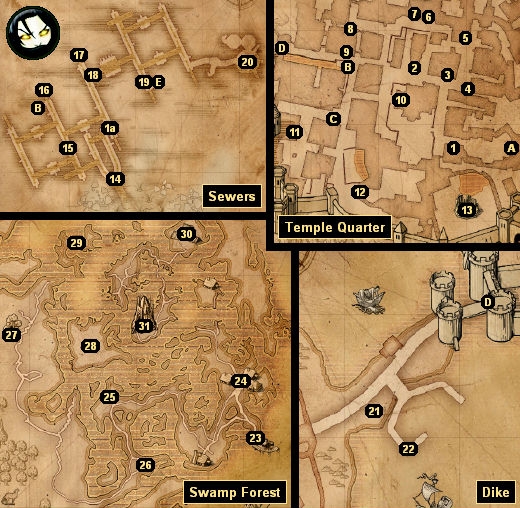
Walkthrough
1 - Prison
Did we miss anything in this section? Is there something we didn't discover?
Let us know!
Walkthrough
1 - Prison
You'll meet Jethro in the prison. You won't have to give him any
Fisstech to talk to him in this chapter. He'll update the quest
Following the Thread and give you the quest
The Viziman Connection.
2 - House
Inside this house on the upper floor you'll find a
Silver Signet Ring. Signet rings of this sort (without a proper name attached) don't serve any purpose, and so you can sell any you find.
3 - Angus' House
Angus' house is involved in the quest
Following the Thread.
4 - Grandmother's House
The first time you enter this house, the old lady who lives inside will probably throw you out, but if you try again, she'll allow you to stay inside, provided that you don't talk to her. The house is involved in the quest "Medic in Distress" (see #10).
5 - Shani's House
Shani will stick to her house in this chapter. She's involved in the quest
The Source.
6 - Kalkstein's House
You won't find Kalkstein here. Instead, he'll be in the mage's tower in the Swamp Forest (#31). In the house's cellar you'll find a teleporter, which can take you to a few places, including Triss' bedroom (in the
Trade Quarter) and the mage's tower.
7 - Vivaldi's House
Yaevinn will start out in the Druids' Grove in the Swamp Forest (#27), but after the quest
Gold Rush, this is where you'll find him.
8 - Kidnappers' Hideout
The hideout is involved in the quest
The Source.
9 - Dentist's House
In Chapter II this house belonged to Raymond Maarloeve, but with Maarloeve and his family dead and gone, the house now belongs to the dwarven dentist Zahin Schmartz. However, Schmartz belongs to the Zoltan Chivay school of physical exercise, which requires him to spend his days wandering around the streets of the Temple Quarter, and so you might need to track him down to talk to him. When you do find Schmartz, he'll give you the quest
Won't Hurt a Bit.
10 - Hospital
At noon a "distressed nurse" will leave the hospital through the front door and loiter around outside (near the Gardener) for a while. If you talk to her during this time, then she'll give you the quest "Medic in Distress." She'll tell you that something is going on at her grandmother's house (#4), and that her grandmother won't let her go in the cellar. When you go to the house at night, you'll discover the problem -- there's a fleder in the cellar. After killing the fleder, when you return to the nurse, she'll reward you with 50 orens and 2000 experience points.
11 - Eager Thighs Brothel
After you've talked to Carmen in the Swamp Forest (#23), this is where you'll find her.
12 - Order Cloister
You'll find Siegfried here during the day, training his troops. He'll give you the quest
Six Feet Under, and you'll have to choose between him and Yaevinn (#27) during the quest
Gold Rush.
13 - Cemetery
The Cemetery and its attached crypt are a good source for undead creatures -- ghouls, alghouls, fleders and graveirs -- which makes it useful for this chapter's
Contracts. The Cemetery is also involved in the quest
Six Feet Under.
You won't have to do anything to enter the Cemetery in this chapter; its gates will start out unlocked.
14 - Transfer Point
You'll have to fight a battle against the Salamandra here during the quest
The Viziman Connection.
15 - Drop-Down Point
This is where you'll end up if you go through the grate in the Temple Quarter (Exit C).
16 - Crypt
This crypt is a good source of graveirs, which you might need for the
Graveir Contract.
17 - Salamandra Base
You'll infiltrate this base during the quest
Following the Thread.
18 - Locked Gate
There are two keys that can unlock this gate. You'll find one during the quest
Following the Thread, and you'll find the other on a corpse in the eastern part of the Sewers (#19).
19 - Corpse
You'll find a key on this corpse. It unlocks the gate to the west (#18). You might also notice a corpse behind the gate just to the south. There isn't any way to unlock the gate, but if you move the camera just right you can loot the corpse. You'll find another key on this corpse, but as far as we can tell it doesn't unlock anything.
20 - Elven Ruins
You'll encounter a few undead creatures in the ruins, including an alp. You'll also find some
Diamond Dust, a
Vodon Rune Stone, and a Circle of the Vengeful Flame, which will give you (or temporarily improve) the Igni sign when you click on it.
The ruins are involved in the quests
Echoes of Yesterday and
Gold Rush.
21 - Desperate Merchant
The Desperate Merchant will give you the quest "The Ring." He'll tell you that his uncle was killed in the Swamp Forest near the Shrine of Melitele (#25), and that he was carrying a
Family Ring at the time, which the merchant would like to get back. You'll have to kill several bloedzuigers to loot the uncle's corpse, but when you pick up the ring you'll earn 500 experience points, and when you give it to the merchant you'll get 100 orens and 2000 experience points more.
22 - Ferryman
For 5 orens, the Ferryman will take you to the landing in the Swamp Forest (#23).
23 - Landing
You'll find the Ferryman at the landing. For 5 orens he'll take you back to the dock at the Dike (#22).
When you first arrive in the Swamp Forest, you'll also meet Carmen here. She'll give you the quest
Beauty and the Beast, and then she'll head back to the Eager Thighs Brothel in the Temple Quarter (#11).
24 - Brickmakers' Village
You'll meet Vaska here again. She's involved in the quest
Reaping Time.
25 - Shrine to Melitele
26 - Cave
This cave is involved in a few quests, including
A Lost Lamb,
Diplomacy and Hunting, and
Reaping Time. You'll also encounter several cockatrices in the cave, which you'll need for the
Cockatrice Contract.
27 - Druids' Grove
When you visit the Druids' Grove in Chapter III, you'll find the same people here as in Chapter II, but with two exceptions:
- The Hierophant. The Hierophant is involved in the quests
Beauty and the Beast and
Diplomacy and Hunting. He's also a professional dice poker player (see the quest
A Game of Dice for details).
- Yaevinn. Yaevinn will be back here now that the Salamandra have kicked the Scoia'tael out of the swamp. He'll give you the quest
Echoes of Yesterday, and you'll have to choose between him and Siegfried (#12) in the quest
Gold Rush.
28 - Voref
This is where the trophy wolf Voref starts out, but he'll wander around and so you might need to hunt around for him for a bit to find him. We've also heard people claim (and other people dispute) that he'll only show up after you've completed the quest
Diplomacy and Hunting.
Voref shouldn't be too tough to kill. He'll only have regular wolves with him, and you'll only get 1 experience point for killing him. But Voref will drop a
Wolf's Head when he dies, and when you take this trophy to the royal huntsman (in the
Trade Quarter), he'll reward you with 600 orens and 5000 experience points.
29 - Moa / Wyvern Island
You'll find the trophy wyvern Moa on this island surrounded by a handful of royal wyverns. Some regular wyverns will drop by as well. The best way to deal with the wyverns is the same now as it was in Chapter II. Try to draw them to you one at a time, because they're pushovers when you attack them one-on-one (since your attacks will disrupt their attacks), and they can cause a lot of damage otherwise. Moa herself isn't too bad. We took a
Swallow potion before the battle and we regenerated faster than she could damage us, and so it was just a matter of wearing her down.
When Moa dies she'll drop a
Head of a Wyvern Female, and when you take it to the royal huntsman (in the
Trade Quarter), he'll reward you with 600 orens and 5000 experience points.
30 - Camp
Instead of Scoia'tael here, you'll find a bunch of Salamandra thugs. You'll need to defeat this base during the quest
Diplomacy and Hunting.
31 - Mage's Tower
This is where you'll find Kalkstein in this chapter. You'll also find a teleporter here, which can take you to places like Triss' bedroom (in the
Trade Quarter) and Kalkstein's laboratory (#6).
Exits:
- Gate to the
Trade Quarter.
- Gate between the Temple Quarter and the Sewers.
- Grate to the Sewers. If you go through the grate, you'll drop down into the Sewers (#15). This is a one-way exit.
- Gate between the Temple Quarter and the Dike.
- Gate to the
Trade Quarter.


