 Did we miss anything in this section? Is there something we didn't discover?
Let us know!
Background
Did we miss anything in this section? Is there something we didn't discover?
Let us know!
Background
Leuvaarden will give you this quest at the end of the quest
A Posh Reception (#1).
Walkthrough
This quest will start out as an overview quest. After completing the quests
Following the Thread,
The Viziman Connection,
Reaping Time, and
Diplomacy and Hunting, you'll end up with an
Encrypted Document and a
Key to Salamandra Code. When you give these items to Leuvaarden, he'll reward you with 500 experience points, and he'll tell you to return the next day. However, you don't actually have to wait that long; just exit and then re-enter the inn, and Leuvaarden will be happy to see you.
When you talk to Leuvaarden this time, he'll tell you that he's discovered the location of the third and final Salamandra base -- right here in the
Trade Quarter. The only problem is that it is "beyond the supervised zone," and so you'll need to find a friendly city guard officer to let you through. Leuvaarden will then give you the code phrase to recognize the right officer: "The lily has yet to be engulfed by flames."
Of course, when you enter exit the inn and explore the
Trade Quarter, you'll discover that there are several officers patrolling its streets, and so you'll have to keep talking to them until one recognizes the code phrase. This part of the quest is random; you'll always find the right officer on the third try.
Leuvaarden's officer will tell you to meet him in the
Sewers (#2) at midnight, at which point he'll open up a route into the northern part of the
Trade Quarter (Exit B). You'll find the Salamandra base to the north (#3). Inside, you'll witness Salamandra officers using a
Seeing Stone to activate a magical mirror and speak to somebody named Radovid. Radovid will refuse their request for money, and then they'll hear you and attack. You'll have to fend off three Salamandra officers and one mage, but they'll rush right up to you, and so you should be able to dispatch them quickly using your steel sword and the group style.
Note: The mage should drop a
Power Stone when he dies. You'll need such a stone in the quest
The Unforgiven, but if you don't pick it up here then you'll be able to get another one later.
After the battle, when you talk to Radovid, he'll applaud your swordplay, and he'll claim that while he was once allied with the Salamandra, that is no longer the case. "I thought to use them as a tool, but I changed my mind." Then Radovid will disappear and the mirror will go silent, and when you pick up the
Seeing Stone, you'll decide that you should take it to Triss and Leuvaarden.
Note: If you go down into the cellar of the base, you'll meet up with a few Salamandra assassins, and you'll find some rings in a trunk.
When you exit the base, you'll witness a long cut scene where a werewolf will attack some Salamandra thugs before turning its attention to you. After skirmishing with the werewolf for a bit, you'll start up a conversation with it, and you'll learn that it is none other than Vincent Meis. Meis will tell you that he's been using his powers to hunt down Salamanders and other lowlifes, and you'll have to make a choice: to allow him to continue his hunt (and perhaps cure him later), or to kill him.
This decision will mostly influence the quest
Beauty and the Beast (since Meis is the "beast" in that quest), but it will impact the quest
Identity as well, and you should check those two quest entries to see the ramifications of your choice. Regardless, after dealing with Meis, you'll find yourself in a new part of the
Trade Quarter (#4), in an isolated area east of the Salamandra base (#3). To escape this area, you'll have to enter the Old Forge (#5), which will lead you back to the
Sewers (#6).
Note: The stairs to the cellar in the Old Forge can be tough to spot. You'll find them behind the counter.
Back in the
Trade Quarter, when you return to Leuvaarden in the New Narakort Inn (#1), he'll recognize that the
Seeing Stone is magical, and he'll refer you to Triss. Triss meanwhile will require some time to study the stone, but after you've exited and then re-entered the inn, she'll tell you that the Salamandra's influence has spread too far, and that "We're no longer able to face them ourselves." This ominous announcement will complete the quest but trigger a new one:
The Unforgiven.
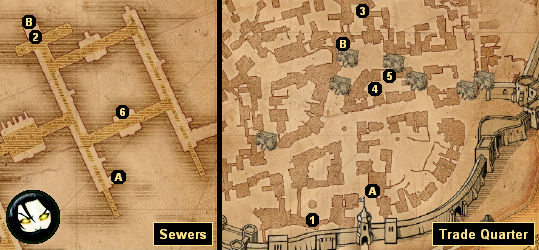
1 - New Narakort Inn
2 - Meeting Place
3 - Salamandra Base
4 - Werewolf Encounter
5 - Old Forge
6 - Old Forge Cellar Exit
Exits:
- Gate between the
Sewers and then main part of the
Trade Quarter.
- Ladder between the
Sewers and the northern part of the
Trade Quarter.


