 Did we miss anything in this section? Is there something we didn't discover?
Let us know!
Background
Did we miss anything in this section? Is there something we didn't discover?
Let us know!
Background
If you decided to support the Scoia'tael, then Zoltan Chivay will give you this quest at the Vizima Dike at the start of Chapter V.
Walkthrough
Zoltan will tell you that Shani has set up a field hospital in
Old Vizima (#1), but that the fighting between the Order and the Scoia'tael has overrun the area, and he'll suggest that the two of you escort the patients and civilians to safety.
When you finally arrive in
Old Vizima, you'll find Zoltan there (#2), and he'll direct you to two places where you'll find refugees (#3 and #4). The refugees can't be damaged, so you won't need to protect them. You'll just need to lead them to the hospital.
Inside the hospital, you'll meet up with Shani (who may or may not be happy to see you), but before you can say much to her, a soldier will burst into the room and tell you that a striga has been spotted at the tower (#5), and you'll have to rush off to take care of it.
After returning from the tower, you'll once again try to talk to Shani, but once again you'll be interrupted. This time some Order knights will barge into the hospital, intent upon slaying the wounded Scoia'tael. As before, you won't need to defend anybody; you'll just need to kill the knights, and Shani will help you out.
"They wanted to slay the wounded. How can anyone fall so low?!"
After the battle, when you leave the hospital, you'll encounter some more knights surrounding Toruviel. After dispatching the knights, Toruviel will thank you for saving her life, and then she'll run to the Scoia'tael hideout (#6). This is where you can sleep with her if you want.
Inside the hideout, an elven commander will tell you that the Order has suffered heavy losses lately, and that the time is right to attack them in the western part of the quarter. Then when you exit the hideout, Zoltan will join up with you again, and he'll recommend that you charge right at the enemy. "We'll be like polar tigers, fast and merciless!"
Your first goal in the battle is to fight your way to Toruviel (#9). To do this you'll need to defeat some Order soldiers (#7) and then knock down a barricade (#8) using the Aard sign. The barricade can be tough to recognize, but it will be marked on your map, and it will be one of the few not on fire, so you should spot it eventually.
When you reach Toruviel, she'll tell you that Yaevinn has something planned, and that you'll need to create a diversion to give him a chance. To create the diversion, you'll first need to knock down another barricade (#10) and then wipe out a group of Order defenders. When the last enemy falls, you'll witness a cut scene where Yaevinn will kill White Rayla, and then you'll be teleported to the
Swamp Cemetery and the quest will come to an end.
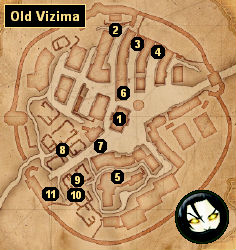
1 - Field Hospital
2 - Zoltan
3 - First Refugee Group
4 - Second Refugee Group
5 - Tower
6 - Scoia'tael Hideout
7 - First Battle with the Order
8 - First Barricade
9 - Toruviel / Second Battle with the Order
10 - Second Barricade
11 - Third Battle with the Order


