 Did we miss anything in this section? Is there something we didn't discover?
Let us know!
Background
Did we miss anything in this section? Is there something we didn't discover?
Let us know!
Background
After you've completed Siegfried's quest
Six Feet Under or Yaevinn's quest
Echoes of Yesterday,
and after you've completed the quest
A Posh Reception, the next time that you enter the
Temple Quarter or the
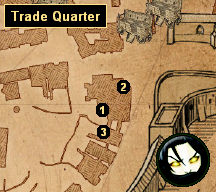
Trade Quarter, a young boy will come running up to you and tell you that the bank (#1) is being robbed. That announcement will trigger this quest.
Walkthrough
When you arrive at the bank, you'll find Velerad and some city guards milling around out front. Velerad will tell you that the Scoia'tael are robbing the bank, and that they've taken hostages. Depending on who you've supported so far in the campaign, you'll get different options:
- If you're on good terms with the Scoia'tael, then you'll get two possible responses: "Fine, I'll help," which will allow you to enter the bank directly, or "Is there another way in?" which will allow you to enter the bank via a nearby warehouse. For the former you'll have to rescue Siegfried when you enter the bank and then re-enter the bank via the back door in the town hall. For the latter you'll have to kill some fleders as you make your way to the bank.
Note: If you enter the bank directly, then don't attack any Scoia'tael when you rescue Siegfried, or else you won't be able to side with the Scoia'tael in the matter. If you're planning to side with the Order then it doesn't matter.
- If you're on good terms with the Order, then you'll get two possible responses: "Let's wait for Siegfried," which will allow you to enter the bank via the town hall (after talking to Siegfried when he shows up), or "I work alone," which will allow you to enter the bank via a nearby warehouse.
Regardless, when you reach the back room of the bank (or perhaps the bank's basement), you'll have to make a decision: to negotiate with the Scoia'tael, or to attack them. That is, you'll have to side with the Scoia'tael or the Order, and whichever side you pick here is also the side you'll have to pick for the quest
The Unforgiven.
If you side with the Scoia'tael, then you'll find Yaevinn in the basement of the bank. He'll spend a lot of time reciting poetry and telling you about Aelirenn, but eventually he'll invite you to join the Scoia'tael. If you don't accept, then you'll be forced to fight the Scoia'tael, and the quest will progress just as if you had sided with the Order at the start. If you accept Yaevinn's invitation, then he'll tell you that some kikimores have entered the
Sewers and are blocking their retreat, and you'll be teleported down to deal with them. Defeating the kikimores will complete the quest, and Yaevinn will reward you with 3000 experience points. "That little foray was impressive."
If you side with the Order, then you and Siegfried will attack the Scoia'tael. Yaevinn will flee into the
Sewers, and when you follow him there (via the sewer inlet in the bank basement) you'll have to fight a few more Scoia'tael, but Yaevinn will get away. When you relay these happenings to Velerad (still in front of the bank), he'll reward you with 3000 experience points. "You deserve a medal!"
Note: If you completed
Lock and Key before starting this quest, then at the conclusion of this quest you'll be able to ask Siegfried or Yaevinn (depending on which side you picked) to help you in the quest
The Unforgiven. Otherwise you'll have to track them down later.
Another note: While in other quests it didn't really matter which side you picked between the Order and the Scoia'tael (you'd gain favor with one, lose favor with the other, but nothing would really change), the decision in this quest will make a difference. Whichever side you don't pick will no longer want to work with you, and in the future you'll be forced to work with the other side or stay neutral.
1 - Bank
2 - Town Hall
3 - Warehouse


