 Did we miss anything in this section? Is there something we didn't discover?
Let us know!
Overview
Did we miss anything in this section? Is there something we didn't discover?
Let us know!
Overview
When the chapter opens up, you'll find yourself in Triss Merigold's house (#1). You'll witness Triss having a conversation with someone in a mirror, and then she'll turn to you. After determining that you're still physically fit, she'll give you a handful of quests, including
A Posh Reception, which will introduce you to the chapter.
As the chapter progresses, you'll continue your pursuit of the Professor and Azar Javed, and you'll continue your explorations of Vizima. The main quests for the chapter are
The Source (where you'll track down and deal with a source of power),
Lock and Key and
The Unforgiven (where you'll finally put an end to the Salamandra's operations in Vizima), and
Gold Rush (where the Scoia'tael and Order conflict will come to a head).
The chapter will end with you confronting the Professor and then escaping from a kikimore lair. After the sequence, you'll find that you're no longer especially popular in Vizima, and you'll be teleported away to
Lakeside and Chapter IV.
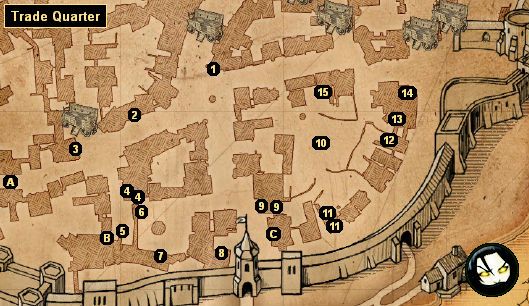
1 - Triss' House
This is where you'll start out in the chapter. Triss will give you four quests --
A Posh Reception,
All the King's Men,
Identity and
The Source -- and then she'll give you a
Letter of Safe Conduct, which will allow you to travel through the Trade Quarter. At night Triss will head over to Leuvaarden's party at the New Narakort Inn (#7), and you'll either find her there or here for the remainder of the chapter.
You'll also find a teleportation mirror on the upper floor of the house. Mirrors like this one will allow you to quickly move to certain places, like Kalkstein's house (in the
Temple Quarter) and the mage's tower (in the
Swamp Forest).
2 - Workshop
Inside the workshop, you'll meet some townsmen and an alchemist. One of the townsmen will describe the workshop to you, and inadvertently reveal that they're creating weapons for somebody at the royal court, but this won't lead to anything.
There are two things you can do with the alchemist:
If you ask him what he does, then the conversation will eventually lead to Kalkstein and his book
Transmutations and Metamorphoses (which you can buy from the antiquary in the
Temple Quarter). If you defend Kalkstein by saying...
- Kalkstein denies that all substances are co-dependent.
- Secondary substances don't appear of themselves.
- After transposition, substances continue to attach and detach from the chain.
- According to Kalkstein's theories, you could construct a golem.
... then the alchemist will see the error of his ways, and he'll give you the scrolls
Samum and
Secrets of the Southern Masters.
If you ask the alchemist about Zerrikanian masters, then he'll eventually offer to trade you the scroll
Zerrikanian Alchemy for a
Red Meteorite. The scroll will only prove useful if you plan to use bombs.
3 - House of the Night
The House of the Night is involved in the quest
Blue Eyes, which you can pick up from Patrick de Weyze in the New Narakort Inn (#7). You won't be able to do much in the brothel until you've accepted that quest.
4 - Watchtower
There are two entrances into the watchtower. The one on the western side will take you to the upper level while the one on the eastern side will take you to the lower level.
Early in the chapter you won't find much of interest inside the tower, but later, after you've completed the quest
A Posh Reception, Count de Wett will appear in the upper level and Velerad will appear in the lower level. Both men will play dice poker with you (they're both professionals in the quest
A Game of Dice), and Velerad will also accept a few
Contracts.
5 - Royal Huntsman
You'll find the royal huntsman at the table here during the day. When you ask him about the trophy monsters for this chapter, he'll tell you that "a huge wolf has appeared in the swamp, and the locals claim wyverns steal their children." That's not entirely clear, but you'll find both creatures -- Moa the wyvern and Voref the wolf -- in the
Swamp Forest.
When you bring trophies to the huntsman, he'll reward you with 600 orens and 5000 experience points for each one. If one of the trophies is your fifth, then he'll also give you a
Perun Rune Stone.
6 - Armorer
When you first meet the armorer, he'll mistake you for a thug sent by the guild. If you press him on the matter, he'll suspect that either the King (Foltest) or the Grandmaster of the Order (Jacques de Aldersberg) is trying to take over the guild, and he'll tell you that he didn't want to join because "I hate rules that force me to give free arms to some and refuse business with others." This won't lead to anything, but it will let you know that there is a division in Vizima's highest ranks.
Other than gossiping about the guild, the armorer will act like a normal shopkeeper, and he'll sell you weapons and weapon-related items, like the
Ceremonial Sword of Deithwen.
7 - New Narakort Inn
On the ground floor of the inn, you'll find a few people of interest:
- Andrew Gablodda. He's a fighter in the
Fistfight quest.
- Dandelion. He'll give you the quest
Dandelion's Lute. After completing the quest, the next time you enter the inn during the evening, you'll witness Dandelion performing one of his songs. Dandelion will also pop up in the quest
The Source.
- Innkeeper. If you ask the innkeeper about his "illustrious guests" and then bribe him, he'll tell you that he overheard some Salamandra thugs talking about the password to an underground complex. The password is "thorn." Buying this information is optional, but it will come into play during the quest
Following the Thread.
- Patrick de Weyze. He'll give you the quest
Blue Eyes.
- Security Guard. During the day the security guard will stand in front of the staircase and prevent you from going upstairs. At night he'll move out of the way so that you can join Leuvaarden's party. After completing the quest
A Posh Reception, the guard will disappear.
- Townswoman. One of the townswomen in the inn will offer to tell you stories, provided that you give her what she wants to drink. She'll ask you for drinks like milk and beer, and she'll tell you about creatures like basilisks and wyverns.
- Waitress. The waitress can say a few different things to you. If she tells you a long story about her grandma, and if you keep saying that you're not bored, then you'll end up with the formula for
Devil's Puffball. If she tells you that she ruined a pair of red gloves, and if you help her out, then you'll receive two bottles of
Wives' Tears (plus perhaps the formula for it).
Upstairs at the inn, you'll meet the high-rollers who were invited to Leuvaarden's party: Count de Wett, Erkyn Blunt, Princess Adda, Thaler, Triss, and Velerad. Most of these people will leave after you've completed the quest
A Posh Reception, but some will stay:
- Erkyn Blunt. You can play the drinking game with him. He won't accept weak beers, but he seems to like everything else. If you beat him, then he'll give you a
House of the Night Signet Ring, which will give you a discount at the House of the Night (#3), and then he'll leave the inn (never to be seen again).
- Leuvaarden. Leuvaarden won't act like a shopkeeper in this chapter, but he'll give you a few quests, including
Following the Thread,
Lock and Key, and
Reaping Time.
- Thaler. After the party, Thaler will head outside where he'll be confronted by Count de Wett. When you show up (right outside the inn), the count will claim that he has a royal edict relieving Thaler of his position, and Thaler will claim that the edict is a fake. If you support Thaler, then de Wett and his men will leave. If you support de Wett, then Thaler will turn hostile, and you'll have to kill him. As far as we can tell, there aren't any long-term consequences to this decision.
If Thaler is still alive, then he'll head back into the inn, and he'll hang out at the table next to the stairs. When you talk to him there, he'll show you a real royal edict, and so you'll have evidence that something fishy is going on. But after that, Thaler won't have anything new to say, and you won't be able to shop with him or play dice poker with him.
- Triss. You'll find Triss either here or in her house (#1). She's involved in a bunch of quests, including
The Source,
All the King's Men,
The Unforgiven, and more.
Outside of the inn, you'll find a notice board with seven contracts on it. The contract quests are covered in the
Contracts section of the walkthrough.
8 - Herbalist's House
Despite this being labeled the herbalist's house on the game map, you won't ever find an herbalist inside. A merchant from the marketplace (#10) will come and sleep here, but that's it.
9 - Merchant's House
When you enter the house, the merchant, Hobbs Pankiera, will demand that you leave his daughter in peace. You'll then be given a choice: to bribe him with 50 orens, or to get fed up with his insults and box him. Either way, Hobbs will allow you to go upstairs and talk to his daughter Rozalind.
Rozalind will tell you that she's been lonely ever since her father caught her with Dandelion studying music. "Papa couldn't understand why the rehearsal was in the nude." If you've already talked to Dandelion (#7) and picked up his quest
Dandelion's Lute, then you'll get dialogue options (starting with "That's why I'm here") that will allow you to sleep with Rozalind.
You'll find
Dandelion's Lute in a trunk in Rozalind's bedroom. Grabbing the lute can give you the quest
Dandelion's Lute, but if you trigger the quest this way (instead of getting it from Dandelion himself), then you won't be able to sleep with Rozalind.
10 - Marketplace
You'll find a bunch of shopkeepers in and around the marketplace, including an alchemist, an antiquary, and a blacksmith. You'll have to give the blacksmith a gem before he'll deal with you.
11 - Gambling Den
The gambling den will mostly be empty during the day, but at night Koster and the other gamblers will show up. Koster is a sharper (see the quest
A Game of Dice for details), but despite warning you that he'll only accept "large wagers," he'll barely bet anything, and so he isn't a great opponent.
12 - Warehouse
The warehouse will remain locked for most of the chapter, but you might be allowed to enter it during the quest
Gold Rush.
13 - Bank
The bank is involved in the quest
Gold Rush. You won't be able to do much in it otherwise.
14 - Town Hall
On the main floor you'll find the scribe who will accept the
Cockatrice Contract. On the upper floor you'll meet a bunch of "townclerks," and if you bring one a
Diamond then you'll be able to sleep with her.
15 - Radovid's Hideout
You'll learn more about Radovid during the quest
Lock and Key.
Exits:
- Gate to the
Temple Quarter.
- Gate to the
Cemetery.


