 Did we miss anything in this section? Is there something we didn't discover?
Let us know!
Walkthrough
Did we miss anything in this section? Is there something we didn't discover?
Let us know!
Walkthrough
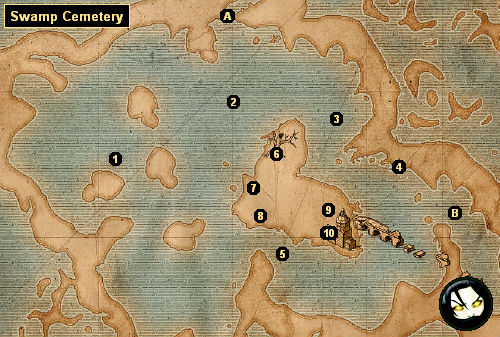
When you first enter the Swamp Cemetery, you'll be attacked by some bloedzuigers, but then Jacques de Aldersberg, the Grand Master of the Order of the Flaming Rose, will fight his way up to you. Jacques will tell you that he knows about you from a "very trustworthy source," and that the Order is attempting to create a new world order better than the current one. He won't seem to care if you're not supporting the Order, and he'll leave after the conversation is over. But don't worry; you'll see him again.
1 - Mine
You'll encounter some kikimore workers and fleders inside the mine, and, on the southern side of the main chamber, you'll also find a Wayfarer's Stone. If you cast Igni, Igni, Aard on the stone, then you'll be teleported to a special crypt. Inside the crypt, you'll encounter lots of undead creatures, including alps, bruxae, and a wraith, and on the western side you'll discover a dwarven trunk containing a
Bifunctional Fiber and Alloy Recirculator. You'll need the recirculator for the Scoia'tael version of the
Armor quest.
2 - Druids' Cave
You'll find a few people of interest inside the druids' cave:
- Cousin Corbin. He's involved in the quest
Mud and Velvet.
- Elder Druids. The two elder druids will only interact with you during the day. At that point they'll act as shopkeepers, and they'll also ask you for
Fool's Parsley Leaves,
White Roses, women's apparel, and gems. If you bring them any of these specific items, then they'll reward you with potions. Some of the exchanges that you can make are listed below.
- Eldest Druid. The eldest druid will only talk to you during the day. He's the one responsible for the
Bloedzuiger Contract.
- Royal Huntsman. He'll tell you about the trophy monsters for the chapter -- "a bat-like creature" named Vesper (#6) and a bruxa named Lilly (#7). When you bring their trophies to the royal huntsman, he'll reward you with 1000 orens and 10,000 experience points each. If one of the trophies is your 10th, then he'll also offer you a
Mahakaman Rune Sihill or a
Moonblade.
- Shani / Zoltan. One of your friends might end up in the cave, but they won't say anything important.
3 - Refugees' Cave
Inside this cave you'll meet Cousin Buse, who is involved in the quest
Mud and Velvet.
4 - Raven's Crypt
When you enter the crypt, you'll see a treasure seeker trapped behind some fallen rocks. If you use the Aard sign on the rocks, then you'll free the treasure seeker and gain access to the rest of the crypt. You can talk to the treasure seeker if you want, but the conversation won't lead anywhere, and you'll never see him again.
Inside the crypt, you'll face a bunch of fleders and wraiths and even a basilisk, making your explorations worth a lot of experience points. You'll also discover two circles of stones (for the Igni and Quen signs), and you'll find two items involved in the
Armor quest: a
Piece of Armor (in a sarcophagus on the southern side) and the
Remains of Raven's Armor (in Raven's tomb on the northern side). You'll also find
The Book of the Full Moon inside Raven's tomb.
5 - Refugees' Cave
You'll find three things of interest inside the cave:
- Cousin Ramerot. He's involved in the quest
Mud and Velvet.
- A Wayfarer's Stone. If you cast Aard, Igni, Aard on the stone, then you'll be transported to a special crypt. Inside the crypt, you'll encounter undead creatures and basilisks, and you'll find a
Magic Formula inside Agnes of Glanville's trunk (located in the large chamber on the southern side). The formula is required for the neutral version of the
Armor quest.
- Zdenek. He's the final boxer for the
Fistfight quest.
6 - Vesper
You'll encounter the trophy garkain Vesper here at night. When you kill him, he'll drop a
Garkain Head, and when you take it to the royal huntsman (#2), he'll reward you with 1000 orens and 10,000 experience points.
7 - Lilly
Around this spot at night you'll encounter Lilly, the trophy bruxa. When you kill her, she'll drop a
Bruxa's Head, and when you take it to the royal huntsman, he'll reward you with 1000 orens and 10,000 experience points.
8 - Circle of Mute Thunder
This circle is for the Aard sign.
9 - Refugees' Camp
You'll meet a desperate father at the camp. He'll tell you that he's in the swamp searching for his son, but this conversation won't trigger a quest. Instead, the father will update the quest
Her Highness the Striga, and he's the one you should talk to for the
Cemetaur Contract.
10 - Chapel
The chapel is involved in two quests:
Her Highness the Striga and
Armor. You won't find any enemies inside the crypt (except for the striga at dusk), but you will discover a Wayfarer's Stone on the eastern side. The stone is mainly for the Order version of the
Armor quest, but if you cast Aard, Aard, Igni on it, then you'll find a
Vodon Rune Stone as well as
St. Gregory's Litany in the crypt connected to it.
Exits:
- Path to
Old Vizima.
- Path to the
Old Manor.


