|
|
Space Station: Jarrahe Station (Strabo / Eagle Nebula)
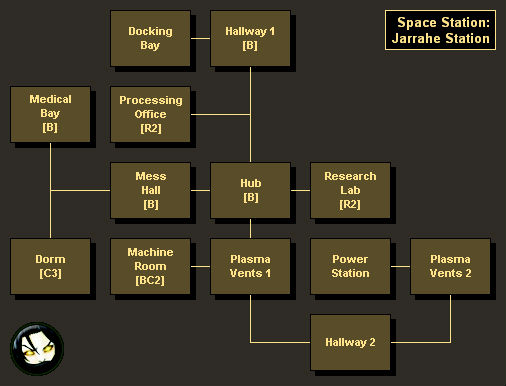
Map Legend:
[B - Background Info] [C - Credits] [M - Medi-Gel]
[P - Power Cells]
[R - Resource] [U - Upgrade] [W - Weapon]
|
Did we miss anything in this section? Is there something we didn't discover?
Let us know!
Background
Jarrahe Station (Strabo / Eagle Nebula) won't show up on your galaxy map until after you've completed the assignment "Wrecked Merchant Freighter" on
Neith. After that assignment, you'll receive a private message from EDI, informing you that Jarrahe Station was the last docking point for the MSV Corsica before a series of technical malfunctions caused it to crash on Neith. Receiving this message will trigger the assignment "Abandoned Research Station."
Walkthrough
When you arrive on the station, you'll find its crew dead, and its VI "zealously protecting itself from intruders" -- that is, you. For some reason, the VI will lock you inside the station, and so you'll have to figure out a way to escape. Fortunately, the VI won't have any mechs at its disposal, so you won't have to do any fighting, but you will have to solve a few puzzles so you can restore power to the station.
You'll have to turn on the power in four places:
- Docking Area. You'll find the power console in the Processing Office, but you won't have to do anything special to turn it on.
- Living Quarters. You'll find the power console in the Medical Bay, but when you turn it on, the station VI will lock you inside and recommend that you "engage self-destruct procedures to avoid starvation." To get out of the Medical Bay, you'll have to operate the three terminals that you'll find there. Each one will lock or unlock some of the doors in the living quarters, and you'll need to unlock them all. From the starting position (with one door in the middle unlocked and the other doors locked), you should just activate the two outer terminals and ignore the middle terminal, and that will open everything up.
- Research Lab. As with the Medical Bay, when you turn on the power console here, the station VI will lock you inside. To get out, you'll have to position the mirrors (aka "the reflective armor prototypes") so the laser hits the machine in the back of the testing area. To do this, you should operate Computer 1 once (so it reflects the laser to Mirror 2), you should operate Computer 2 twice (so the laser passes through its mirror), you should operate Computer 4 three times (so it reflects the laser to Mirror 3), and you should operate Computer 3 once (so the laser hits the target). Then the station VI will unlock the door to the lab.
- Engineering. To survive the engineering section, you'll have to dodge some Plasma Vents, either by timing your movements carefully, or by running to Hallway 2 and the Power Station (where you won't find any vents) and taking your chances. When you restore power in the Power Station, the vents will turn off, allowing you an easy trip back to the Hub.
After restoring power to all four sections of the station, when you return to the Hub, you'll be allowed to restore power there as well, which will grant you access to the mainframe. Shutting down the mainframe will complete the mission and prevent the station VI from infecting the
Normandy.
Rewards
- Experience: 125
- Credits: 7500 (525 from personal locker in Dorm, 750 from personal locker in Dorm, 375 from personal locker in Dorm, 1350 from personal locker in Machine Room, 750 from personal locker in Machine Room, and 3750 from Cerberus)
- Resources: 2000 Iridium (600 from container in Processing Office, 400 from container in Processing Office, 600 from container in Research Lab, 400 from container in Research Lab)
|
|
|


