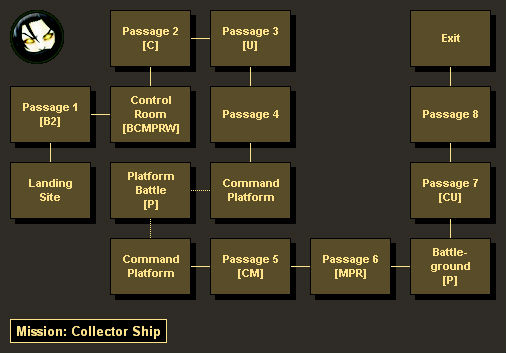
Map Legend:
[B - Background Info] [C - Credits] [M - Medi-Gel]
[P - Power Cells]
[R - Resource] [U - Upgrade] [W - Weapon]
|
Did we miss anything in this section? Is there something we didn't discover?
Let us know!
Background
Five missions after saving (half of) the colonists at
Horizon, Yeoman Chambers will let you know that the Illusive Man would like to speak with you in the
Normandy's briefing room. Your conversation with the Illusive Man will trigger the mission.
Note: You won't be allowed to use the galaxy map at this point, so you won't have any choice but to talk to the Illusive Man.
Walkthrough
The Illusive Man will tell you that a turian patrol somehow managed to disable a Collector ship before being destroyed, and that if you're quick, you might be able to board the ship and learn something about the Collectors. You'll then automatically take flight to the Collector ship and start the mission.
When you board the ship, EDI will tell you that she's located "an access node to uplink with Collector databanks," and reaching that node will become your first objective. Along the way you'll find some empty pods and some dead bodies, and you'll learn that the Collector ship you're on is the same one that attacked
Horizon.
When you reach the control terminal in the Control Room, you'll learn something surprising -- that the Collectors used to be the Protheans, but that the Reapers modified their genetic code in some way to turn them into their slaves. You'll also gain access to some advanced weapon training -- for the assault rifle, shotgun, or sniper rifle -- and choosing the training will either allow you to use that type of weapon, or give you an improved version of the weapon (the
M-76 Revenant Machine Gun, the
M-300 Claymore Heavy Shotgun, or the
M-98 Widow Anti-Material Rifle). We'd recommend choosing the assault rifle training if you don't have it. Otherwise, just pick whichever option helps your character the most.
Note: If you pick an advanced weapon, only your character will be able to use it.
As you continue to make your way through the ship, you'll continue to not be attacked, and you'll learn some more disturbing news -- that the Collector ship you're on is also the one that destroyed the Normandy and killed you two years ago. "The same ship dogging me for two years? Way beyond coincidence."
Eventually you'll reach the Command Platform, and you'll find a command console there. When you activate it, EDI will start mining data from the Collector ship, but then she'll suffer a power surge, and you'll learn that the Collector ship was really a trap. The command platform will then start moving to a different part of the ship, and you'll finally come under attack.
During the ensuing battle, other platforms will move in and connect to your platform, and you'll be attacked by Collectors, scions, and harbingers. However, you'll have plenty of cover, and the enemies mostly won't advance upon you (the scions in particular will seem kind of lost), and so the battle shouldn't be too tough. You'll just have to be careful and conserve your ammunition because you won't be able to move around much to replenish it.
After the battle, when you re-connect with EDI, you'll get some good news and some bad news: EDI will tell you that she's learned of a way to navigate the Omega 4 relay, but then she'll also inform you that the turian distress call was obviously a fake, and that the Illusive Man probably knew this when he sent you in. But before you can complain much, the Collector ship will start powering up, and Joker will recommend that you get moving. "I'm not losing another Normandy!"
From this point on you'll just need to flee the ship. You'll come under attack by Collectors, husks, scions, and even a praetorian -- basically, all of the enemies you faced on Horizon -- but, as always, you'll be given plenty of things to hide behind, and chances are that only the praetorian will give you trouble. For that fight (at the Battleground), you should try to take out the Collectors and husks first, and then concentrate on the praetorian. The praetorian will focus on you and follow you around, so as long as you can maintain your cover against it, you should be all right.
After escaping from the Collector ship, when you return to the
Normandy, the Illusive Man will be unapologetic about sending you into a dangerous situation. "I wouldn't have sent you in if I didn't think you could succeed." Then he'll get to the good news. He'll tell you that EDI analyzed the data from the ship, and discovered that the Collectors are using an "Identify Friend/Foe" (IFF) system at their relay, which is why their ships survive and other ships don't.
Moreover, the Illusive Man will tell you about a source for acquiring an IFF -- yet another derelict Reaper ship, but this one far less likely to be a trap. You'll then (probably) receive the
Reaper IFF mission, which will task you with acquiring the IFF, but you won't be forced into it. Completing that mission will railroad you towards the final mission in the campaign, and so you might want to take the time to recruit more crew members and complete more loyalty missions before starting it.
Note: After completing this mission, many shops will add new items for you to buy.
Rewards
- Experience: 1000
- Credits: 75,000 (7500 from Collector technology in Control Room, 15,000 from Collector technology in Passage 2, 7500 from Collector technology in Passage 5. 7500 from Collector technology in Passage 7, and 37,500 from Cerberus)
- Resources: 500 Element Zero (250 from container in Control Room and 250 from container in Passage 6)
- Upgrades:
Damage Protection (from control terminal in Passage 3) and
Tech Damage (from control terminal in Passage 7)
- Weapons:
M-76 Revenant Machine Gun,
M-300 Claymore Heavy Shotgun, and
M-98 Widow Anti-Material Rifle (one possible from control terminal in Control Room)


