Map Legend:
[B - Background Info] [C - Credits] [M - Medi-Gel]
[P - Power Cells]
[R - Resource] [U - Upgrade] [W - Weapon]
|
Did we miss anything in this section? Is there something we didn't discover?
Let us know!
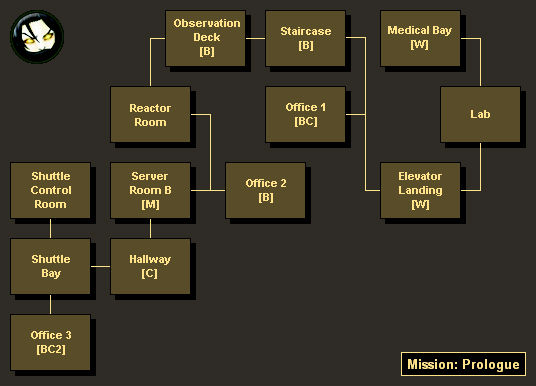
Walkthrough
You'll start out on board the
Normandy, in the middle of a ship-to-ship battle. The battle will be going badly for you, but you won't be able to do much. You'll only be able to move forward and make your way to the cockpit. You won't need to hurry for this trek, so feel free to look around and get comfortable with the controls of the game.
When you reach Joker in the cockpit, the enemy ship will come around for another attack. You'll be able to get Joker into an escape pod, but you won't make it yourself, and you'll be jettisoned into space where you'll die. The end. We hope you enjoyed playing
Mass Effect 2.
Well, not quite. Something called the Lazarus Project will bring you back to life. This is where you'll get to create your character, including your appearance, background, and class. If you're importing a character, then you'll still be able to tinker with your appearance and class, and perhaps pick an extra power, but you won't be able to change your background.
When you wake up from your long winter's nap, you'll find yourself in the Medical Bay of the Lazarus Project Facility, and you'll learn that the facility is under attack. A scientist named Miranda will talk to you over an intercom, and she'll lead you through your first steps, including grabbing an
M-3 Predator Heavy Pistol from a nearby weapons locker, taking cover behind some beds, and killing your first enemy.
Note: You might notice that your character is sporting some new scars, and that they glow orange. That's intentional. If you perform paragon actions while playing the game, then the scars will slowly disappear. If you make renegade choices, then the scars won't disappear on their own, but you'll eventually get a research option that will allow you to remove them.
As you make your way through the facility, you'll encounter lots of hostile mechs to kill, and you'll find an
M-100 Grenade Launcher at the Elevator Landing. Eventually you'll make it to the Observation Deck, where you'll meet Jacob, a soldier who works for Miranda. He'll give you a brief rundown of the situation, including that you've been dead for two years, and that the current attack is probably an inside job. Then Jacob will join you as a companion.
When you reach Server Room B, you'll meet Wilson, who will join your party. Wilson will be hobbled by a leg wound, and so you'll need to loot the medical station in the room to pick up some medi-gel, which will allow you to use the Unity talent and heal him. Wilson will speculate that Miranda might be the traitor behind the attack, but before you can get into the discussion, some mechs will burst into the room and begin firing at you.
After the battle (which will conveniently clear the way to the next room), Jacob will reveal that Cerberus is the organization behind the Lazarus Project. Cerberus is an extremist group that isn't afraid of using any means necessary to make humanity the top dog in the galaxy, and so their sponsorship of the project isn't exactly good news. Your reaction to the revelation can gain you some paragon or renegade points.
When you finally reach the Shuttle Control Room, you'll meet Miranda, who will promptly gun down Wilson. Miranda will claim that Wilson was the culprit behind the attacks, and since Wilson won't be able to disagree, you'll have to take her word for it. Then you, Miranda, and Jacob will flee the facility on board a shuttle, and you'll head towards a new facility where you'll get to meet the Illusive Man, the person in charge of Cerberus. While en route, Miranda will give you a quiz to test your memory, and you'll get a few more opportunities to earn paragon or renegade points.
When you reach the new Cerberus facility, you won't be able to do much other than head down the stairs to talk to the Illusive Man. The Illusive Man will tell you that human colonists have been disappearing without a trace, and that the Alliance hasn't been doing anything about it, preferring to claim that the attacks must be due to pirates or slavers rather than the Reapers. The Illusive Man will then reveal that he just got word that the colonists at Freedom's Progress have disappeared, and he'll suggest that if you were to hurry, then you might be able to reach the colony before scavengers and military personnel can muck up the evidence.
To end the mission, you'll just need to return to the waiting room where you started in the facility, and open the door that had previously been locked.
Rewards
- Experience: 1000
- Credits: 7500 total (975 from wall safe in Office 1,
900 from datapad in Hallway,
975 from datapad in Office 3,
900 from wall safe in Office 3, and
3750 from Cerberus)
- Weapons:
M-3 Predator Heavy Pistol (from the Medical Bay) and
M-100 Grenade Launcher (from the Elevator Landing)


