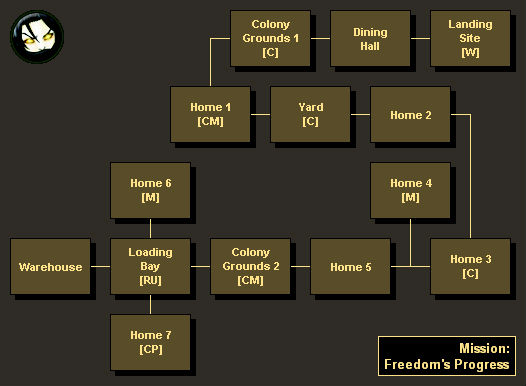
Map Legend:
[B - Background Info] [C - Credits] [M - Medi-Gel]
[P - Power Cells]
[R - Resource] [U - Upgrade] [W - Weapon]
|
Did we miss anything in this section? Is there something we didn't discover?
Let us know!
Walkthrough
Note: During the Prologue, you should have received an
M-3 Predator Heavy Pistol and an
M-100 Grenade Launcher. When you touch down at Freedom's Progress, you'll receive the rest of the weapons that your character can use (if any). This might include the
M-23 Katana Shotgun, the
M-8 Avenger Assault Rifle, and the
M-92 Mantis Sniper Rifle.
When you arrive at Freedom's Progress, you won't find any humans around, but you will be "greeted" by some mechs, who will pop up from time to time. When you reach Home 2, you'll run into Tali (who was a crewmate of yours in the original
Mass Effect) and her team of quarian commandos. They'll tell you that a quarian named Veetor came to Freedom's Progress for his Pilgrimage, and that he's probably the one who turned the mechs against you. After the conversation, the quarians will strike off in search of Veetor, and you'll be left on your own.
Eventually, when you reach the Loading Bay, you'll hear from Tali again. She'll try to coordinate her team with yours, and she'll insist that you take cover by the Loading Bay doors. But once you've put your team in position, the quarians will rush ahead and get mowed down by a heavy mech. That means you'll have to defeat the mech on your own.
The heavy mech can be tough. You'll have to burn through its shields, armor, and health, which will absorb a lot of damage. When the battle starts up, you should immediately seek cover, but it's a good idea to avoid the fragile crates since they won't stop many attacks. Then once you've found a secure spot, just stay there and shoot the mech when it's safe, and heal your companions when necessary. The mech will move around, so you might need to reposition yourself from time to time to keep yourself out of harm's way.
After the battle, when you enter the Warehouse, you'll meet Veetor. He'll be in an agitated state, mumbling about "monsters" and "swarms," and you'll need to use a paragon or renegade interrupt to snap him out of it. That will cause Veetor to show you some security footage, and you'll learn that it was a race called the Collectors who abducted the colonists.
Tali will then demand that Veetor leave with her. If you agree, then you'll receive paragon points. If you disagree and insist that Cerberus interview Veetor first, then you'll receive renegade points. This decision won't affect much in the campaign. It'll only change Veetor's state of mind when you eventually meet up with him again at the Migrant Fleet.
After completing the mission, when you report in to the Illusive Man, you'll get some good news. You'll learn that not only did Cerberus spend billions of credits putting you back together again; they also recreated the Normandy, complete with Joker as pilot. You'll then be put in charge of the vessel, which will serve as your base of operations for the remainder of the campaign. See the
Normandy location entry for more information.
Finally, the Illusive Man will give you some dossiers on the best available "soldiers, scientists, and mercenaries." The first act of the campaign will involve you recruiting the people from these dossiers and adding them to your crew. Miranda will suggest that you pursue Dr. Mordin Solus first, but you're welcome add crewmates in any order you want.
Rewards
- Experience: 1000
- Credits: 20,000 (1000 from spare parts in Colony Grounds 1,
2000 from wall safe in Home 1,
1000 from spare parts in Yard,
2000 from wall safe in Home 3,
1000 from spare parts in Colony Grounds 2,
3000 from wall safe in Home 6, and
10,000 from Cerberus)
- Resources: 2000 Iridium (from container in Loading Bay)
- Upgrades:
Heavy Weapon Ammo (from damaged YMIR Mech in Loading Bay)


