Map Legend:
[B - Background Info] [C - Credits] [M - Medi-Gel]
[P - Power Cells]
[R - Resource] [U - Upgrade] [W - Weapon]
|
Did we miss anything in this section? Is there something we didn't discover?
Let us know!
Background
You'll receive this mission from the Illusive Man after completing the mission at
Freedom's Progress.
Walkthrough
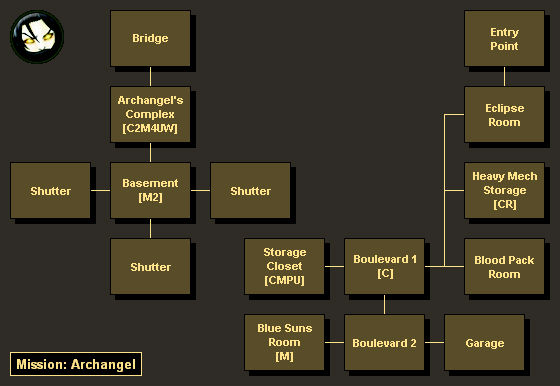
For this mission you'll need to travel to the space station
Omega (Sahrabarik / Omega Nebula), where you'll learn that Archangel has done so much damage to all of the local gangs, that they've actually banded together to take him out. To get close to Archangel, you'll have to pretend to join these gangs. This will involve you talking to Aria (in the Afterlife nightclub) and a merc recruiter (also in the Afterlife nightclub), and passing the merc's not-so-restrictive screening process.
Note: At the end of the screening process, a kid will come in looking to sign up, and you'll be able to use a paragon interrupt to discourage him. If the kid signs up, then he'll get killed during the assault on Archangel. If he doesn't sign up, then he'll survive, and you'll later get a message from him on your private terminal on board the
Normandy.
To reach the merc's staging area, you'll need to talk to the Blue Suns Driver in
Omega's Transport Depot. When you arrive at the Entry Point, you'll begin a conversation with Salkie. He'll give you some background information on your job as part of the "distraction team," and he'll also mention that the mercs have a gunship that they're planning to use during the assault. Finally, Salkie will direct you to talk to Sergeant Cathka (in the Garage).
On your way to Cathka, you can meet some of the merc leaders -- Jaroth of the Eclipse, Garm of Blood Pack, and Tarak of the Blue Suns -- and talking to them will give you codex entries for their gangs. You'll also find some useful things to pick up, including a Message to Tarak (in the Eclipse Room), which will give you the "Datapad Recovered" assignment. When you deliver the datapad to Aria (in
Omega) you'll receive 40 xp.
But most importantly, as you explore the staging area you'll find some ways to sabotage the gangs. In Heavy Mech Storage, if you hack the Friend or Foe module on the heavy mech, then it will attack gang members instead of you when the gangs bring it into the battle. In the Garage, at the end of your conversation with Cathka, if you have enough renegade points, then you'll be able to stab him in the back, and he won't be able to finish the repairs on the gunship, which will reduce its health when you encounter it at the end of the mission.
When you reach Cathka (in the Garage), he'll tell you that you're "just in time," and he'll begin the assault on Archangel. You'll start out on the Bridge, and you'll have to kill a few mercs as you make your way to Archangel. From this point on, Archangel will take damage, and you'll see his health in the lower right-hand corner of the screen. If Archangel dies, then you'll fail the mission, and so you'll need to make quick work of mercs and gang members when you encounter them.
When you reach Archangel, you'll discover that he's really Garrus (who was a crewmate of yours in
Mass Effect). He'll tell you that he started attacking the
Omega gangs for personal reasons, but he won't elaborate. Then the gangs will press forward with their attacks, starting with Eclipse mechs and troopers. Once you've killed enough of them, they'll bring out the heavy mech. If you hacked it, then it will begin firing at Eclipse gang members, and it will help you out (but it will still be labeled as an enemy, so try to avoid shooting it). Eventually, Jaroth himself will attack, and defeating him will complete the wave.
Note: Ammunition clip will spawn regularly in Archangel's Complex, so you won't have to worry too much about conserving ammunition.
After defeating the Eclipse wave, you should explore Archangel's complex. Along with lots of credits and medi-gel, you'll find an
M-15 Vindicator Battle Rifle, a weapon that might last you the rest of the game. Then when you talk to Garrus again, the Blood Pack will begin assaulting the complex from the Basement, and you'll need to block their access. You'll decide to split up into two groups. Garrus will always stay in the complex, and you'll always tackle the Basement, but you'll have the option of leaving one of your crewmates with Garrus. If you do, then he'll lose health more slowly, but you'll probably have more trouble in your half of the battle. The higher the difficulty setting that you play on, the more you might need to leave Garrus on his own and hope for the best.
To thwart the Blood Pact, you'll need to close three shutters in the Basement. Enemies will spawn regularly behind the shutters, but as long as you activate the shutter control panel and keep the shutter area clear for 10 seconds, the shutter will close, and you won't have to worry about new enemies appearing from that direction. After closing all three shutters, you'll be transported back to Archangel's complex, and Garm will make his attack. Garm will usually head straight for Garrus, so as long as Garrus has health to spare, you should take down Garm's goons first and then worry about Garm.
After defeating the Blood Pack, you'll once again be given a chance to catch your breath (and save your game). Then when you talk to Garrus again, Tarak and the Blue Suns will come at you with the gunship. No matter how well you've played the mission up to this point, Garrus will immediately take major damage from the gunship, and he'll be knocked out of the fight.
The gunship will attack you in three ways: with rockets, with machine guns, and by offloading troops (including Jentha, Tarak's second-in-command). The troops shouldn't cause you too much trouble, so the fight will basically come down to avoiding the gunship's damage, and then popping up when it's safe to return fire. If you have a heavy weapon available, then this is a good place to use it. Otherwise, you'll just have to slowly wear the gunship down. When it explodes, the mission will come to an end. Garrus will survive his injuries, and he'll become available as a crewmate.
Rewards
- Experience: 1000
- Credits: 40,000 (4000 from eezo smuggling accounts in Heavy Mech Storage, 6000 from "protection" money accounts in Boulevard 1, 4000 from Blue Suns gunrunning account in Storage Closet, 4000 from wall safe in Archangel's Complex, 2000 from footlocker in Archangel's Complex, and 20,000 from Cerberus)
- Resources: 500 Element Zero (from a container in Heavy Mech Storage)
- Upgrades:
Submachine Gun Damage (from Blue Suns weapon shipment in Storage Closet) and
Tech Damage (from omni-tool power boost x-mods in Archangel's Complex)
- Weapons:
M-15 Vindicator Battle Rifle (from vindicator battle rifles in Archangel's Complex)


