 Did we miss anything in this section? Is there something we didn't discover?
Let us know!
Background
Did we miss anything in this section? Is there something we didn't discover?
Let us know!
Background
The first time you exit
Lothering, you'll set up a camp in the wilderness, and there you'll meet a man named Levi Dryden. Dryden will tell you about his great-great-grandmother Sophia, who was the Warden-Commander of Ferelden during the tumultuous reign of King Arland. Supposedly, Sophia conspired to kill the king, and when her plans went awry, she was murdered, and all of the Dryden lands and titles were confiscated.
Levi Dryden will then ask you to travel to the old Warden keep at Soldier's Peak, and look for information that might shed some light on Sophia's actions. He'll also suggest that you might find some useful relics at the keep, and that the keep might be restored to its former glory. Dryden will then mark the location of Soldier's Peak on your world map, and he'll leave to meet you there.
Note: Completing the conversation with Dryden will give you the Characters codex entry for
Sophia Dryden and the Culture and History codex entry for
The History of the Drydens.
Walkthrough
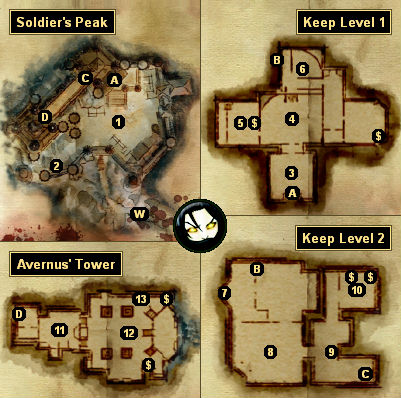
When you arrive at Soldier's Peak, you'll start out on a path leading to the Warden's keep (Exit W). Levi Dryden will meet you there, just as promised, and he'll follow along with you as you battle your way through all of the undead minions that now call the keep their home.
Note: At any time during the DLC, if your party takes some injuries, then you can retreat to your party camp to heal for free.
As you explore the area, you'll have visions of Sophia's final days at the keep, and you'll also find four codex entries for the history of the keep (#2, 6, 9, 13). Receiving any of the codex entries will trigger the quest "Ancient History," which will culminate with you uncovering the secret cache of a former Warden-Commander named Asturian (at #7). Inside the cache you'll find the enchantable sword
Asturian's Might, a
Shadow Belt, and more.
Eventually you'll meet with Sophia (#10) -- or at least with the demon now residing in her undead body. Sophia will try to make a deal. If you agree to destroy everything in the tower, and allow her to go free, then she'll mend the Veil, thus preventing any more demons from entering the keep. If you're persuasive, then you can also convince Sophia to answer Dryden's questions, or to give you a monetary reward. For the former, you won't really learn anything not in the codex. For the latter, Sophia will tell you about a loose brick in the fireplace in the commander's office (#10), behind which you'll find 8 sovereigns.
You'll then have two choices for how to proceed:
- If you agree to Sophia's deal, then you'll have to enter the tower and kill Avernus (#12), the mage who has been keeping the demons at bay. Avernus is a powerful blood mage, so you should ignore his allies and take him down as quickly as possible. After the battle, Sophia will take you to the summoning chamber (#8), where she'll repair the Veil while you defend her from other demons. Afterwards, you'll get a chance to break your deal and kill her.
- If you don't agree to the deal, then you'll have to kill Sophia in her office, and then enter the tower and meet with Avernus (#12). With your support, he'll decide that it's time to repair the Veil, and he'll take you to the summoning chamber (#8), where you'll have to defend him from demons while he does his work. Afterwards, you'll be able to attack Avernus or allow him continue his research in peace.
That is, either way the DLC will go about the same. You'll pick an ally, you'll defeat some demons, and then you'll perhaps turn on your ally. If you kill Sophia then you'll find
Warden Commander Armor,
Warden Commander Boots, and
Warden Commander Gloves on her corpse. If you kill Avernus then you'll find
Robes of Avernus on his corpse. If you allow Sophia to leave, or Avernus to continue his research, then you'll never hear from them again, and so the most profitable solution is to kill them.
Note: Sophia can also drop a
Warden Tower Shield when she dies, but this drop is extremely rare. We're guessing that the shield only drops about 5% of the time.
For the battle in the summoning chamber (#8), you'll have to withstand four waves of demons:
- Three lesser rage demons.
- Four greater shades.
- Two lesser rage demons and two ash wraiths.
- A desire demon, which will drop 3 sovereigns and 50 silvers when it dies.
The demons are reasonably powerful, so it's a good idea to command your party members to attack them one at a time (rather than spreading out their attacks, which is what they'll do naturally). You'll also probably have to quaff some health poultices to keep everyone alive.
After dealing with the tear in the Veil, and after locating Asturian's secret cache (see #7), you'll essentially be done with the DLC. Nothing much else will happen, but when you leave the area and then return, you'll find Levi and his brother Mikhael in the courtyard, and they'll both act like shopkeepers. You'll also find a party storage chest in the courtyard, which you'll be able to use to store your extra gear (like all those pesky gifts). But you won't be allowed to re-enter the keep, so be sure you've looted everything before you leave.
1 - Courtyard
The first time you enter the courtyard, you'll trigger a three-part battle that will culminate with you facing off against a Warden Master Scout. The master scout will drop an
Antique Warden Crossbow, some
Fire Bolts, and more when it dies.
Later, after completing the main quest in the keep, and after leaving the area and then returning, this is where Levi and his brother Mikhael will set up their shops, and it's also where you'll find your party storage chest.
2 - Statue
Clicking on the statue will give you the Culture and History codex entry for
The History of Soldier's Peak: Chapter 1.
3 - Foyer
You'll find a statement of defiance on the wall here, but reading it won't lead to anything.
4 - Break Room
You'll face an arcane horror in this room, which will give you the Creatures codex entry for
Arcane Horror. You'll also find a note in the room. Reading the note will give you the Notes codex entry for
A Letter from Bann Mathuin Wulff.
5 - Barracks
Inside the barracks you'll encounter Commander Athlar and three skeleton archers. You'll also find a note that will give you the Notes codex entry for
A Plea from Commander Athlar.
6 - Archives
You'll face three waves of undead creatures in this room, culminating with a Warden Scribe. The scribe will drop a
Heavy Metal Shield when it dies. Inside the room you'll also find an archivist's book, which will trigger another vision, and a regular book (on the floor), which will give you the Culture and History codex entry for
The History of Soldier's Peak: Chapter 2.
7 - Asturian's Portrait
Once you've received the four codex entries for the history of Soldier's Peak (#2, 6, 9, 13), this is where you'll discover Asturian's secret cache. Inside the cache you'll find the enchantable sword
Asturian's Might, a
Shadow Belt, and more.
8 - Summoning Chamber
When you enter this room, you'll have another vision, and you'll witness Sophia conspiring with the blood mage Avernus to summon demons against King Arland's men. After the vision, you'll face a rage demon here. It will have four dead Wardens assisting it. If the Wardens survive for long enough then they'll heal the demon, and so you should kill them right away. After a while, the Wardens will re-spawn, so you'll need to keep killing them or else you'll never be able to finish off the demon. When the demon dies, it will drop the mage staff
Winter's Breath.
9 - Shrine
At the base of the shrine you'll find some raspberry jam. Clicking on it will give you the Culture and History codex entry for
The History of Soldier's Peak: Chapter 3.
10 - Commander's Office
If you read the book on the desk in the office, then you'll recieve the Books and Songs codex entry for
Sophia Dryden's Journal.
11 - Study
You'll find three things of interest inside the study: ability notes (which will give you some clues about Avernus' research), a book (which will give you the Notes codex entry for
Avernus's Notes), and an alchemical concoction. If you drink the concoction, then you'll gain two new "Power of Blood" talents. If you destroy the concoction, then nothing will happen.
12 - Avernus
13 - Corpse
You'll find a corpse spiked to the wall here. If you click on it, then you'll receive the Culture and History codex entry for
The History of Soldier's Peak: Chapter 4.
Exits:
- Entrance to the keep.
- Stairs between levels 1 and 2 of the keep.
- Exit from the keep. You won't be allowed to use this exit until you've spoken to Sophia (#10).
- Entrance to Avernus' tower.
- World exit.


