 Did we miss anything in this section? Is there something we didn't discover?
Let us know!
Background
Did we miss anything in this section? Is there something we didn't discover?
Let us know!
Background
When you install the DLC, you'll automatically receive the quest "Sulcher's Pass" (under premium content). It will direct you to go to Sulcher's Pass, where you'll meet a merchant and entrepreneur named Felix de Groisbois. Felix will tell you about this wonderful
Golem Control Rod that he has, and he'll give it to you for free. The only catch is that the golem is located in the village of Honnleath, which has been overrun with darkspawn.
Walkthrough
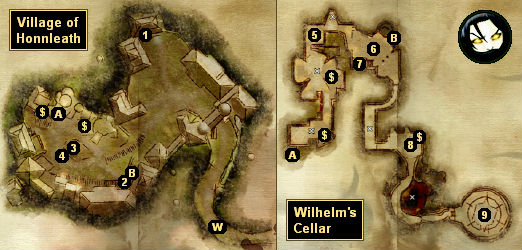
When you reach Honnleath, you'll find it swarming with darkspawn, just as advertised. You'll also find the golem in the town square (#3), but nothing will happen when you use the control rod on it. To learn about the golem, you'll need to enter Wilhelm's Cellar (via Exit A) and rescue the villagers trapped there (#6).
After defeating the darkspawn in the cellar, if you click on the magical barrier protecting the villagers, then you'll start up a conversation with Matthias, the son of the man who created the golem. Matthias will thank you for your assistance, but he'll tell you that during the confusion his daughter Amalia ran further into the cellar, and he'll ask you to rescue her. In return, he'll offer to tell you the correct pass phrase to activate the golem.
When you reach Amalia, you'll find her talking to a demon-possessed cat named Kitty (#9). Kitty won't try to hide what she is, and she'll ask you for two things -- to help her escape from the cellar, and to allow her to possess Amalia. You'll have four ways to proceed:
- You can immediately attack Kitty. This will cause Kitty to possess Amalia, essentially killing her, before turning on you. You'll then have to fight Kitty plus four lesser rage demons, but at the end of the battle you'll find the
Helm of Honnleath and a
Cord of Shattered Dreams on Kitty's corpse. When you return to Matthias (#6), he won't be happy with this result, but he'll reward you with 50 silvers and 150 xp.
Note: Sten will approve of this option.
- You can pretend to help Kitty out. You'll have to lower the barrier in the chamber so Kitty can leave (see #9), but afterwards you'll be able to reveal your true intentions, which will cause Kitty to become angry. Amalia will then flee to her father, and you'll have to fight Kitty plus four lesser rage demons. This option will then go about the same as the previous option, except that Amalia will survive, and Matthias will be much happier about the result.
Note: Alistair and Leliana will approve of this option. Morrigan will disapprove.
- You can actually help Kitty out. Regardless of what you say to Kitty, she'll demand Amalia once you've lowered the barrier (see #9), but if you told her previously that the girl wasn't an option, then you'll be able to convince Kitty to sweeten the deal by giving you
Wilhelm's Magus Staff in exchange. Otherwise, Kitty / Amalia will simply return to Matthias, and you'll receive a
Cord of Shattered Dreams, 1 sovereign and 50 silvers, and 300 xp when you make your way to him as well.
Note: Alistair, Leliana and Sten will disapprove of this option. Morrigan will approve.
- You can tell Kitty "I'll think about it" and then return to Matthias and tell him about the demon. This will cause Matthias to rush into the containment facility, where he'll become possessed by Kitty and complete the slider puzzle for her. You'll then have to choose whether you allow Matthias / Kitty to leave or not, which will net you the same rewards (and approval changes) as if you had helped or attacked Kitty after talking to her.
Regardless of how you decide to deal with Kitty, when you return to Matthias (#6), he'll tell you the proper pass phrase for activating the golem. Then when you return to the golem (#3), it will wake up and introduce itself as Shale, and it will become available as a companion. If you want to, you can kill Shale at this point, but it won't drop anything.
1 - Olaf's Chest
You'll need a key (#4) to open this chest. Inside you'll find
Olaf's Prized Cheese Knife.
2 - Note
Clicking on the note will give you the Notes codex entry for
A Note from the Honnleath Village Council.
3 - Shale
This is where you'll meet the golem Shale. The basket of birdseed next to it is just an illustration of how the villagers have been treating it like a statue. In a few places Shale will mention how much it doesn't like birds -- calling them "feathered fiends" among other things -- and if you add Shale to your party right after waking it up, then it will step on a chicken as you make your way out of the village.
4 - Dead Villager
The corpse here is presumably what remains of Olaf, since you'll find the key to his chest (#1) on it.
5 - Distillery
You'll find
Wilhelm's Special Brew here.
6 - Barrier Room
You'll encounter no less than ten darkspawn creatures in this room, including a genlock emissary. You'll probably get chewed up if you just rush in and start fighting, so we'd recommend that you use one character to lure some of the darkspawn back to you in the distillery (#5), and break the one large battle into two smaller ones. After defeating some of the darkspawn, if you run back to the entrance (Exit A), then you'll exit combat mode, and your party will heal back up.
7 - A Decades-Old Letter
If you click on the decades-old letter here, then you'll receive the Notes codex entry for
A Decades-Old Letter.
8 - Study
When you enter the study, you'll be attacked by a dust wraith and four lesser shades. The dust wraith will drop a
Harvest Festival Ring when it dies. Inside the room you'll also find a book that will give you the Books and Songs codex entry for
The Journal of Enchanter Wilhelm.
9 - Containment Facility
The containment facility contains a big slider puzzle that controls the barrier in the room. If you can solve the puzzle, then you'll lower the barrier, which will allow Kitty to escape.
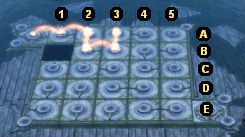
|
| The containment facility puzzle.
|
The puzzle consists of a 5x5 grid of squares, with 24 of the squares containing tiles, and one square being blank. Any tile adjacent to the blank square can be moved into that square, thus creating a new blank square. The idea is to arrange the tiles so that the "energy" flows from the upper left corner to the lower right one. The energy will flow out of a tile in the direction of the pointer on the tile.
If you label the tiles from left to right using the numbers 1 to 5, and from top to bottom using the letters A to E (as shown in the insert above), then the following sequence of moves will complete the puzzle: 2B, 2C, 2D, 2E, 1E, 1D 1C, 1B, 2B, 2C, 2D, 3D, 3E, 4E, 4D, 5D, 5E, 4E, 4D, 4C, 5C, 5D, 5E, 4E, 4D. For completing the puzzle you'll receive 500 xp.
Exits:
- Main entrance to Wilhelm's Cellar.
- Side entrance to Wilhelm's Cellar. This entrance won't become visible until you've reached the barrier room (#6).
- World exit.


