 Did we miss anything in this section? Is there something we didn't discover?
Let us know!
Walkthrough
Did we miss anything in this section? Is there something we didn't discover?
Let us know!
Walkthrough
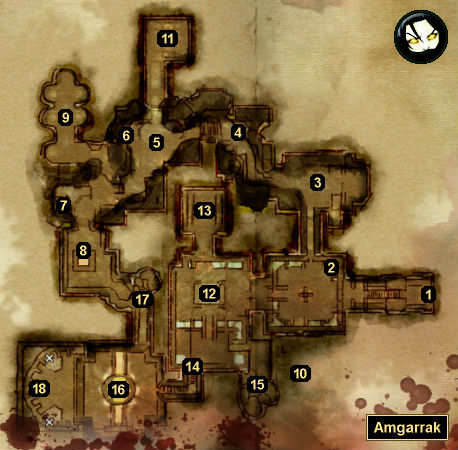
When you enter Amgarrak (#1), a green barrier will pop up behind you, preventing your escape. Then as you explore the thaig, you'll discover more colored barriers, and eventually you'll learn that the barriers are linked to different phases of the thaig, and that you'll need to be in the right phase to go through them. That means it's a good idea to try and remember where the barriers are, so you won't have to wander around as much when you switch phases.
You'll start out in the normal phase of the thaig. You'll have to do some fighting in this phase -- mostly golems (where it's a good idea not to keep your party clumped together, or else you'll get whacked by boulders) -- and you'll also run into Brogan (#4), but he'll be in the blue phase, so you won't be able to talk to him yet. A few times during your explorations you'll also witness a creepy crawly creature called the Harvester, but it will always run away when you approach it.
Eventually, you'll reach a switch (#8), and activating it will move you into the blue phase of the thaig. There are a few things you can do while you're in this phase:
- Talk to Brogan (#4). He'll then join your party. Brogan is a sword and shield warrior, which is just fine even if that's what your character is (survivability is important).
- Loot a chest (#7). Inside you'll find some "superb" potions.
- Enter the burial room (#9). When you get far enough into the room, a "red" twisted sentinel and eight corpses will rise up and attack you. If you can defeat these enemies, then you'll find a
Greater Tome of the Mortal Vessel in a chest in the back of the room. If you return to this room in the normal phase, then you'll have to fight some "yellow" golems, but you'll find
Golem Research Motes: Healing in a chest.
- Loot four chests in the ancient hall (#3), after defeating a "red" warped watcher and four "yellow" twisted sentinels. Inside the chests you'll find
Golem Research Notes: Mechanics,
Golem Research Notes: Fire, and more.
Just be careful when you enter the blue phase. New enemies will appear in this phase, and they won't be happy to see you.
To advance in the DLC, you'll next need to move into the purple phase, which you can do in the switch room south of the entrance (#10). While in the purple phase, you'll find a couple more things to do:
- Enter the green golem room (#11). Inside this room, in the normal phase, you'll find a switch for the green phase, plus half a dozen "red" and "yellow" golems. When you approach the switch, the golems will activate and attack you. The battle with the golems is the toughest in the DLC (since the golems will surround you, and you won't have room to maneuver), but you can use the green switch in the room to your advantage. When your party suffers significant damage, you can just hit the switch and travel to the green phase, where you'll be able to heal back up, and then you can return to the normal phase to fight the golems some more. The golems will heal up when you do, but as long as you can kill at least one during each round, you'll eventually be able to defeat them.
While you're in the green phase in the room, you'll have access to five chests. Inside these chests you'll find
The Reaper's Cudgel,
Golem Research Notes: Healing,
Golem Research Notes: Lightning, and some potions. The exit door from the room will always be closed in the green phase, and so this room is the only place in the thaig where you'll be able to enter the green phase.
- Enter the lyrium well room (#12), which will give you access to four lettered switches (#13). You'll find the combination to these switches on Darion's body (#15). If you enter the combination correctly, then you'll create a red switch.
To finish the DLC, you'll need to switch to the red phase (#12). This will allow you to enter the final chamber (#16), where you'll encounter the Harvester (#18). The battle with the Harvester will end the DLC, so be sure you've explored everywhere you plan to go before approaching it.
The battle with the Harvester can be tough. The Harvester will start out by attaching itself to some fleshy creature, and then once you've defeated it there, you'll be able to fight it for real. All the while, the Harvester will summon "white" and "yellow" and even a "red" skeleton to attack you. We'd recommend that you keep at least one character fighting the Harvester (preferably your ranged character), and have everybody else fighting the skeletons. If you don't keep up with the skeletons, then they'll eventually overwhelm you. It's also best if you can keep your party close together, so they can take advantage of the golem's Cleansing Aura ability.
Defeating the Harvester will complete the DLC. Regardless of your difficulty setting, this will earn you the achievement Reaper. But if you can defeat the Harvester on the Hard or Nightmare difficulty setting, then you'll also earn the achievement Grim Reaper.
1 - Starting Point
2 - Darion's Journal
You'll find Darion's journal sitting out on a table here. Picking it up will give you the Books and Songs codex entry for
Darion's Journal.
3 - Ancient Hall
In the normal phase, when you get far enough into the room, you'll be attacked by four "yellow" golems. This fight can be tough, so be prepared. After the battle, you'll be able to loot a chest for a
Potent Health Poultice.
In the blue phase, you'll be attacked by a "red" warped watcher and four "yellow" twisted sentinels. All five enemies are spellcasters, so we'd recommend taking down the sentinels first and then ganging up on the watcher. After the battle, you'll be able to loot four chests, inside of which you'll find
Golem Research Notes: Mechanics,
Golem Research Notes: Fire, and more.
You'll also find a rune anvil in the ancient hall, which you'll be able to use in every phase.
4 - Brogan
You'll find Jerrik's brother Brogan here, but you won't be able to talk to him until you've switched to the blue phase.
5 - Darion's Journal
You'll find two pages from Darion's journal here, one in the normal phase and one in the blue phase. Both pages will update the Books and Songs codex entry for
Darion's Journal.
6 - Chest and Tattered Note
In the normal phase, you'll discover a chest here, and inside you'll find a
Potent Health Poultice. In the normal phase and the blue phase, you'll also find a tattered note here. Each version of the note will update the Notes codex entry for
Ancient Writings.
7 - Chest
You'll only be able to open the chest while you're in the blue phase of the thaig. Inside, you'll find two
Superb Health Poultices, two
Superb Stamina Draughts, and two
Superb Lyrium Potions.
8 - Blue Switch
Using this switch will move you into the blue phase of the thaig. In one of the chests next to the switch, you'll find a
Greater Tome of the Mortal Vessel.
9 - Burial Room
10 - Switch Room
Inside this room you'll find a blue switch and a purple switch. You'll also find a page from Darion's journal (in the blue phase), which will update the Books and Songs codex entry for
Darnion's Journal, and some scattered notes (in the purple phase), which will update the Notes codex entry for
Ancient Writings.
11 - Green Golem Room
12 - Lyrium Well Room
13 - Switch Room
Inside this room, in the normal phase, you'll discover four switches labeled C, M, W, and Y. You'll find the combination for these switches on Darion's body (#14). If you get the combination wrong, then you'll activate the "yellow" golems in the room, who will then attack you. If you get the combination right, then you'll create a red switch, which will allow you to reach the final chamber (#16), where you'll encounter the Harvester (#18).
You'll also find another page to Darion's journal here, and reading it will update the Books and Songs codex entry for
Darion's Journal.
14 - Darion's Body
On Darion's body you'll find some notes, which will give you the combination "YMWC" for the switches to the north (#13).
15 - Darion's Journal
You'll find another page to Darion's journal here, and reading it will update the Books and Songs codex entry for
Darion's Journal.
16 - Forge Room
17 - Chest
Inside this chest you'll find
Golem Research Notes: Mechanics.
18 - Harvester


