 Did we miss anything in this location? Is there something we didn't discover? Let us know!
Overview
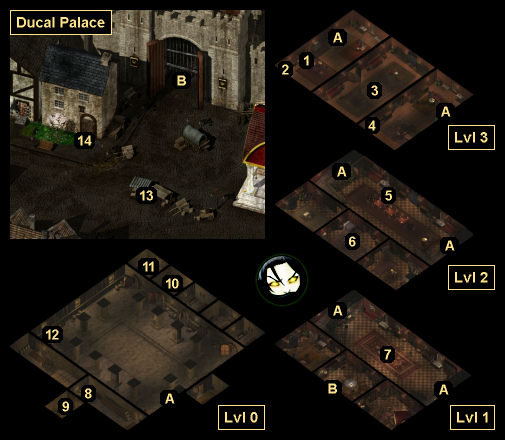
1 - Your Bed
Did we miss anything in this location? Is there something we didn't discover? Let us know!
Overview
1 - Your Bed
This is where you'll start out in the Ducal Palace -- until Imoen wakes you up and tells you that she's heard some strange noises in the hallway (#3). She'll then leave to investigate.
2 - Supply Chest
Inside this chest, you'll find all of the inventory items (but none of the equipped items) that your party had in
Korlasz's Tomb. This chest will travel with you as you make your way through the game, so feel free to fill it with any items you think you (or your future companions) will find useful later on.
3 - Assassin Attack
When you approach this spot, you'll see Imoen being attacked and poisoned by four assassins. Imoen won't last very long, but luckily Schael Corwin, a captain with the Flaming Fist, will show up and help you with the battle. Afterwards, Duke Liia Jannath will teleport in, and she'll begin tending to Imoen. She'll also order you and Corwin to secure the rest of the palace. Before leaving, you should loot the assassins. One of them will drop a Parchment indicating that you were their target.
4 - Imoen's Chest
Inside this chest you'll find an
Oil of Speed, three
Potions of Healing, a
Wand of Magic Missiles, and scrolls of
Armor,
Identify and
Magic Missile. You'll also find all of Imoen's gear (if any) from the saved game you imported into Siege of Dragonspear.
5 - Assassin Battle
You'll encounter three assassins here, but you'll have Corwin plus a pair of Flaming Fist Enforcers helping you out, so you should have an easy time.
6 - Ambush Room
When you enter this room, you'll get ambushed by three assassins. In a cabinet in the room, you'll find
40
Arrows +1.
7 - Drawing Room
You'll meet the four Grand Dukes here -- Belt, Eltan, Entar Silvershield, and Liia Jannath -- even if some of them died during Baldur's Gate. They'll inform you that the assassins bore the crest of Caelar Argent, and they'll order you to infiltrate her crusade and bring her to justice. They'll also recommend that you travel with Corwin to pick up some of your former companions, who can still be found in the city. Corwin will automatically follow you when you leave the palace.
After the cutscene plays out, Skie will wave you over. She'll tell you that the Grand Dukes suspect that Caelar is another Bhaalspawn. However, Skie won't want to say anything more in the palace, and she'll promise to talk to you later in private. She'll then vacate the premises, and you won't see her again until you're ready to leave the city.
You can also talk to Jospil in the drawing room, but he'll cut your conversation short because he's depressed. To cheer him up, you'll need to talk to him again and discuss Caelar Argent and the problems that she's been causing. If you're successful, then you'll earn 250 xp, and you'll receive
Brevin's Quarterstaff +1.
If you search the containers in the drawing room, then you'll find an
Antidote, two
Potions of Healing, a
Potion of Infravision, and a
Potion of Strength. Nobody will care if you loot them.
8 - Ophyllis
Ophyllis is the palace treasurer. When you try to turn in your Treasury Note so you can withdraw your money, he'll admit that he lost it all betting on a dog race, but he'll promise to return it to you soon. Then when you meet him again just outside the palace, he'll inform you that as he was coming back with your money, he was robbed by some refugees, who conveniently mentioned the
Three Old Kegs.
Inside the
Three Old Kegs, you'll find the robbers on the second floor enjoying a hearty meal. If you question them, then you'll learn that they've already spent or given away all of the money they stole. This will give you three ways to proceed:
- You can forgive them their crime. You'll receive a
Battle Axe +1.
- You can have them arrested. You'll earn 750 xp.
- You can kill them. You'll earn over 600 xp for the battle, and you'll find a
Battle Axe +1 and 132 gp on their corpses.
You won't ever get your money back, but a couple of times during your travels, Ophyllis will show up and make a payment to you. For example, while you're at the
Coast Way Crossing, he'll give you a Gold Bust worth 300 gp.
9 - Treasury
The door to the treasury will start out locked. You'll only be able to open it by picking its lock. Inside, you'll find a locked and trapped chest containing a few gems and 1647 gp.
10 - Korlasz's Cell
If you didn't kill Korlasz earlier, then this is where you'll find her imprisoned -- for a moment anyway. As soon as you get close to her cell, she'll break free, and you'll have to kill her with the help two Flaming Fist Enforcers. Korlasz will mostly run around and cast spells like Confusion, Mirror Image, and Slow, so she shouldn't be too tough to kill, but it might take a while. You'll earn 2500 xp for defeating her.
Note: After the battle when you talk to the Enforcers, if you ask them if Korlasz had any help, then they'll mention the doppelganger in the next cell (#11), alerting you to the nature of that prisoner.
11 - Doppelganger's Cell
When you get close to this cell, the doppelganger inside will start pounding on the door asking you to let him out. He'll claim that he's an officer with the Flaming Fist who was tricked into being locked inside. If you made the right dialogue choices with the Flaming Fist Enforcers after killing Korlasz (#10), then you'll know he's lying. Still, you'll have a few choices for how to deal with the doppelganger. For most you'll have to open his cell, which will require you to pick the lock or grab the Cell Key from the nearby table (#12).
- You can ignore the doppelganger and let him keep pounding on the door.
- You can let the doppelganger go with no strings attached (generally when not realizing that he's a doppelganger).
- You can attack the doppelganger. Once you've done enough damage, he'll beg you for mercy. This will allow you to either finish him off or accept a bribe.
- You can let the doppelganger bribe you.
If you accept the doppelganger's bribe, then he'll tell you that he's hidden a cache of valuables in the basement of the
Iron Throne Headquarters, and he'll offer it to you if you agree to meet him there in three hours. You don't actually have to wait. When you show up in the basement he'll have the appearance of a Flaming Fist Officer, and he'll give you three random potions, a random wand, and 250 gp. Then he'll leave.
12 - Table
On this table you'll find a Cell Key, which will allow you to open the doppelganger's cell (#11).
13 - Teera and Quila
When you talk to Teera, she'll tell you that she's been mugged the last two times she's tried to take her earnings to her moneylender, and she'll ask you to make the deposit for her. If you agree, then she'll give you 50 gp, and she'll tell you that Senna the moneylender can be found across the street from
Sorcerous Sundries. If you're feeling poor, then you can demand payment for the job, which will cause Teera to offer you 5 gp upon completion.
On your way to Senna, you'll be stopped by a thief named Zelma. If you notice her trying to rob you, then she'll turn hostile -- and probably die pretty quickly thanks to Corwin and any Flaming Fists nearby. Then when you reach Senna, she'll accept the 50 gp and update Teera's account. Finally, when you return to Teera, you'll earn 250 xp and perhaps 5 gp.
If you don't notice Zelma robbing you, then you'll have a choice. You can pay Senna the 50 gp out of your own funds, or you can tell Senna and Teera that you got pickpocketed. For the former, you'll receive the same reward as if you hadn't been robbed. For the latter, you'll only earn 100 xp, and the refugees near Teera will boo you.
Quila won't do anything other than comment on your quest with Teera.
14 - Perren and Garachen
Between Perren and Garachan you'll learn that Garachen has been charging exorbitant fees to allow refugees to take shelter in his home. If you suggest that he could charge less, then Garachen will inform you that feeding refugees is expensive, and that if it means so much to you, then you can bring him some provisions from Lady Alyth in the
Elfsong Tavern.
You'll have two ways to complete this quest:
- You can meet with Alyth in the
Elfsong Tavern. She'll tell you that she just received some Supplies, and she'll offer them to you for 1000 gp. To acquire the Supplies, you can either pay for them, ask Alyth to donate them, or steal them. For the first two options, Alyth will give you a Supply Chest Key, which will unlock a chest in the storage room on the upper floor. For the third option, you'll have to pick the lock on the chest. Either way, when you deliver the Supplies to Garachen, he'll see the error if his ways, and Perren will reward you with a Black Opal.
- Instead of helping Garachen, you can make trouble for him. To do this, you'll need to talk to Officer Fritz at the
Flaming Fist Castle. When you describe what Garachen is doing, Fritz will sound sympathetic, but he'll tell you that it's perfectly legal. So to up the ante, you'll have to lie and tell Fritz that Garachen is selling refugees into slavery. This will mobilize the Flaming Fists, and when you return to Garachen and tell him that he's been "found out," Flaming Fist soldiers will show up and arrest him. However, you won't receive a reward for following this route.
Exits
- Staircases. These staircases will allow you to move between the four levels of the palace.
- Palace exit. Corwin will join you (as a follower, not a companion) when you leave the palace.


