|
|
 Did we miss anything in this location? Is there something we didn't discover? Let us know!
Overview
Did we miss anything in this location? Is there something we didn't discover? Let us know!
Overview
Note: When you first arrive in Lunia, if you have Hexxat in your party, then she'll take some fire damage, and she'll warn you that this holy land is not meant for her kind, and that you should hurry up and finish your business here before her flesh is burned away. However, this is the only time that Hexxat will take damage. You don't actually need to rush.
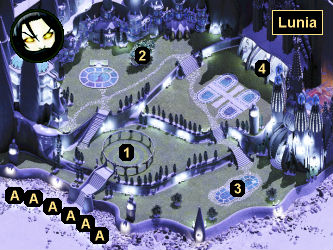
Lunia is a part of
Dorn's companion quest. Your goal here is to remove your name and Dorn's name from the Scroll of Retribution, which you'll find in the Pavilion of Righteous Wrath (#4). You can either talk your way or fight your way to the pavilion, and finish your objective without fighting anybody at all -- if you feel so inclined -- but then when you try to leave the area, you'll run into a pair of roadblocks:
- Dolrassa and Ixthezzys. When you return to the Crusaders' Pavilion (#1), you'll run into the silver dragons Dolrassa and Ixthezzys. They'll ask you if you have any defense for your actions in Lunia. With 16 Charisma, you can point out your lineage, and the dragons will unhappily realize that they're not supposed to interfere with Bhaalspawn. So as long as you don't pick a fight with them, they'll allow you to leave. But this is boring, of course, and you won't earn any sort of reward for choosing this path.
If your encounter with Dolrassa and Ixthezzys turns violent, then you'll have a tough fight on your hands. The dragons will trigger a bunch of buffs, but only Ixthezzys will gain Protection from Magical Weapons, and so you should attack Dolrassa first. If you can take down Dolrassa quickly (with a heaping helping of Greater Whirlwind Attacks), then battling Ixthezzys should be about the same as dealing with any other dragon. You'll just have to watch out for wing buffets, dragon fear, cold breath, and the occasional Maze spell.
If you're able to kill both dragons, then you'll earn 119,000 xp, and you'll find gems, gp, and
Silver Dragon Scales on their corpses.
Cespenar in the
Pocket Plane can use the scales to produce
Silver Dragon Scale armor, one of the best armors in the game.
- Baldwin. Just past the Crusader's Pavilion (#1), you'll encounter Baldwin plus three crusaders and three petitioners. Baldwin won't care what the silver dragons might have decided. He'll attack you no matter what. But this battle shouldn't be challenging at all, and you'll earn 100,000 xp for defeating everybody in your way. Interestingly, the petitioners won't turn hostile, but you should attack them anyway since they're worth way more xp than Baldwin and the crusaders.
To exit from Lunia, you'll just have to return to the portal you arrived from (Exit A).
1 - Crusaders' Pavilion
When you reach this pavilion, you'll witness a planetar welcoming a few disciples of Tyr to Lunia. The planetar won't realize that you're not supposed to be there, so this will give you a few ways to proceed:
- You can kill the planetar, either attacking right away when there are four paladins and priests nearby, or waiting for the paladins and priests to leave. You'll earn 20,000 xp for defeating the planetar, plus perhaps 40,000 xp for defeating the paladins and priests, and you'll find a Sigil of Tyr on the planetar's corpse.
- You can talk to the planetar. With 14 Charisma, you can use your real name or the name Rodesi Ponz, and with 17 Charisma, you can claim to be Keldorn Firecam. If you're convincing, then the planetar will give you a Sigil of Tyr. If you're not convincing, then the planetar and everybody nearby will attack you (see above).
- You can pickpocket a Sigil of Tyr from the planetar.
- You can ignore the planetar and not bother with a Sigil of Tyr.
You might need the Sigil of Tyr at the Pavilion of Righteous Wrath (#4).
2 - Apple Tree
When you approach the southern side of the apple tree here, you'll meet the acolytes Rikkon and Zara, who will tell you about the tree and the "holy vigor" supplied by its apples. However, if Dorn still has a patron demon, then at the conclusion of your conversation with the acolytes, he'll announce that his demon wants him to destroy the tree, and he'll proceed to do it, no matter what you say. You won't be able to loot the tree after it's been destroyed, so if you want any of the tree's
Silver Apples, then you'll need to approach it from the north (or approach it while invisible) and loot it before the acolytes spot you.
3 - Bollard Firejaw
You might remember killing Firejaw during the SOA portion of
Dorn's companion quest. If once wasn't enough, then you can kill him again here. This will earn you 1400 xp.
4 - Pavilion of Righteous Wraith
This pavilion is where you'll find the Scroll of Retribution. It'll be guarded by three paladins, a priest, and the scribe Naiman Alore. You'll have two basic ways to deal with the guardians and make changes to the scroll:
- You can use diplomacy. When you approach the pavilion, you'll get stopped by the priest. If you have a Sigil of Tyr (#1) and 14 Charisma, then you shouldn't have any trouble talking your way past him. For example, you can say that you're Rodesi Ponz and that you have business inside the pavilion.
When you talk to Naiman Alore, you'll have to be more careful. With 14 Charisma, you can tell him that you're on a "holy quest" to retrieve Ink and Sand, which will cause him to give the item to you. With 16 Charisma, you can ask him to remove your name and Dorn's name from the scroll by claiming that it's the gods' will and that he'd have to ask them why. With 18 Charisma, you can ask him to remove the names, and you can use just about any excuse to convince him. Just don't tell Alore your real name, or else he'll immediately start a fight. If all else fails, you can also pickpocket the Ink and Sand from him.
- You can start a fight. You'll earn 62,000 xp for defeating Alore and the guardians, and you'll find Ink and Sand on Alore's corpse.
If you end up with the Ink and Sand, and if you didn't ask Alore to make changes to the scroll, then you'll be able to make the changes yourself. You won't even need to go invisible or anything. Alore (if he's still alive) will just let you scribble away. When you interact with the scroll, you'll be able to remove your name, Dorn's name, or both names, and then perhaps replace those names with new names. If you leave Dorn's name on the scroll, then eventually you'll get ambushed by a planetar again, and when Dorn learns that you betrayed him, he'll turn hostile and leave your party. So don't do this if you want to keep Dorn as a companion. If you leave your name on the scroll, then you'll get ambushed again, but the fight won't lead to anything.
When adding names to the Scroll of Retribution, you'll have a few choices:
- Azothet or Ur-Gothoz (if they didn't get absorbed by the
Abyssal Blade). At some point later, Dorn will feel the loss of his patron demon, but he won't lose his powers, so this choice won't change anything.
- Bosses. Without listing any names to avoid spoilers, you can pick any of the major bosses in Chapters 9 or 10, provided that you know about them. A planetar will then appear and help you when you fight them, but the planetar probably won't do enough damage to make any difference.
- Noober. You'll meet Noober (whom you might remember from
Nashkel in BG1) outside
Abazigal's Lair after you've defeated Abazigal. Noober will declare that it's "Noober's day now," but before he can expand upon that theme, a planetar will appear and kill him. The planetar will then recognize you and attack you as well. You'll earn 20,000 xp for killing it.
- Saemon Havarian. Saemon will get visited by a planetar in
Amkethran after you've defeated the
Amkethran boss. You won't see this encounter; you'll just find Saemon's corpse on the ground near the Temple of Waukeen, next to a couple of surprised civilians. When you loot Saemon's corpse, you'll find a
Rod of Shadowstep, two copies of
Water's Edge +3, and the Journal of Saemon Havarian (which, unfortunately, won't tell you anything interesting).
Exits
- Exit portal. You'll arrive in Lunia from one of these portals (it's random). To exit, you'll just need to return to the same portal. When you leave Lunia, you won't be able to return, so make sure you've completed
Dorn's companion quest first.
|
|
|


