 Did we miss anything in this location? Is there something we didn't discover? Let us know!
Overview
Did we miss anything in this location? Is there something we didn't discover? Let us know!
Overview
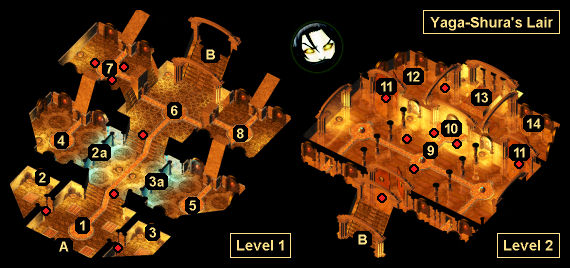
Note: Be careful of the lava pools in the lair. They'll deal non-trivial fire damage, and your party won't try to avoid them. The lava rivers, on the other hand, are perfectly safe.
1 - Fire Giants
When you enter the lair, you'll immediately get attacked by four fire giants, and two nearby elite fire giants will probably wander in as well. You'll earn 116,000 xp for defeating these giants. If you have trouble with the battle, then you can always jump right back outside (via Exit A) to heal and regroup.
2 - Hammer Sphere / Barrier
When you examine the golden sphere here (#2), it will show you the symbol of a hammer. If you touch the sphere without the item it wants, then you'll get energy drained. But if you touch it while carrying the Hammer Wardstone (#7), then it will remove a nearby barrier (#2a), and each character in your party will earn 5000 xp. Either way, touching the sphere will burn you for some fire damage.
3 - Skull Sphere / Barrier
When you examine the golden sphere here (#3), it will show you the symbol of a skull. If you touch the sphere without the item it wants, then you'll get energy drained. But if you touch it while carrying the Skull Wardstone (#8), then it will remove a nearby barrier (#3a), and each character in your party will earn 5000 xp. Either way, touching the sphere will burn you for some fire damage.
4 - Fire Pit (Flame Wardstone)
This room will start out blocked by a barrier (#2a). To remove the barrier, you'll have to take the Hammer Wardstone (#7) to a nearby golden sphere (#2).
Inside the room, you'll encounter a burning man, two fell cats, two fire salamanders, and a flaming skull. They'll be guarding a fire pit, where you'll find the Flame Wardstone. When you loot it, two burning men and two greater fire elementals will teleport into the room and attack you. You'll earn 92,000 xp for defeating both groups of enemies.
5 - Fire Pit (Blood Wardstone)
This room will start out blocked by a barrier (#3a). To remove the barrier, you'll have to take the Skull Wardstone (#8) to a nearby golden sphere (#3).
Inside the room, you'll encounter a burning man, two fell cats, three fire salamanders, and a flaming skull. They'll be guarding a fire pit, where you'll find the Blood Wardstone. When you loot it, two bone fiends and an erinyes will teleport into the room and attack you. You'll earn over 80,000 xp for defeating both groups of enemies.
6 - Strange Device
When you examine this device, you'll see that it has depressions labeled blood, flame, hammer, and skull. After collecting the Blood Wardstone (#5), the Flame Wardstone (#4), the Hammer Wardstone (#7), and the Skull Wardstone (#8), when you interact with the machine again, it'll remove the barrier blocking the way to Level 2 (Exit B). This will earn each character in your party 20,000 xp.
7 - Fire Pit (Hammer Wardstone)
Inside the fire pit here, you'll find a
Girdle of Fire Giant Strength and the Hammer Wardstone. When you loot these items, two fire salamanders and four fire trolls will teleport into the room and attack you. You'll earn 19,000 xp for defeating them.
Note: Remember that you'll need acid or cold damage -- or
Crom Faeyr +5 -- to kill fire trolls.
8 - Fire Pit (Skull Wardstone)
Inside the room here, you'll encounter three fire giants and two elite fire giants. They'll be guarding a fire pit, where you'll find the Skull Wardstone. When you loot the fire pit, an adamantite golem, a clay golem, and a magic golem will teleport into the room and attack you. Remember that adamantite golems require +3 or better weapons, clay golems require crushing weapons, and magic golems require non-magical weapons. If you don't have any non-magical weapons on hand, you can find some on the corpses of the fire giants. You'll earn 141,000 xp for defeating the fire giants and the golems.
9 - Berenn
Around here, you'll run into Berenn (fire giant cleric) and his entourage: two fell cats, four fire giants, and two elite fire giants. Try to draw the enemies to you (rather than charging at them) so you don't face them all at once, and ignore Berenn until the end since he'll mostly only cast Flame Strike and Hold Person, which you should be able to resist pretty well. You'll earn over 170,000 xp for defeating all of the enemies, and you'll find
Balor's Claw and a
Rogue Stone on Berenn's corpse. The claw will allow
Cespenar in the
Pocket Plane to upgrade the
Axe of the Unyielding +3 to the
Axe of the Unyielding +5.
10 - Brazier
Inside the brazier here, you'll find Yaga-Shura's Heart. When you take it, each character in your party will earn 20,000 xp. You'll need the heart for Nyalee's quest in the
Forest of Mir.
11 - Giant Doors
You'll need a character with at least 19 Strength to open these doors. Wearing the
Girdle of Fire Giant Strength (from #7) will do the trick.
12 - Imix
In this part of the lair, you'll encounter Imix, the self-proclaimed Prince of Fire. He'll have two burning men with him. The battle shouldn't be too difficult, but it's best to draw the enemies to you so you don't stumble into the three traps in the room. You'll earn 74,000 xp for defeating the flaming trio, and you'll find an
Amulet of the Master Harper and
Ravager +4 on Imix's corpse.
13 - Yaga-Shura's Bed
Inside the (trapped) chest beneath the bed here, you'll find a
Bag of Plenty +1, a Beating Heart, and Yaga-Shura's Journal. You'll need the heart for Nyalee's quest in the
Forest of Mir.
14 - Slave Woman
At this spot, you'll meet Ehlastra, one of Yaga-Shura's slaves. If you release her, then each character in your party will earn 15,000 xp, and she'll reveal a few things about Yaga-Shura, including that Nyalee in the
Forest of Mir might know how to defeat him.
In the (locked and trapped) container next to Ehlastra, you'll find the
Stone Golem Page, which
Cespenar in the
Pocket Plane can use to upgrade the
Clay Golem Manual into the
Stone Golem Manual.
Exits
- Exit to the
Marching Mountains.
- Stairs between Levels 1 and 2. To use this exit, you'll have to activate the nearby strange device (#6).


