 Did we miss anything in this location? Is there something we didn't discover? Let us know!
Overview
Did we miss anything in this location? Is there something we didn't discover? Let us know!
Overview
Note: This area is a part of
Rasaad's companion quest.
When you arrive here (#1), you'll meet Lemp Coldhearth. He'll demand to know what you're up to. If you're rude to him or claim to be a follower of Shar, then he'll attack you, and you'll earn 9000 xp for defeating him. Otherwise, he'll escort you to the dwarven camp (#3), and he'll introduce you to Meems Dugdeep. If you kill Lemp, then you'll still be able to work with the dwarves in the camp. You'll just have to walk over there on your own.
When you talk to Meems, she'll give you some background information about the area -- namely, that the dwarves discovered some purple crystals in their mines, and that almost immediately afterwards, Alorgoth and his Sharran disciples attacked them and took over their keep, turning many of them into their slaves. Meems will then give you some suggestions for entering the keep. The three main ways are detailed below:
- You can use the main keep entrance (Exit A). This entrance will start out locked, but you can pick up the key by killing Sharran Guard Ovidiu (#2). However, to reach the entrance, you'll have to kill the gate guards (#4), and then when you enter the keep, you'll have to kill a bunch more guards in order to reach the mines.
- You can use the secret keep entrance (Exit B). For this, you'll have to rescue the dwarves at the lumber camp (#5). Afterwards, Cuddy Dugdeep will tell you about the secret entrance, and if you're interested in that approach, then he'll set up some logs so you can float to the entrance without alerting the gate guards (#4). When you enter the keep, you'll start out in the kitchen (#6), where you'll meet Fillis and Killis. They'll allow you to use the dumbwaiter (Exit C) to reach the mines. Entering the keep this way will earn each character in your party 1000 xp.
- You can tunnel into the mines directly. For this, you'll need to retrieve three items for Meems Dugdeep (#3): Meems' Special Grog, a
Potion of Explosions, and Rock Salt. You'll find the potion and the Rock Salt at the lumber camp (#5). You'll find the grog on a gate guard named Tallus (#4a). The easiest way to acquire the grog without fighting all of the gate guards is to quaff a Potion of Invisibility, pickpocket the grog from Tallus, immediately quaff another Potion of Invisibility, and then retreat away from the guards. When you give the items to Meems, she'll create the tunnel, and you'll automatically head inside (and start out at #12).
If you accept the help of dwarves to enter the keep, then you'll start out in the mines, and you'll have some dwarven allies helping you out for a few battles. If you enter the keep on your own, then you'll start out in the keep, and you won't have any allies. But still, it's a good idea to visit the keep either way. If you confront Alorgoth before visiting the keep, then the dwarves will kill all of the Sharrans there, and you'll lose out on some xp.
Inside the mines, you'll find more Sharrans and dwarves, but eventually you'll meet up with Alorgoth in the crystal chamber (#14). He'll have eleven Sharrans with him, but before the fight starts up, he'll order the mage Yxtrazzal to spin the Wheel of Obliteration and create a portal to the Plane of Shadow (Exit E). Alorgoth and Yxtrazzal will then leave through it.
Even with the departures, the fight is impossible to win, even if you have some dwarves helping you out. The enemies will hit you way too hard and way too often for you to survive for long. Plus, every so often, shadows will arrive through the portal and replenish the enemy ranks. So as quickly as possible, you should clear a path to the portal and follow Alorgoth through it. Having your party hasted (or with
Boots of Speed) will make this easier.
Inside the Plane of Shadow, you'll get attacked by a few Shadow Creatures and Shadow Fiends, but you should be able to defeat them easily. Before pushing forward, you should take the time to heal and re-buff as much as possible. That's because when you track down Alorgoth this time (#15), he'll order Yxtrazzal to spin the Wheel of Obliteration again, which will close the portal you just came though (Exit E), and then he'll have Yxtrazzal transform into a black dragon.
During the ensuing fight, you won't be able to kill Alorgoth. Luckily, he won't do much. He'll hit you with minor melee damage, and he'll cause Shadow Creatures to appear. So instead you should focus on Yxtrazzal. Yxtrazzal will do dragon things, but she's mostly only powerful because of the buffs she starts with (including Bless, Haste, and Mirror Image) so if you can breach her defenses, or if you have a character with
Carsomyr +5, then she should go down relatively quickly.
Note: If you have a lot of trouble with Yxtrazzal, then you can also use a quirk of the game against her. The cut scene where Yxtrazzal transforms into a black dragon will only occur when Rasaad approaches Alorgoth. So you can send your thief in ahead of the rest of your party to set some traps. Alorgoth and Yxtrazzal will just stand there and watch. If you set one snare at Yxtrazzal's feet, then it will disrupt her attempt to turn into a dragon, and she'll stay in human form, making her much easier to kill. Just be careful not to place so many traps at Yxtrazzal's feet that she dies right away. If she dies during the cut scene, then the cut scene will break and the game will lock up.
When Yxtrazzal dies, you'll earn 22,000 xp, and you'll find
Shadow Dragon Scales, the Wheel of Obliteration, 3200 gp, and more on her corpse. At the same time, the Plane of Shadow will start to collapse, and fire will start raining down from the sky. To escape, you'll need to retreat back to where you started in the plane and use the Wheel of Obliteration (by placing it in a Quick Items slot of one of your characters). This will recreate the exit portal (Exit E). When that happens, the Shadow Creatures will turn on Alorgoth and kill him, and you'll automatically step through the portal.
When you return to the mines, you'll receive 20,000 xp for completing Rasaad's quest. If Bentaxe Foekiller or Halnur Farcutter (#13) is still alive, then one of them will also give you 7500 gp.
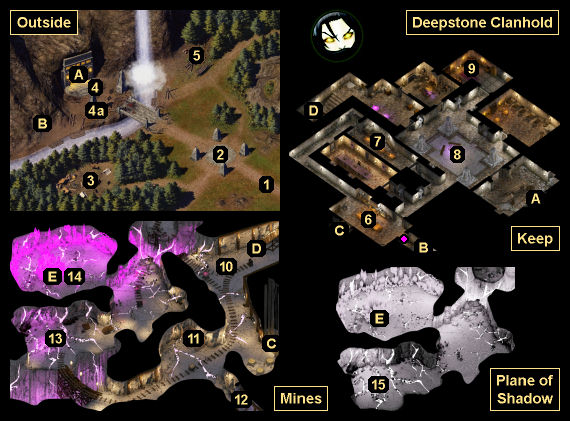
1 - Starting Point
2 - Ambush
When you approach the dwarf Rolf Hammersparks here, he'll command you to back away. If you ignore his warning, or if you ask him to explain, then you'll get ambushed by Sharran Guard Ovidiu and seven other Sharran Guards. Ovidiu will shoot Arrows of Detonation at you, so take him down first and then mop up the rest.
You'll earn 50,000 xp for defeating the guards, and you'll find
Oils of Speed,
Potions of Superior Healing, and +1 to +3 items on their corpses. You'll also find an Intricate Key, which you can use to unlock the main entrance to the keep (Exit A).
If Rolf survives the ambush, then he'll run over to the dwarven camp (#3), but he won't give you a reward or anything.
3 - Dwarven Camp
This is where you'll meet Meems Dugdeep.
4 - Gate Guards
You'll encounter several Sharran guards around here (#4), including Tallus (#4a). You'll earn 71,000 xp for defeating them. You should target Tallus quickly, as he'll repeatedly hit you with an annoying acid breath attack (presumably gained from drinking Meems' Special Grog).
5 - Lumber Camp
At this spot, you'll discover some dwarves being forced to cut down trees. If you defeat their Sharran taskmasters, including Sharran Overseer Razvan, then you'll earn 38,000 xp, and you'll find Rock Salt and a
Potion of Explosions (both needed by Meems at #3) when you loot the corpses and nearby containers.
After the battle, you'll meet Cuddy Dugdeep. If you tell him that you're going to take on the Sharrans directly, then he and the other dwarves in the camp will help you to defeat the gate guards (#4). If you tell him that you're looking for a way to enter the keep, then he'll tell you about a secret entrance (Exit B), which you'll be able to float to using logs from the camp.
6 - Kitchen
You'll meet Fillis and Killis here, but they'll only talk to you if you entered the keep via the secret entrance (Exit B).
7 - Dining Area
You'll meet Fiddich and a few other dwarves here. If you ask them to follow you, then they'll move over to the central chamber (#8) and help out with any battles that come their way.
8 - Central Chamber
Inside this chamber, you'll encounter several Sharran soldiers, including Torcadahl, who will drop
Plate of the Dark +1 when he dies.
9 - Alorgoth's Room
You'll encounter Jassar (fighter) and Sephos (mage) just outside this room, and then Shani (invoker) inside. They're a formidable trio, but if you can defeat them then you'll earn 59,000 xp. Just be careful of Shani's trap inside the room. If you trigger it, then it'll set off a Fireball that will destroy some of Alorgoth's possessions, including his
Night Walkers and his journal. But either way, you'll still be able to loot his
Cloak of the Dark Moon and his
Headband of the Devout.
10 - Haldorr Deepstone
You'll meet Haldorr Deepstone here. If you kill the Sharrans guarding him, then he and the dwarves with him will head up into the keep and disappear from the game. Nearby in a mine cart, you'll find a Shadow Gem. It looks like it might be important (and perhaps at one time was intended to be important), but it's not useful for anything. You can pick up two more Shadow Gems in a mine cart just outside the crystal chamber (#14).
11 - Haralt Deepstone
Inside the cell here, you'll meet Haralt Deepstone, the lord of the clanhold. When you kill the guards outside his cell, you'll automatically free him, and he'll head up to the keep. Haralt will promise you a reward for helping him and his clan, but he' won't actually give you anything.
Note: One of the guards outside Haralt's cell will drop a Holding Pen Key, but you won't actually need it to open the cell.
12 - Tunnel
This is where you'll start out if you work with Meems (#3) to enter the mines.
13 - Bentaxe Foekiller and Halnur Farcutter
In this part of the mines, you'll find several dwarves, including Bentaxe Foekiller and Halnur Farcutter, being overworked by a large group of Sharrans. A fight will break out when you arrive, with you and the dwarves against the Sharrans, and any surviving dwarves will help you against Alorgoth in the crystal chamber (#14). If Bentaxe or Halnur survives these fights, then one of them will give you 7500 gp after you've freed the clanhold.
14 - Crystal Chamber
15 - Alorgoth Battle
Exits
- Main keep entrance.
- Secret keep entrance.
- Dumbwaiter between the keep and the mines.
- Stairs between the keep and the mines.
- Portal to the Plane of Shadow.


