 Did we miss anything in this location? Is there something we didn't discover? Let us know!
Overview
Did we miss anything in this location? Is there something we didn't discover? Let us know!
Overview
When you arrive on this level of the keep, you'll meet Carston (#1). He'll be inside the Machine of Lum the Mad, which will allow him to cast spells and summon creatures at will. Carston will have a high opinion of himself -- and a low opinion of you -- so every time you annoy him or bore him, he'll either hit you with a Lightning Bolt or summon some Mind Flayers to attack you. So don't talk to him any more than necessary.
As you explore the level, you'll meet Carston's apprentice (#10), and you'll find the apprentice's diary (#15). The apprentice will want Carston to rot inside the machine, so he won't tell you anything, but when you read his diary, you'll learn that the Crystal Mallet can shatter the glass cage protecting Carston, and allow you to evict him from the machine.
To reach the mallet, you'll have to solve a brazier puzzle (#7). It'll require you to pick up Blue Oil (#4), Purple Oil (#15), Red Oil (#12), and a Flint and Tinder (#13). With the materials in hand, you'll have to light the braziers with the correct color. The clues for this can be found in the main part of the level, by looking at the triangles on the ground (#3, #5). If you light the braziers just like the triangles -- that is, Red-Red-Purple on the left side and Blue-Purple-Red on the right side -- then the door blocking the way to the mallet room will open, and each character in your party will earn 10,000 xp.
Inside the mallet room (#8), you'll encounter the minotaurs Garock and Rock. When they spot you, they'll summon four ice salamanders and attack. You'll earn 37,000 xp for defeating them, and you'll find an
Axe of the Unyielding +3 and two
Battle Axes +3 when you loot their corpses. Then in the back of the room, you'll find a
Clay Golem Page (which
Cespenar in the
Pocket Plane can use to upgrade the
Golem Manual into the
Clay Golem Manual) and the Crystal Mallet in a pair of safes.
When you return to Carston (#1), you'll just need to interact with the glass cage he's in. The game will ask you how many times you'd like to strike it with the mallet. The right answer -- six -- appears in the Diary of Carston's Apprentice. If you get the answer wrong, then Carston will laugh at you and hit you with a Fireball. If you get the answer right, then the glass will shatter, and each character in your party will earn 7500 xp.
No longer in the machine, Carston will beg you for his life. If you let him go, then you'll earn 10,000 xp, and Carston will give you his journal before departing. If you kill Carston, then you'll earn 6000 xp when he dies, and you'll find the journal on his corpse.
When you interact with the Machine of Lum the Mad (#1), you'll see that it has three buttons, three dials, and three levers. To get the machine to do something, you'll have to use the input devices three times. The order doesn't matter. There are 729 possible combinations, but only nine of them give a fixed result. You can find these combinations in Carston's Journal plus the eight Handwritten Notes sprinkled throughout the keep (two on this level, three on Level 1, and three on Level 2).
The nine fixed results are listed below:
- Blue-Square-Short grants +1 Dexterity.
- Circle-Square-Triangle grants +1 Wisdom.
- Long-Blue-Green grants +5 Magic Resistance.
- Long-Circle-Blue grants +1 Intelligence.
- Long-Red-Circle grants +1 Constitution.
- Medium-Green-Triangle gives
Storm Star +3.
- Short-Medium-Square grants +1 Strength.
- Short-Red-Green grants +1 Charisma.
- Triangle-Red-Medium activates the portal to
Level 5 (Exit B).
If you enter any other combination, or if you repeat one of the combinations from above, then you'll get a random -- usually bad -- result:
- 10% chance of losing fifteen levels.
- 10% chance of losing a point of Dexterity.
- 10% chance of losing a point of Intelligence.
- 10% chance of suffering 50 points of fire damage.
- 10% chance of suffering 75 points of lightning damage.
- 10% chance of being poisoned.
- 10% chance of being turned to stone.
- 10% chance of being Imprisoned.
- 10% chance of gaining a
Potion of Superior Healing.
- 10% chance of gaining 100,000 experience points.
When you activate the exit portal (Exit B), each character in your party will earn 25,000 xp.
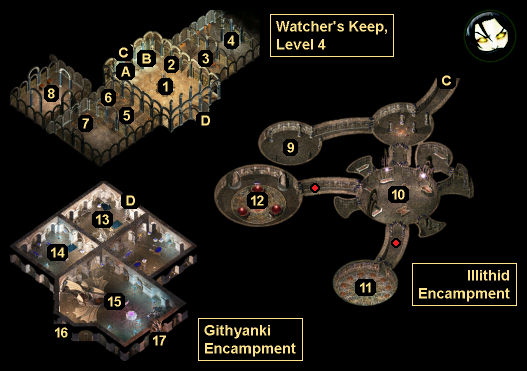
1 - Carston / Machine of Lum the Mad
2 - Cabinets
Inside these cabinets, you'll find lots of ammunition and potions, plus
Full Plate Mail +1. You'll also find an assortment of non-magical weapons, which might come in handy when fighting the nearby magic golems (#4).
3 - Triangles
On the floor here, you should notice three triangles. It's important to remember their color sequence: blue, purple, red.
4 - Magic Golems / Pool
In this room, you'll encounter two magic golems guarding a blue pool. The golems can only be damaged by non-magical weapons. Luckily, they're restricted to ranged attacks, so if you close in on them with melee attackers, all they'll do is retreat. This will give you time to scrounge up some weapons if necessary (such as the weapons in the cabinets in the starting room, #2). You'll earn 16,000 xp for defeating the golems.
After the battle, when you loot the pool you'll find Blue Oil, which you'll need for the brazier puzzle (#7).
5 - Triangles
On the floor here, you should notice three triangles. It's important to remember their color sequence: red, red, purple.
6 - Killer Mimics
In this part of the level, you'll encounter a new enemy -- killer mimics. When they die, their corpses will turn into containers, where you'll find some ammunition and a
Wand of Spell Striking. You'll earn 20,000 xp for defeating them.
7 - Brazier Puzzle
For information on how to solve this puzzle, please refer to the Overview text above.
8 - Crystal Mallet Room
This is where you'll find the
Clay Golem Page (which
Cespenar in the
Pocket Plane can use to upgrade the
Golem Manual into the
Clay Golem Manual) and the Crystal Mallet.
9 - Storage Room
In the container in this room, you'll find an Illithid Rod and a
Wand of Cursing. The rod is half of the key needed to open the crypt (#12).
10 - Prison / Apprentice
In one of the cells here, you'll meet an apprentice. He'll tell you about coming to the keep with Carston (#1), and how Carston entered Lum's machine and went mad. This will earn each character in your party 1000 xp. The apprentice will die at the end of the conversation. There isn't any way to save him.
If you loot the containers in the prison, then you'll find a Handwritten Note (which will give you a clue for Lum's machine, #1).
11 - Storage Room
Inside this chamber, you'll encounter two mind flayers, an ulitharid, and two umber hulks. You'll earn 45,000 xp for defeating them, and you'll find an Illithid Rod when you loot their corpses. The rod is half of the key needed to open the crypt (#12).
12 - Crypt
The door to this crypt will start out locked. To open it, you'll need to collect two Illithid Rods (#9, #11). Once you have both of them, they'll automatically combine together to form the full Illithid Rod, which will allow you to unlock the door. Forming the full rod will also earn each character in your party 1000 xp.
Inside the crypt, you'll find three blood pools and two sarcophagi. When you loot Red Oil from one of the pools, the two sarcophagi will open, releasing vampiric illithids. You'll earn 28,000 xp for defeating them. You'll need Red Oil for the brazier puzzle (#7).
13 - Foyer
When you arrive here, you'll get attacked by a knight, a warrior and an anti-paladin. You'll earn 9650 xp for defeating them, and you'll find the two-handed sword
The Unholy Reaver +5: Ir'revrykal on the anti-paladin's corpse.
When you loot the containers in the room, you'll find a Flint and Tinder and a
Wand of the Heavens. You'll need the Flint and Tinder for the brazier puzzle (#7).
14 - Room
When you loot the containers in this room, you'll find a Wand of Striking and a Handwritten Note (which will give you a clue for Lum's Machine, #1).
15 - Room
You'll encounter several githyanki in this room, including two anti-paladins and a captain. You'll earn over 30,000 xp for defeating them, and you'll find the long sword
Angurvadal +4 and the Diary of Carston's Apprentice (which will give you a hint for dealing with Carston, #1) on the captain's corpse.
Also in the room, you can pick up
Montolio's Clasp (from the dragon's mouth) and Purple Oil (from the purple pool).
Cespenar in the
Pocket Plane can use the clasp to upgrade
Montolio's Cloak. You'll need Purple Oil for the brazier puzzle (#7).
16 - Demilich
If you go down the stairs here, then you'll encounter a hostile demilich. The demilich will cast Imprisonment like crazy, so you'll need to be prepared. You can make your main character immune to Imprisonment by switching to Slayer form, as long as you don't mind losing some Reputation. You can also use Korgan's Enrage ability to make him immune, or use a
Protection from Magic scroll to make a different character immune, or leave some of your characters out of the fight upstairs to keep them safe (and let, for example, your main character in Slayer form solo the demilich), or just take the Imprisonments and then cast Freedom afterwards. You'll earn 55,000 xp when the demilich dies, and you'll find a
Dagger of the Star +4 and 20,000 gp on its corpse.
17 - Saladrex
If you go down the stairs here, then you'll enter a large cavern where you'll meet Saladrex the red dragon. Saladrex won't mind you visiting, and he'll explain how Carston (#1) summoned him to the keep, and how he sort of enjoys being here. The conversation won't lead to a fight unless you want it to.
If you decide to attack Saladrex, then you might need to be careful. He'll turn hostile if he sees you planning anything -- like setting traps or summoning creatures -- so for those strategies, you should keep your party near the entrance staircase and then lure him into things. But if you're in Chapter 6 or later, then it's possible Saladrex won't pose much of a challenge. You'll earn 64,000 xp for killing him, and you'll find a
Rogue Stone, a
Staff of the Ram +4, and 1500 gp on his corpse.
Exits
- Portal to
Outside.
- Portal to
Level 5. See the Overview text above for details about how to activate this portal.
- Stairs to the Illithid Encampment.
- Stairs to the Githyanki Encampment.


