 Did we miss anything in this location? Is there something we didn't discover? Let us know!
Background
Run in the Seattle Sprawl and sooner or later you'll find yourself in the Redmond Barrens. It doesn't matter your business, the Barrens doesn't like you. Take one part radioactive wasteland, three parts dog-eat-dog slum, add a dash of tourist trap, and you've got a recipe for Mean-As-Hell.
Did we miss anything in this location? Is there something we didn't discover? Let us know!
Background
Run in the Seattle Sprawl and sooner or later you'll find yourself in the Redmond Barrens. It doesn't matter your business, the Barrens doesn't like you. Take one part radioactive wasteland, three parts dog-eat-dog slum, add a dash of tourist trap, and you've got a recipe for Mean-As-Hell.
You leave the sanitized death and formaldehyde of Organ Grinders behind, entering the anarchy and desperation of the streets. Jake stops a moment to breathe deeply, filling his lungs with motorcycle exhaust, radioactive dust, cordite and who knows what else. He exhales with an expression of wry contentment. The stench and grime tell him he's home.
Karma Points
- [1] Deal with the thugs at the market (#6).
- [1] Deal with the Halloweeners (#7).
- [1] Pick up the Bar Tab Receipt at the crime scene (#8).
- [2] Examine all of the hotspots at the crime scene (#8).
Walkthrough
You'll begin this mission in the Barrens right outside the Morgue (#1). Jake Armitage will be with you, and he'll want you to head into a nearby alley, where you'll find his stash of supplies (#2). Inside, you'll find Jake's gear, plus a few items for you, too, including healing supplies, grenades, and possibly some spells. However, after looting the stash, two muggers will attack you, and you'll need to put them down. For best results, take down the one with the baseball bat first.
With Jake geared up, he'll be ready to take on the Halloweeners, the gangers who attacked him on the night that Watts died. Along the way to their base, you should talk to some of the locals, including the Worried Man (#3), who will give you a quest to protect the market (#6) from thugs.
When you approach the Halloweener base (#7), a sentry will stop you -- until he spots Jake, and then he and two other gangers will attack you. We'd recommend taking down the melee sentry first, then the mage, and finally the gun sentry. Once they're down, John Paul the gang leader will rush at you. John Paul is big, which means he'll hit you hard, but he's also a big target, and you shouldn't have any trouble hitting him with your attacks. Once you've removed about 2/3rds of his health, John Paul will surrender, and you'll be able to let him go or finish him off. This decision won't make any difference.
When you approach the spot where Watts' body was found (#8), Jake will part ways with you, but not before paying you for helping him out. You'll either earn 1000 or 1500 nuyen, depending on what you negotiated with Jake (if anything) while you were in the
Morgue.
Just outside the crime scene, you'll witness a Lone Star officer named Kuprik talking to a homeless man named William. William will try to get into the crime scene to retrieve some of his belongings, but Kuprik will keep him out. Then when you talk to Kuprik, he'll keep you out, too. But you'll have a three ways to get in:
- You can bribe Kuprik with 100 nuyen.
- You can bribe Kuprik with a SoyKaf & Donut from Dan (#10), which will only cost you 10 nuyen.
- You can use the Security etiquette to fool Kuprik.
At the crime scene itself, you'll discover four hotspots. Examining all four will net you a Bar Tab Receipt (labeling Coyote as Watts' server when he was at the
Seamstresses Union the night he died), a Coat and Blankets (belonging to William), and a Test Tube Piece. You'll also spot large footprints from an orc or a troll, and you'll notice that all of the lights in the area are broken. For picking up the Bar Tab Receipt, you'll receive one karma point. For examining all of the hotspots, you'll receive two more.
Before going into the
Seamstresses Union (Exit A), you might want to talk to a few more residents. William (#8) will tell you that he saw a troll in green hospital scrubs on the night of the murder, and that the troll had some sort of sophisticated cyberware instead of a right hand. Sally (#9) will tell you that all of the lights at the crime scene "exploded" at the time of the murder.
Note: It won't make any difference if you give William his Coat and Blankets.
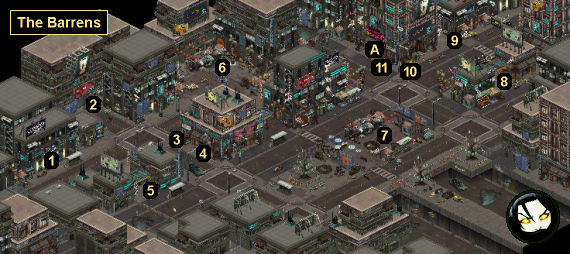
1 - Morgue
2 - Jake's Stash
3 - Worried Man
The Worried Man here will tell you that two thugs have been shaking down the merchants at the local market, and he'll ask you to help. When you head over there (#6), you'll find the thugs trying to collect their take. With Strength 4 or the Gang etiquette, you can scare them off without a fight. You can also bribe them 300 nuyen to leave. Otherwise, you'll have to fight them.
For your reward, you'll always earn 1 karma point. If you use Strength, then the Head Thug will pay you 200 nuyen. If you use the Gang etiquette, then you won't receive any money. If you kill the thugs, then Mrs. James will pay you 48 nuyen.
4 - Sarah
Sarah will warn you about the Halloweeners and their leader, John Paul, who you'll encounter at their base (#7).
5 - Vlad
Vlad will tell you that he saw a "dark" and "alien" spirit the night that Watts died.
6 - Market
7 - Halloweener Base
8 - Crime Scene / Kuprik / William
9 - Sally
Sally will tell you that all of the lights in the alley exploded at the time of Watts' murder.
10 - Dan the Donut Man
For ten nuyen, you can buy a SoyKaf & Donut from Dan, which will give you a bribe for Officer Kuprik (#8).
11 - Bobby
Bobby will sell you
Kamikaze and
Nitro.
Exits
- Entrance to the Seamstresses Union.


