 Did we miss anything in this location? Is there something we didn't discover? Let us know!
Background: After Hours
When you return to the Seamstresses Union in the early hours of the morning, it seems a completely different place. Bereft of the normal crowd that haunts it, the bar feels desolate, almost abandoned. It's eerie, like the back hallways of hotels and shopping malls.
Did we miss anything in this location? Is there something we didn't discover? Let us know!
Background: After Hours
When you return to the Seamstresses Union in the early hours of the morning, it seems a completely different place. Bereft of the normal crowd that haunts it, the bar feels desolate, almost abandoned. It's eerie, like the back hallways of hotels and shopping malls.
But you finally have a break in your case -- a sample of the Ripper's blood. You just need to find someone to help you analyze it....
Background: The Digital World
You've been doing a lot of legwork on this job, but it's going to require a trip to cyberspace and back to ID the Ripper.
The Matrix. The cybernetic analog of inside the Grid -- the worldwide computer network. A digital world, information brought to life. Inside cyberspace, your avatar does all the work while your meat body's left behind. All around your avatar are pathways to other nodes filled with data, IC -- counter-intrusion programs -- and other jacked-in runners.
Cyberspace has as many dangers as the meat world, and more: locked doors, security countermeasures, and Black IC that can fry a decker's brain. Every movement you make in the Matrix can be tracked, if you aren't careful. Get dumpshocked out and your brain gets fuzzy for a bit. Get hit by an enemy decker and you can die.
Karma Points
- [4] Talk to Mrs. Kubota.
- [2] Talk to David Fry II and Johnny Clean.
- [6] Complete your decking runs.
Walkthrough
When you enter the Seamstresses Union, you'll find the place almost empty. In fact, the only people you'll be able to talk to are Mr. Kluwe and Mrs. Kubota in the VIP room. When you tell Mrs. Kubota that you're looking for somebody who can analyze DNA evidence, she'll open the way into the Safehouse, and you'll earn 4 karma points.
In the Safehouse, you'll only find three people around. The first one you should talk to is Van Graas by the bar. If you picked up the Ares Flight Recorder during the previous mission, then he'll offer you 2000 nuyen for it. However, if you have the Corporate etiquette, then you'll be able to get 2500 nuyen for it.
Next, you should head over to the Med-Bay, where you'll find David Fry II and Johnny Clean. Fry will jury-rig some equipment, and he'll come up with the gene code sequence of your DNA sample. But to figure out who it belongs to, you'll need to make a pair of runs into the matrix. To help you out, Fry will have some new items in stock, which will help you if you're a decker. This encounter will earn you 2 karma points.
Johnny Clean will then move over to Fry's terminals at the back of the Safehouse. If you're a decker, then the two of you will be able to make the matrix runs together (which will make them much easier). Otherwise, Johnny will have to make the runs on his own.
The matrix is about the same as reality, except you'll have IP (integrity points) instead of HP, you'll use programs to attack enemies instead of weapons, and you'll be able to use ESPs (expert system programs) to summon help. You'll also have to be quick. You'll start out facing White IC (intrusion countermeasures), but if you take too long and the alarm timer runs out, then (much tougher) Black IC will show up. So be sure to use the Suppression program in between battles. Finally, to exit the matrix, you can either return to the entrance, or you can immediately exit by pressing the eject button in the lower left-hand corner of the interface. Ejecting will cause you problems in reality -- you'll be stunned and lose half of your health -- but that's mostly only an issue when decking during real combat, which isn't the case here.
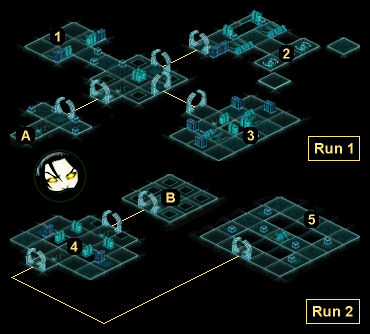
For your first run, you'll hack into the Lone Star Database (Exit A). While in the matrix, you'll need to clear out the area around three data nodes, which will allow you to interact with them. At the Arrest Records Node (#1), you'll match the DNA evidence to Silas Forsberg, a surgical assistant listed as dead. At the Autopsies Node (#2), you'll learn that Silas' face was mutilated, and that police were only able to identify him via dental records. At the News Node (#3), you'll learn that Silas left all of his possessions to his psychiatrist.
When you exit from the Lone Star Database, Johnny will summarize what you discovered, and he'll recommend that you investigate Silas' psychiatrist. This will lead to your second run in the Hospital Database (Exit B). At the Medical Records Node (#4), you'll learn that the psychiatrist is named Dr. Henry Holmes, and that shortly before Silas died, he had started dressing and acting like him. At the Employment Records Node (#5), you'll learn that Holmes is the Chief Psychiatrist at Mercy Mental Hospital.
When you exit from the Hospital Database, you'll earn 6 karma points, and you'll find that all of the Safehouse shopkeepers have returned to their posts. It's a good idea to visit these shopkeepers because, just like with David Fry II, they'll have new items available.
When you talk to David Fry II and Johnny Clean in the Safehouse, you'll decide that Silas must have faked his death and turned himself into Dr. Holmes, which means you'll need to visit the good doctor at Mercy Mental Hospital. Johnny Clean will give you 4000 nuyen so you can hire a team to go with you. Hiring that team (from Mr. Delilah near the entrance to the Safehouse) will complete the mission. You'll face lots of combat ahead, and you'll also have a spot where you can use a decker, so plan accordingly.
1 - Arrest Records Node
2 - Autopsies Node
3 - News Node
4 - Medical Records Node
5 - Employment Records Node
Exits
- Lone Star Database entrance.
- Hospital Database entrance.


