 Did we miss anything in this location? Is there something we didn't discover? Let us know!
Overview
Overview
Did we miss anything in this location? Is there something we didn't discover? Let us know!
Overview
Overview
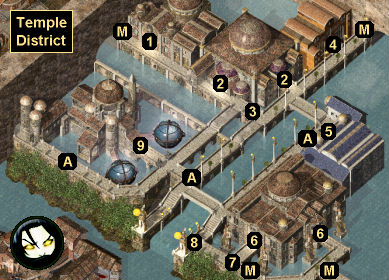
You'll trigger three quests while you're in the Temple District. These quests are a little more complicated than normal because you'll receive the quests from one of the three temples in the district (#1, #2, #9). The temple that you work with will depend on your class and alignment.
Temple Quest 1: Cult of the Eyeless
In the middle of the district (#3), you'll witness the blind priest Gaal trying to convince a group of peasants that the gods are false, and that they should join the Cult of the Eyeless instead. Afterwards, Gaal will leave with some of the peasants, and a high-ranking priest -- High Mornmaster Arval (if you're a cleric with good alignment), Stormherald Nallabir (if you're a cleric with evil alignment), or High Watcher Oisig (otherwise) -- will come up to you and invite you to meet with them in their temple.
When you talk to the priest in their temple, they'll ask you to infiltrate the Cult of the Eyeless, which is located somewhere in the sewers beneath the district (Exit A). If you're talking to Arval or Oisig, then they'll mention that they already have an agent in place, by the name of Keldorn. You'll meet Keldorn (a lawful-good paladin) in the sewers.
Inside the
Temple District Sewers, you'll reach the
Cult Compound, where you'll discover that the Cult of the Eyeless is worshipping a beholder known as the Unseeing Eye. You'll also learn about a weapon called the Rift Device that can destroy the beholder. To use the Rift Device, you'll have to collect its two halves and join them together. This will give you an easy (but optional) way to defeat the beholder. See the
Cult Compound and
Pit of the Faithless pages for more information about dealing with the cult.
After defeating the Unseeing Eye, when you return to the priest who gave you the quest, you'll receive a point of Reputation, and each character in your party will earn 45,750 xp. You'll also earn an extra reward. If you're playing a cleric, then you'll receive 8000 gp, and you'll be allowed to use the priest's temple as your stronghold. See the
Cleric Stronghold page for more information. Otherwise, if you're not playing a cleric, then you'll receive 7000 gp and
Ardulia's Fall +1.
Temple Quest 2: Sir Sarles
You'll receive this quest from a priest in the same temple that gave you the Cult of the Eyeless quest above: Dawnbringer Sain (#2), Guardian Telwyn (#1), or Talon Yarryl (#9). The priest will ask you to commission a statue from Sir Sarles, the greatest sculptor in the land now that Prism of Nashkel is dead (you might remember Prism from Baldur's Gate). The only problem is, Sir Sarles will only work in illithium, and so you might have trouble hiring him.
You'll find Sir Sarles in the Jysstev estate in the
Government District. Sarles won't be impressed by you or the "bloody churches" that you're working for, and he'll let you know that he'll only work for someone who can provide him with 200 pounds of illithium, as anything less would be an "insult" to his skills.
To get the necessary illithium, you'll need to visit with Jerlia, the ore merchant in
Waukeen's Promenade. She'll be at her booth during the day. Jerlia will inform you that 200 pounds of illithium is much more than she can provide, but she'll give you two options for obtaining the full amount:
- Illithium Alloy. Jerlia will tell you that you can fool Sarles with an illithium alloy that only contains a small amount of illithium. This will cost you 200 gp, but you'll have to wait 24 hours for Jerlia to prepare it. However, when you come back the next day, Jerlia will reveal that the other two temples in the Temple District have shown interest in the alloy as well, and she'll increase her price to 500 gp. There isn't any way to negotiate. If you make the exchange, then you'll receive a Chunk of Illithium Alloy.
Note: If you tell Jerlia that you can't afford 500 gp, then when you talk to her again and make the purchase, she won't actually collect the fee from you, and you'll get the alloy for free.
When you deliver the alloy to Sir Sarles, he'll recognize that it isn't pure illithium, and he'll leave the city in a huff. When you relay this bit of news to the priest who gave you the quest, the priest will be content (the main priest will consider the alloy to be just as good as a sculpture), and you'll earn 10,000 xp. You'll also receive an item. If you're playing a cleric, then you'll be allowed to pick what you want:
Armor of Faith +3, a
Ring of Holiness: Honorary Ring of Sune, or a
Staff Spear +2. This item will be delivered to you by Alphonse, so be sure to wait for him. If you're not playing a cleric, then you'll receive a
Helm of Glory +1: Helm of the Noble.
- Pure illithium. If you pay Jerlia 1000 gp, then she'll reveal that her illithium supplier is a duergar named Unger Hilldark, who can be found in the
Copper Coronet in the
Slums District. When you talk to Unger, he'll inform you that his last illithium shipment was stolen by a gnome named Neb (you might remember Neb as the riddling child killer in Baldur's Gate), who lives in a derelict house in the
Bridge District.
You'll find the derelict house on the western side of the
Bridge District, behind the Temple of Helm. Inside, you'll meet Neb. No matter what you say to him, he'll summon four child spirits and attack you. The battle should not be difficult, but there's a slight trick to it. Neb will have four Potions of Invisibility in his inventory, and he'll keep quaffing them during the fight, hoping to force you to attack the spirits. If you kill the spirits, then you'll earn 1500 xp each, but if you kill Neb first, then you'll free the spirits and earn 2500 xp each. Neb doesn't have many hit points, so you might be able to kill him while he's quaffing. You can also use a spell like Detect Invisibility or True Seeing to spot him.
At the end of the battle, if there are any child spirits left, then they'll cast Lesser Restoration on you before departing (which is sort of useful since the spirits can drain levels, but also sort of annoying since the spell will fatigue you). Then when you loot Neb's corpse, you'll find Illithium Ore, Neb's Head, and
Neb's Nasty Cutter +2.
Note: If you take Neb's Head to Chief Inspector Brega in the Council of Six building in the
Government District, then you'll receive 2500 gp and a point of Reputation as a reward.
When you deliver the Illithium Ore to Sir Sarles, you'll receive 21,750 xp. Then when you return to the priest who gave you the quest, you'll receive 1000 gp and 20,000 xp. You'll also receive an item. If you're playing a cleric, then you'll be allowed to pick what you want:
Armor of Faith +3, a
Ring of Holiness: Honorary Ring of Sune, or a
Staff Spear +2. This item will be delivered to you by Alphonse, so be sure to wait for him. If you're not playing a cleric, then you'll receive a
Helm of Glory +1: Helm of the Noble.
- Both. It's also possible to pick up both the Chunk of Illithium Alloy and the Illithium Ore from Jerlia the ore merchant. This will cost you 1500 gp, but you'll be able to use the alloy to complete the quest and the pure ore with
Cromwell in the
Docks District to upgrade the
Mace of Disruption +1. You'll just have to be careful when you talk to Sir Sarles after obtaining the illithium. If you have the alloy and the pure ore in your inventory, then he'll take the pure ore from you. So before you talk to him, you should drop the pure ore to ensure that he takes the alloy instead.
Temple Quest 3: Dawn Ring
The final quest will start out slightly differently depending on which temple you're working for:
- Temple of Lathander. Dawnbringer Sain will tell you that the Talassans (that is, the followers of Talos) hired a thief named Travin to steal the Dawn Ring from them, and he'll ask you to bring it back.
- Temple of Helm. Guardian Telwyn will ask you to speak with Dawnbringer Sain in the Temple of Lathander. From there, the quest will proceed roughly the same as if you had received it directly from the Temple of Lathander.
- Temple of Talos. Talon Yarryl will inform you that he hired a thief named Travin to steal the Dawn Ring from the Temple of Lathander, and he'll ask you to meet with Travin and collect the ring from him.
You'll find Travin in the
Slums District at night. He'll be in the northern part of the district, near the exit. When you ask Travin about the ring, he'll try to charge you 400 gp for it, but then you'll learn that he doesn't actually have the ring, and that it's in the possession of Borinall in his house above the
Copper Coronet. Travin will then try to flee the district. If you paid him for his information, then you can kill him quickly to get your money back, and it won't cost you any Reputation.
Inside Borinall's house, Borinall will want you to prove yourself by declaring your loyalty to Talos. If you refuse to do this, or if you do it while working for Helm or Lathander (which will cause a bolt of lightning to zap you), then Borinall will summon help (either two thugs and a mage, or three muggers), and they'll attack you. For this case, you'll find the Dawn Ring on Borinall's corpse. If you're working for Talos and pledge your loyalty to him, then nothing bad will happen to you, and Borinall will give you the ring. You can also just pickpocket the ring from Borinall.
To complete the quest, you'll need to deliver the ring to Dawnbringer Sain (if you're working for Helm or Lathander) or Talon Yarryl (if you're working for Talos). You'll earn 16,250 xp for your efforts. Sain will also give you 1000 gp, but Yarryl won't give you anything.
1 - Temple of Helm
Inside this temple, you'll meet Sir Lothtyran and possibly Guardian Telwyn. Lothtyran will provide you with temple services, including selling you such items as a
Large Shield +2,
Plate Mail +1, and a
War Hammer +2. Telwyn is involved in the Helm version of the Temple quests, which are detailed in the Overview text above.
2 - Temple of Lathander
Inside this temple, you'll meet Dawnmaster Kreel and possibly Dawnbringer Sain. Kreel will provide you with temple services, including selling you such items as
Boots of Grounding: Talos's Gift, a
Helm of Charm Protection, and a
Staff of Striking +3. Sain is involved in the Lathander version of the Temple quests, which are detailed in the Overview text above.
In a southern room in the temple, you'll find a Statuette of Lathander inside a locked safe. You might need to steal this statuette for Mae'Var inside
Mae'Var's Guildhall in the
Docks District.
3 - Gaal / Cult of the Eyeless
When you approach this site, you'll witness the blind priest Gaal trying to convince a group of peasants that the gods are false, and that they should join the Cult of the Eyeless instead. This will trigger the Cult of the Eyeless quest, which is detailed in the Overview text above.
4 - Pimlico Estate
This estate is involved in
Korgan's companion quest.
5 - Guarded Compound
When you enter this compound, you'll run into Sion and Ketta, who won't be thrilled to see you. No matter what you say to them, they'll gate away. If you leave the compound right away, then nothing will happen. But if you decide to explore, then you'll trigger two battles:
- On the main floor, you'll encounter a variety of summoned creatures, including two ettercaps, a glabrezu, an ogre berserker, and a nishruu. You won't earn any xp for defeating them. This battle should be reasonably easy. If it's not, then you should leave the compound right away.
- Upstairs, you'll encounter Ketta (thief), Koshi (fighter), Maferan (fighter), Olaf Rassmusen (fighter), Sion (conjurer), and Stalman (cleric). This can be a tough fight, in part because you'll have to deal with two traps right where you start, and because Ketta will keep quaffing
Potions of Invisibility and backstabbing people. So cast buffs before heading up the stairs, summon some helpers when the fight starts, and try to disarm the traps right away (by turning off the AI so your party doesn't step on the traps before you can do anything about it, and then turning on the AI again when the floor is safe). You might also try immediately retreating back downstairs. Sometimes only half of the enemy party will follow you, and if nothing else, you'll avoid the traps.
If you can defeat the enemy party, then you'll earn 43,500 xp, and you'll find an
Adventurer's Robe, a
Battle Axe +2,
Celestial Fury +3,
Full Plate Mail +1 (x2), a
Helm of Charm Protection, a
Helm of Defense: Gift of Peace, a
Large Shield +2,
Leather Armor +3, a
Mace +2,
Plate Mail +1, a
Short Sword +2, a
Two-Handed Sword +2, and more. You'll also find two Empty Potion Bottles, but they're not used for anything.
If you search through the entire compound, then you can also pick up a
Morning Star +2 (on the main floor), a
Sling +2 (upstairs in a bedroom), two
Spears +3 (upstairs in the eastern secret room), and a variety of wands and ammunition.
6 - High Hall of the Radiant Heart
You'll meet several people inside this temple, but only two of them are involved in quests:
- Prelate Wessalen. He's involved in
Anomen's companion quest, a
Mage Stronghold quest, and a
Paladin Stronghold quest. He'll also help you against Bodhi, if you side against her.
- Sir Ryan Trawl. If your Reputation is at least 10, then Trawl will tell you about Anarg and the Fallen Paladins, who once were paladins in good standing, but who are now acting on the opposite side of the spectrum. He'll then ask you to infiltrate their band and "do what you think is necessary."
You'll find a group of Fallen Paladins led by Reynald de Chatillon on the eastern side of the
Bridge District, next to the Balthis estate. They'll be in a fight with some smugglers. Both sides will be neutral to you, and all you'll need to do is wait for the paladins to win (which they'll do easily). Or you can assist the paladins (by force-attacking the smugglers) if you want. If you attack the paladins instead of the smugglers, then you'll break the quest.
After the battle, Reynard will come up to you and ask you why you're there. If you say that you want to meet Anarg, then Reynard will give you a task to prove your worth -- to steal Anarg's Cup back from the High Hall. When you return to the High Hall, you'll just need to talk to Trawl to get the cup (assuming your Reputation is still at least 10).
When you return to Reynald with the cup, he'll call Anarg over to see you. Anarg will ask you if you'd like to join his outfit.
- If you say yes, then Anarg will reveal that he knows about your scheme with Trawl, and he and his men will attack you. Following this path will earn you 39,500 xp total.
- If you say no, then you'll still have to fight Anarg and his men, but Reynald will take offense at Anarg's words, and he'll leave, giving you a slightly easier fight. Following this path will earn you 27,250 xp total.
Either way, when you return to Trawl, he'll take back Anarg's Cup, and he'll give you
Gloves of Healing. You'll also receive a point of Reputation, and every character in your party will earn 17,500 xp.
Trawl is also involved in
Anomen's companion quest.
7 - Cyrando, Garrick, Lady Irlana, and Sir Cadril
If you visit this spot on three separate occasions (waiting at least a day in between each visit), then you'll witness Cyrando trying to help Garrick woo Lady Irlana while Sir Cadril watches. However, Garrick will keep fumbling Cyrando's words, and he'll fail to impress Irlana. But in the final scene, you'll learn that Irlana actually loved what Cyrando had to say -- when he said it himself -- and that the two of them got married, while Garrick ended up falling for a bridesmaid at their wedding.
Note: To watch the drama unfold as quickly as possible, simply run to the guarded compound (#5) and rest there three times after every scene, and then return.
Another Note: Garrick was a bard companion in Baldur's Gate.
8 - Dorn (EE)
If you're playing the Enhanced Edition, then at this spot you'll meet Dorn (a neutral-evil half-orc blackguard). He'll tell you that he plans to kill a man named Bollard Firejaw in the High Hall of the Radiant Heart (#6), and if you agree to help him, then he'll join you as a companion. You can also attack Dorn to prevent him from desecrating the temple. See
Dorn's companion quest for more information.
9 - Temple of Talos
Inside this temple, you'll meet Weathermistress Ada and possibly Stormherald Nallabir and Talon Yarryl. Ada will provide you with temple services, including selling you such items as a
Cleric's Staff +3, a
Girdle of Bluntness: Destroyer of the Hills, and a
Staff Mace +2. Nallabir and Yarryl are involved in the Talos version of the Temple quests, which are detailed in the Overview text above.
At night, Ada will go to sleep in the southern bedroom in the temple, and she'll lock her Necklace of Talos in the cabinet next to her. You might need to steal this necklace for Mae'Var inside
Mae'Var's Guildhall in the
Docks District.
Exits
- Entrance to the
Temple District Sewers.
- Map exit.


