 Did we miss anything in this location? Is there something we didn't discover? Let us know!
Overview
Did we miss anything in this location? Is there something we didn't discover? Let us know!
Overview
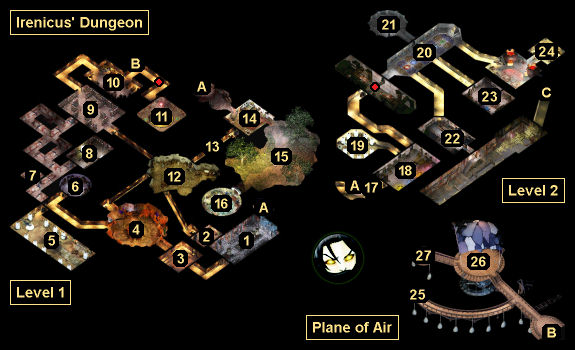
You'll begin the game in a cell in Irenicus' dungeon (#1). Irenicus will perform several "experiments" on you, but then he'll have to leave to deal with some intruders (who you'll later learn are assassins from the Shadow Thieves). During the commotion, Imoen (now a mage/thief) will escape from her cell and free you from yours. You won't have any equipment yet -- even if you imported your character from Baldur's Gate -- so you'll need to explore the dungeon so you can pick up some new gear and also free a few companions.
When you exit the prison (via Exit C), the escape tunnel will collapse behind you, and you won't be allowed to go back in. So try to be thorough in your explorations so you don't miss anything useful. Imoen and Irenicus will also get arrested when you escape, which means you'll lose Imoen as a companion for a while. So make sure she isn't carrying anything important.
1 - Prison
This is where you'll begin in the game. You'll find Jaheira and Minsc in cells here as well. To free Jaheira, you'll need to unlock her cell using the Jail Cell Key found in the room to the west (#2). To free Minsc, you'll just need to talk to him. No matter what you say, he'll get mad at you and break open his cell. Each rescue will earn you 3000 xp.
2 - Jailer's Room
Inside this room, you'll find some basic weapons -- plus Jaheira's Jail Cell Key -- on a table, some basic armor in a chest, and a
Dagger +1 plus three Potions of Healing behind a trapped and locked painting. If you imported a character carrying the
Golden Pantaloons, then you should find them behind the painting as well. Finally, you'll encounter a Jailkeep Golem in the room, but it won't attack you or say anything interesting.
3 - Electrical Chamber
In the center of this room, a strange machine will repeatedly shoot out bolts of lightning, which will release lightning mephits (worth 420 xp) when they hit a wall. To turn off the machine (permanently), you'll just need to flip the switch on the eastern side of the room. Doing so will earn you 2000 xp.
4 - Crystal Chamber
In this chamber, you'll meet the genie Aataqah. He'll ask you a question about a button. If you answer that you'd press it, then Aataqah will call you a "noble one," and he'll summon an ogre mage (worth 650 xp) to fight you. If you answer that you wouldn't press it, then Aataqah will call you a "coward," and he'll summon four gibberlings (worth 0 xp) to run around aimlessly. Either way, you'll also earn 3500 xp, and after defeating your foe(s), Aataqah will recommend that you seek out Rielev (#8) and "offer him the release he craves."
5 - Tank Room
Inside this room, you'll notice several creatures suspended in large, bubbling tanks. If Imoen is with you, then she'll reveal that the creatures "used to be people." You won't be able to do anything with the creatures initially, but after picking up the Energy Cells from Rielev (#8), you'll be able to talk to some of them, and you'll learn three things of interest -- that the mistress' room (#16) can be deadly, that the key to Jaheira's cell (#1) can be found in the jailer's room (#2), and that you'll need a statue to meet with the djinni who resides somewhere in the dungeon (#27).
Also in the room, you'll find a
Quarterstaff +1 in a locked and trapped crate.
6 - Sewage Golem's Room
You'll meet a sewage golem in this room. If you're honest with it, then it won't tell you much. But if you lie and claim to be its master, then it'll tell you that it's supposed to "clean the sewers and feed the guardian," but that it can't do anything unless it has its Activation Stone.
You'll find the Activation Stone nearby (#8). When you give it to the golem, it'll trundle off to the otyugh's room (#12), and it'll unlock all of the doors there, which will allow you to enter the room as well. This will earn you 3000 xp. If you don't want to fetch the Activation Stone, then you can also just steal the Sewage Golem Key from the golem and unlock the doors yourself, but you won't receive any xp this way.
Also in the room, you'll find some weapons on a table, including a
Long Sword +1 and a weapon from your imported character. The imported weapon will come from the following list:
Flame Tongue +1: The Burning Earth,
Ashideena +2,
Bala's Axe, Wizard Slayer,
Suryris's Blade +2,
Longtooth +2: The Grave Binder,
Staff Spear +2,
Staff Mace +2,
Sling +3,
Varscona +2,
Krotan's Skullcrusher +2, or
Kiel's Morning Star +3. The game will select the first weapon it finds in the list, using the order shown here. If you didn't import a character, or if your character didn't carry one of the above weapons, then you'll find a weapon appropriate for your character.
In the other containers in the room, you'll find three
Potions of Extra Healing, a
Potion of Healing, and scrolls of
Dispel Magic and
Flame Arrow.
7 - Clay Golems
The lesser clay golems here won't do anything -- unless you set off the alarm (#16), in which case they'll attack you.
8 - Rielev's Room
Inside this room, you'll meet Rielev, a former friend / servant of Irencius, now kept alive in a large tank. When you talk to Rielev, you'll get a chance to free him from his undeath. If you follow this path, then before dying, Rielev will suggest that you talk to the others like him (#5). Then when Rielev dies, you'll receive Energy Cells (which will allow you to power the other tanks) and 4000 xp.
Also in the room, you'll find two
Potions of Extra Healing (in a barrel) and an Activation Stone (on a table). You'll need the Activation Stone for the Sewage Golem (#6).
9 - Library
When you loot the shelves here, you'll find a bunch of books, plus an
Oil of Speed, a
Potion of Extra Healing, five
Potions of Healing, and scrolls of
Larloch's Minor Drain and
Know Alignment.
10 - Ilyich's Room
When you enter this room, you'll meet Ilyich and a few of his duergar buddies. No matter what you say to them, they'll attack you. We'd recommend taking down their mage first and then mopping up the rest. You'll earn roughly 2700 xp for defeating the duergar, and you'll find Acorns on Ilyich's corpse. You'll need the Acorns for the dryads (#15).
Ilyich will also drop a piece of armor from your imported character. This armor will come from the following list:
Protector of the Second +2,
Mail of the Dead +2,
Fallorain's Plate +1, or
Chain Mail +3. The game will select the first armor it finds in the list, using the order shown here. If you didn't import a character, or if your character didn't carry any of the above armors, then you'll find
Mail of the Dead +2 by default.
Also in the room, you'll find four
Potions of Extra Healing and a scroll of
Grease.
11 - Cambion's Room
Inside this room, you'll discover a strange machine and a cambion stuck inside a protective sphere. The cambion will be hostile, but you won't be able to damage him (or he you) while he's in the sphere. To free the cambion, you'll just need to interact with the machine twice. You'll earn 6000 xp for defeating the cambion, and you'll find a
Bastard Sword +1 on his corpse.
12 - Otyugh's Room
This room will start out locked. To enter it, you'll either need to activate the sewage golem (#6) or steal the Sewage Golem Key from it. Inside the room, you'll encounter an otyugh. When you defeat it, you'll earn 650 xp, and you'll find the Wand of Frost Key on its corpse. You'll need the key for the traps in the throne room (#20).
Also in the room, you'll find a
Helm of Infravision: The Eyes of Truth, an
Oil of Speed, seven
Potions of Healing, and scrolls of
Clairvoyance and
Vocalize.
13 - Goblins
You'll encounter a trio of goblins here. The archer goblin will drop some
Arrows of Biting.
14 - Master's Bedroom
You'll sense "imminent danger" when you enter this room. If you turn on find traps / detect illusion, then you'll discover three traps around you (one on the floor and two on containers). When you loot the containers in the room, you'll find an Air Elemental Statue, a
Metaspell Influence Amulet: The Amplifier, a Wand of Lightning Key, and scrolls of
Burning Hands and
Chromatic Orb. You'll need the statue to enter the Plane of Air (via Exit B). You'll need the key to disarm a trap in the throne room (#20).
You'll also find a miscellaneous item that was imported along with your character. This item will come from the following list:
Helm of Balduran,
The Claw of Kazgaroth,
The Horn of Kazgaroth, or
Koveras's Ring of Protection. The game will select the first item it finds in the list, using the order shown here. If you didn't import a character, or if your character didn't carry any of the above items, then you'll find the
Helm of Balduran by default.
15 - Glade
Inside this glade, you'll meet the dryads Cania, Elyme, and Ulene. They'll ask you for your help. They'll tell you that they can only escape from Irenicus' dungeon if you take their Acorns to Vaelasa the Fairy Queen in the
Windspear Hills. You'll find the Acorns on Ilyich (#10). You'll have to kill him -- and the duergar with him -- to collect them.
When you show the Acorns to the dryads, you'll earn 9500 xp, and they'll tell you that to reach Level 2 of the dungeon, you'll need the Portal Key, which can be found in the Mistress' bedroom (#16). When you eventually escape from the dungeon and deliver the Acorns to Vaelasa, she'll summon the captive dryads to her, and you'll receive an additional 42,250 xp.
16 - Mistress' Bedroom
When you enter this room, you'll set off an alarm, which will cause the two lesser clay golems (#7) to rush over and attack you. You'll earn 4000 xp total for defeating them. Then inside the room, you'll have to deal with no less than seven traps, but you'll find
Bracers of Defense AC 8, the Pommel Jewel of the Equalizer, a Portal Key, a
Potion of Extra Healing, a
Potion of Master Thievery, and scrolls of
Dire Charm and
Monster Summoning I.
The Portal Key will allow you to use the portals in the dungeon (Exits A). The Pommel Jewel is a part of the long sword
The Equalizer. Once you've collected all of the parts of the sword, you'll be able to hire Cromwell in the Athkatla
Docks District to craft it.
17 - Yoshimo
The first time you reach Level 2, you'll meet Yoshimo, a potential companion. In a barrel near this spot, you'll find a scroll of
Hold Person.
18 - Mephit Portal Room
Inside this room, you'll discover four mephit portals, which will regularly release random mephits to attack you. The easiest way to deal with the room is to destroy the portals first and then deal with the mephits. You'll earn 20,000 xp total for destroying the portals.
When you search the room, you'll find three
Bolts +1, a Cursed Scroll of Weakness, two
Potions of Extra Healing, a Wand of Cloudkill Key, a Wand of Fire Key, and a Wand of Summoning Key. You'll need the three keys to disable three of the traps in the throne room (#20). You'll also discover Khalid's corpse in the room, which of course will upset Jaheira (his wife).
19 - Clone Room
Inside this room, you'll find another set of tanks, just like the ones on Level 1 (#5), only the creatures in these will all be clones of the same woman. You'll also see that one of the clones has managed to escape, and that she's fighting an assassin. The clone and the assassin will miss each other with almost all of their attacks, so it'll take a while for them to finish their duel. To speed things up, force attack the assassin and then talk to the clone. No matter what you say to her, she'll attack you, and you'll earn 1250 xp for defeating her. You'll also find a Wand of Missiles Key on her corpse. You'll need the key to disarm a trap in the throne room (#20).
Spoiler Note: Later in the game, you'll discover that the clones are recreations of Ellesime, the elven queen of
Suldanessellar.
Also in the room, you'll find a scroll of
Fireball in a barrel.
20 - Throne Room
Inside this room, you'll have to deal with six pedestal traps. You won't be able to disarm them in the usual way. Instead, you'll have to use the six wand keys: Wand of Cloudkill Key (#18), Wand of Fire Key (#18), Wand of Frost Key (#12), Wand of Lightning Key (#14), Wand of Missiles Key (#19), and Wand of Summoning Key (#18). Each key will disable one of the pedestal traps and give you an associated wand. For example, the Wand of Missiles Key will give you a
Wand of Magic Missiles. However, each of the six wands will only have a single charge remaining, making them only marginally useful.
At the far end of the room, past the traps, you'll find a throne, which you'll be able to loot for a
Ring of Protection +1: Ring of the Princes.
21 - Ulvaryl's Room
Inside this room, you'll witness a vampire named Ulvaryl confronting three assassins. Ulvaryl will defeat the assassins easily -- and then turn on you -- so it's best to attack her right away while she's distracted. Once Ulvaryl has taken enough damage, she'll attempt to transform herself into a bat and flee, but if you're quick then you can kill her anyway and earn 8000 xp.
22 - Assassins
At this spot you'll get stopped by an assassin. Depending on what you say to him, you might learn that the assassins attacking the dungeon are Shadow Thieves, and that they're upset because Irenicus has been trying to create a rival guild. But regardless, the assassin won't believe anything you say, and he and his two (hidden) friends will attack you. You'll earn 2500 xp for defeating them.
23 - Frennedan's Prison
Inside this room, you'll discover an old man named Frennedan trapped in a glass cell. If you show any reluctance to free him, then he'll turn into a small boy, and you'll realize that he's a doppleganger. You'll find the Key to Frennedan's Room in the trapped chest by the door. If you free Frennedan, then he'll start following you, but eventually he'll attack you and you'll earn 3000 xp for defeating him. You can also just attack him right away for the same xp reward.
When you loot the containers in the room (including the containers in Frennedan's cell), you'll find four
Arrows +1, four
Bolts +1, six
Bullets +1, a Cursed Scroll of Foolishness, four
Elixirs of Health, an
Oil of Speed, two
Potions of Extra Healing, a
Potion of Fire Breath, five
Potions of Healing, a scroll of
Protection from Electricity, and spell scrolls of
Blindness,
Blur,
Color Spray,
Invisibility and
Knock.
24 - Duergar
You'll encounter a quartet of duergar in this room. After defeating them, when you look through the containers in the room, you'll find seven
Bolts +1, a
Girdle of Bluntness: Destroyer of the Hills, two
Potions of Extra Healing, three
Potions of Healing, and a scroll of
Charm Person.
25 - Chest
Inside the chest here, you'll find a scroll of
Conjure Air Elemental.
26 - Mephits
You'll encounter several mephits here (worth 420 xp each).
27 - Genie Flask
When you click on the magical flask here, the genie Malaaq will appear. He'll tell you that he has one of your weapons in his possession, but that he can't give it to you while he's bound to the flask. So he'll make you a deal. If you bring him the real version of the flask, then he'll be able to break himself free, and in return he'll give you your weapon.
You'll find The Genie's Flask with the dryads (#15). They'll give it to you if you promise to help them with their Acorns. When you deliver the flask to Malaaq, he'll give you
Sarevok's Sword of Chaos +2 (a good weapon for Minsc), and you'll also earn 15,000 xp. Then Malaaq will disappear and you'll never see him again.
Note: At one point, Malaaq was supposed to be the source for your imported weapon (which makes sense given his dialogue), but for some reason this was moved to the table in the sewage golem's room (#6).
Exits
- Portals between Levels 1 and 2. You'll need the Portal Key (#16) to use these portals. Near the northern portal on Level 1, you'll find scrolls of
Armor and
Fireball.
- Door to the Plane of Air. You'll need the Air Elemental Statue to go through this door.
- One-way exit to
Waukeen's Promenade.


