 Did we miss anything in this location? Is there something we didn't discover? Let us know!
Overview
Did we miss anything in this location? Is there something we didn't discover? Let us know!
Overview
Your goal in Brynnlaw is to find a way to infiltrate the
Spellhold asylum where Imoen is being held prisoner. To that end, you should head into the Vulgar Monkey (#9) and meet with Sanik, your contact in the area. Sanik is a merchant who has had dealings with Spellhold, but before he can say much to you, one of Lady Galvena's assassins will kill him -- and then suicidally attack you.
After the battle, the Vulgar Monkey's innkeeper will inform you that Sanik tried to rescue a girl named Claire from Lady Galvena's clutches, which Lady Galvena didn't appreciate. The innkeeper will then speculate that Sanik might have told Claire what he knew about
Spellhold.
To talk to Clair, you'll need to enter the main part of Lady Galvena's Festhall (#5). You'll have three options for this:
- You can hire (or otherwise convince) one of the courtesans in front of the festhall to take you to their room. Paying the courtesan for information or their services isn't necessary if you have enough Charisma.
- You can acquire Galvena's Medallion from Chremy (#8), either by pickpocketing it from him or killing him for it. When you show this medallion to Front in the foyer of the festhall, he'll open up a secret door, which will give you access to the rest of the rooms.
- You can detect the secret door in the foyer yourself, and then either pick the lock or pickpocket the Guild House Key from Front. However, when you open the secret door, Front will call the guards, and you'll no longer be able to skip fights.
The festhall is comprised of a series of rooms connected by a long hallway. From east to west, those rooms are the foyer, the courtesan's room, the kitchen, Lady Galvena's bedroom, and the dungeon. You'll encounter two guards in the hallway in front of Lady Galvena's bedroom. They won't allow you to pass, even if you have a medallion. There are two ways to deal with them:
- You can drug the guards. For this option, you'll need to convince -- not hire -- one of the courtesans outside the festhall to take you up to their room. When you arrive, the courtesan will give you a Sleeping Draught, which you can then take to Ellie in the kitchen. The guards will spot you when you approach the kitchen. Whatever you do, don't claim to be a new recruit. Just say that you're a customer or that you're leaving, and they'll ignore you.
Inside the kitchen, you'll need to prod Ellie a bit, but she'll take the Sleeping Draught and use it to drug three mugs of ale. This will earn you 1000 xp. A courtesan in the kitchen will then deliver the ale to the two guards outside Galvena's bedroom, and Captain Rerdes (aka "Guard Capt") inside the bedroom, and they'll all fall asleep.
Note: Later, after killing Galvena and rescuing Claire, if you return to Ellie, then each character in your party will earn 2250 xp.
- You can fight the guards. You'll earn 14,500 xp for killing them, and you'll find a
Halberd +2 on one of the corpses. You can also kill the guards after you've drugged them (see above), but for this case you'll only earn 14,000 xp for their deaths, and you'll only find two
Halberds +1 on the corpses.
With the guards neutralized, you'll need to enter Galvena's bedroom and take Galvena's Key from a cabinet. The key will unlock the door to the dungeon. Inside the dungeon, you'll discover Galvena and her "pet wizard" Vadek preparing to kill Claire. But when you arrive, they'll attack you instead. You'll earn 12,000 xp for defeating them, and you'll find a
Flail +2,
Leather Armor +3, and a
Quarterstaff +2 on their corpses.
When you talk to Claire, she won't know anything about
Spellhold, but she'll lead you to the docks, where you'll meet Captain Golin, a friend of Sanik's. Golin will thank you for your help, and if you ask him for a reward, then he'll pay you 22 gp. You'll also earn 2000 xp for talking to him. Finally, Golin will describe two methods for entering
Spellhold:
- As a Cowled Wizard. For this method, you'll need to visit Perth the Adept inside his house (#13). Perth will be a little bit crazy, and when he recognizes you, he'll decide to "test your limits" -- that is, attack you. You'll earn 20,000 xp for defeating Perth, and you'll find a
Book of Infinite Spells and a Wardstone for Asylum on his corpse. The wardstone will allow you to enter
Spellhold through its front entrance, which you can reach via the path leading out of the city (Exit A).
- As a deviant. For this method, you'll need to visit Desharik inside his house (#14). To gain admittance, you'll need to tell the door guard that Captain Golin or Captain Saemon sent you, or bribe him 300 gp. Then when you talk to Desharik, you'll have to convince him that you're insane (and not mention that you want to rescue Imoen). For this to work, you'll need 16 Charisma, or you'll need to have Minsc or Yoshimo in your party. If you fool Desharik, then he'll have you committed to
Spellhold, and you'll end up in a cell on Level 1.
After Spellhold
Inside
Spellhold, you'll find Imoen, but you'll also run into Jon Irenicus, who will capture you and steal your soul. He'll also try to dispose of you, but you'll escape, which will take you through
Spellhold Dungeon and the
Spellhold Tests. Eventually, you'll force Irenicus to flee from
Spellhold, and at this point you'll encounter Saemon Havarian. Regardless of how Saemon might have treated you earlier, he'll inform you that Irenicus is on his way to
Suldanessellar, and he'll offer to take you there.
If you refuse Saemon's offer, then you'll have to exit from
Spellhold using Irenicus' escape portal, which will take you to the
Underdark, and you won't see Brynnlaw again. But if you accept the offer, then Saemon will teleport you out of
Spellhold, and he'll ask you to meet him inside the Vulgar Monkey in Brynnlaw. Before doing that, however, it's a good idea to re-enter
Spellhold and explore some of the rooms that weren't available to you before. Doing so will net you a
Horn of Silence and a
Staff of Thunder and Lightning +2.
Inside the Vulgar Monkey (#9), Saemon will give you some bad news. He'll tell you that the Pirate Lord scuttled his ship, which means he's currently grounded. But Saemon will have a solution for the problem. He'll suggest that you liberate the Pirate Lord's ship and use it for the voyage instead. All you'll need to do for this plan is steal the Pirate Horn from Cayia, the Pirate Lord's girlfriend.
To perpetrate the theft, you'll need to visit Cayia's house (#3) at night. Cayia will be there with Algor, her current paramour, and after they talk for a bit, they'll go to bed. But no matter what you do, they'll spot you when you try to take the Pirate Horn (from a table), and they'll call the guards before fleeing. This will force you to fight three pirates (worth about 3000 xp total). There isn't any way to avoid this fight.
With the Pirate Horn in your possession, you'll next need to meet with Saemon on the eastern side of the docks. However, on your way to him, you'll run into a press gang (near Calahan at #7). No matter what you say to the pirates, they'll attack you. The battle should not be difficult. You'll earn 10,300 xp for defeating the gang, and you'll find some +1 items on their corpses.
When you reach Saemon, he'll accept the horn from you, and you'll automatically board the Pirate Lord's ship (#15). But before you can depart, Desharik the Pirate Lord will show up. He'll kill Cayia for being unfaithful, and then he'll sic several pirates on you (but not fight you himself). You'll earn about 3000 xp for winning the battle, and afterwards Saemon will give you a
Silver Blade (a part of the
Silver Sword, which
Cromwell can craft for you in the
Docks District). Then you'll set sail, and the chapter will come to an end.
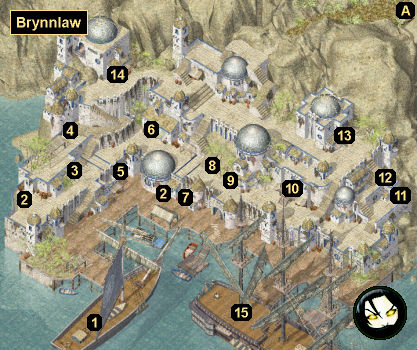
1 - Galante
This is where you'll start out in Brynnlaw. Depending on whom you were working for in Chapter 3, the starting sequence will be a little bit different.
- If you were working with Aran Linvail, then you'll get ambushed by the vampires Del, Parsia, and Valen (who you might remember from Chapter 2) when you disembark from the ship. You'll earn 25,500 xp for defeating them. After the battle, Aran's associate Sime will recommend that you talk with Sanik inside the Vulgar Monkey Tavern (#9) to learn about ways of entering
Spellhold. Sime will then teleport away, but you'll meet her again later (near Exit A).
- If you were working with Bodhi, then she'll be on board the ship with you, but she'll teleport away to take care of her own business. So Saemon Havarian, the ship's captain, will escort you to the Vulgar Monkey Tavern (#9), and he'll recommend that you talk to Sanik inside.
2 - Duels
In these two places, you'll witness pirates having duels: Andar and Olben in one, and Andante and Derbish the Black in the other. The duels aren't important for anything, and you won't earn anything for watching them. The losers of the duels also won't drop anything interesting. If you feel so inclined, then you can kill everybody involved in the duels for some minor xp, and nobody in Brynnlaw will care.
3 - Cayia's Home
On a table inside this house, you'll find a
Rogue Stone. Later, you might need to visit this house to steal the Pirate Horn for Saemon Havarian (see the Overview text above).
4 - Ason
Ason is Ginia's (#11) brother. He'll "accidentally" bump into you and lighten your purse by 10 gp. If you threaten him, then he'll give the money back. If you ask him why he's stealing, then he'll claim it's so he doesn't get beaten, and after talking to Ginia, it'll be clear that Chremy (#8) is his taskmaster. Ason will disappear after your encounter, or after completing Ginia's quest.
5 - Lady Galvena's Festhall
This establishment will start out locked. You won't be able to enter it until after meeting with Sanik in the Vulgar Monkey (#9). See the Overview text above for more information about the festhall.
6 - Shop
Inside this shop, the storekeep will sell you a variety of potions, spell scrolls, and equipment (up to +2).
7 - Calahan
Calahan is involved in Ginia's quest (#11). If you talk to Calahan, then he'll tell you how he got kicked out of Ulgoth's Beard (a location in Baldur's Gate: Tales of the Sword Coast) and ended up here.
8 - Chremy
Chremy is involved in Brynnlaw's main quest (see the Overview text above) and Ginia's quest (#11).
9 - The Vulgar Monkey
You'll meet several named NPCs inside this tavern, but the only two of importance are the innkeeper, who will allow you to rent a room, and Sanik, who is involved in the main quest for the area (see the Overview text above).
10 - Temple of Umberlee
The priestess here will provide standard temple services, and she'll also sell a few items, including a
Cleric's Staff +3, a
Girdle of Bluntness: Destroyer of the Hills, and a
Staff Mace +2.
11 - Ginia
When you talk to Ginia here, you'll learn that she's being forced to work as a courtesan for Chremy, and that she has to earn money to avoid being beaten by him. To save Ginia, you'll need to kill Chremy (#8), and you'll need to pay Calahan (#7) 200 gp to smuggle Ginia and her brother Ason (#4) out of the city. Doing these things, and letting Ginia know about it, will earn you a grand total of 12,100 xp.
12 - Compartment
Inside the compartment here, you'll find a
Wand of Paralyzation.
13 - Perth's Home
14 - Desharik the Pirate Lord's Home
If you loot the containers here, then you'll find a
Light Crossbow +1 and a
Longbow +2.
15 - Pirate Lord's Ship
Exits
- Path to
Spellhold.


