 Did we miss anything in this location? Is there something we didn't discover? Let us know!
Overview
Did we miss anything in this location? Is there something we didn't discover? Let us know!
Overview
When you arrive at the keep, Nalia (either right away or at #1) will tell you about the invasion. Captain Arat (#1) will give you some information as well. Between the two, you'll learn that trolls and yuan-ti are responsible for the attack, that Lord de'Arnise is missing, and that a secret entrance (Exit A) can get you inside. Captain Arat will also suggest that you lower the drawbridge (#2), which will allow him and his men to assist you, and he'll give you 20
Arrows of Fire to help you out.
If you haven't fought trolls before, then know this: any damage you do to them will hurt them, but to kill them permanently, you'll need to hit them with acid or fire (from weapons or spells) while they're unconscious. Otherwise, they'll just get right back up and start fighting again. To make the troll battles easier, you should use a weapon that deals fire or acid damage -- like the
Sword of Flame +1 sold by Ribald Barterman in the Adventurer's Mart in
Waukeen's Promenade, or the
Flail of Ages +3 that you'll be able to craft inside the keep (#5) -- rather than relying on spells or arrows.
When you enter the keep, you should head for the main entrance (Exit B). This will take you to the inner courtyard, where you'll encounter an otyugh (worth 5000 xp). When it's dead, you'll need to climb up into the ramparts, deal with a troll (worth 1400 xp), and then turn the winch above the gatehouse (#2a). This will lower the drawbridge and allow the de'Arnise forces to enter the keep. You'll earn 29,750 xp as a reward, but at the same time more trolls and yuan-ti will appear, and you'll have to help the de'Arnise forces to defeat them.
Back inside the keep, you'll need to head up to the Upper Floor, where you'll encounter a troll and a yuan-ti mage (#10). Nearby, you'll find the Keep Key, which will open all of the locked doors in the keep. This will allow you to enter Lady Delcia's room (#12). Lady Delcia isn't important -- she'll just insult you -- but the secret door in the back of her room will give you access to the Cellar (via Exit G). However, before descending, it's a good idea to craft the
Flail of Ages +3 (see #5 for details).
In the Cellar, you'll have to deal with five umber hulks (#14). If you collected the Dog Meat from the dogs in the courtyard (#3) and cooked it in the kitchen (#8), then you'll be able to use the resulting Dog Stew to distract the umber hulks so you don't have to fight them (see #14 for details). This will earn you 18,750 xp. Or you can just fight the umber hulks for 20,000 xp. Or you can do both.
Past the umber hulks, you'll encounter TorGal, the troll leader (#16). No matter what you say to him, he and his fellow trolls will attack you. TorGal hits hard, so throw your best spells at him and try to kill him quickly, and then mop up the rest. You'll earn 15,000 when TorGal dies. Defeating him will end the invasion.
To complete the quest, you'll need to do one of two things:
- If Nalia isn't in your party, then you'll need to head over to the wooden palisade outside the keep and talk to her there (#1).
- If Nalia is in your party, then as soon as you exit the keep, she'll automatically talk to you and give you your reward.
Either way, each character in your party will earn 45,500 xp. You'll also earn some money: 10,650 gp (if Nalia is in your party and you don't dismiss her) or 650 gp (otherwise).
Finally, if you're playing as a Barbarian, Blackguard, Fighter or Monk, then Nalia will offer you control of the keep so you can block her arranged marriage to Isaea Roenall. See the
Fighter Stronghold section for more information about this. Otherwise, if you're playing as a non-fighter class, then Nalia will just decide to flee from the arranged marriage. Either way, she'll continue to be available as a companion.
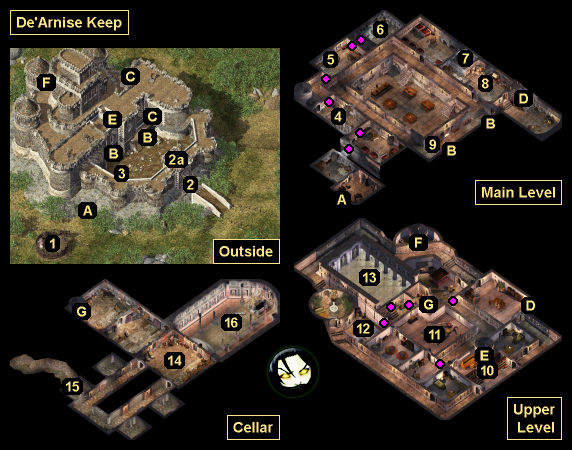
1 - Wooden Palisade
Inside this structure, you'll meet Captain Arat. He'll give you 20
Arrows of Fire.
2 - Drawbridge / Winch
The drawbridge (#2) will start out in the "up" position. To lower it, you'll need to turn the winch at the top of the gatehouse (#2a), which you'll only be able to reach by entering the keep through the secret passage (Exit A) and then going through the main entrance (Exit B).
3 - Dogs
Here you'll meet the dogs Rex, Rover, Sparky and Spot. If you force-attack them, then you'll find four pieces of Dog Meat on their bodies, which you'll be able to cook in the kitchen (#8) to create Dog Stew. The stew will allow you to skip a fight later (#14).
4 - Armory
You'll meet the servant Daleson here. He'll tell you that Lord de'Arnise was captured by large troll, and that the troll is guarded by "nasty-looking monsters" (aka umber hulks) who care about food more than anything else.
In the weapon racks in the room, you'll find a
Quarterstaff +1, a
Spear +1, and lots of magical ammunition, including 12
Acid Arrows +1 and 50
Arrows of Fire, which you might need for killing trolls.
5 - Forge
You can use this forge to craft and upgrade a powerful weapon called the
Flail of Ages +3. Inside the keep, you'll find three flail heads:
- Flail Head (Acid) - Carried by Glaicus (#11).
- Flail Head (Cold) - Found in the crypt (#6).
- Flail Head (Fire) - Found in the treasure room (#13).
If you bring these flail heads to the forge, then you'll craft the
Flail of Ages +3 and earn 22,350 xp. Later in the game, you'll find two more flail heads (during the Throne of Bhaal expansion pack), which will allow you to upgrade the weapon to +5.
Note: If you're playing a fighter class, then you'll need to pick up the flail heads before defeating TorGal (#16) and ending the invasion. That's because when you gain control of the keep, a new version of it will be spawned, and the flail heads -- if they haven't been looted -- will disappear.
6 - Crypt
Inside this crypt, you'll find a Flail Head (Cold), a
Ring of Earth Control, and 810 gp. You'll need the flail head for the
Flail of Ages +3 (see #5).
7 - Bathroom
You'll find a
Star Sapphire hidden in one of the commodes here.
8 - Kitchen
Inside this kitchen, you'll find a wood range. After grabbing the Dog Meat outside (#3), if you place all four pieces into the cauldron here, then you'll receive Dog Stew, which you can use with the umber hulks in the Cellar (#14). You'll also earn 11,500 xp for creating the stew.
9 - Chest
Inside the (trapped) chest here, you'll find a
Dagger +2 and 450 gp.
10 - Library
Inside this small library, you'll encounter an ice troll, a giant troll, and a yuan-ti mage. When you "kill" the giant troll, it'll split into two smaller trolls. You'll receive over 8000 xp for winning the battle, and when you loot the shelves in the room, you'll find the Keep Key, which will unlock several doors on the Upper Floor.
11 - Meeting Room
Inside this room, you'll encounter Glaicus, Lord de'Arnise's bodyguard. Glaicus will mention how glorious his "new master" is before he attacks you, and Nalia will recognize that he's been charmed. If you dispel Glaicus or charm him yourself, then you'll free him from the spell. This will earn you 22,550 xp, and Glaicus will reward you with the Flail Head (Acid), which you'll need for the
Flail of Ages +3 (see #5). Otherwise, you'll have to kill Glaicus. This will earn you 9500 xp, and you'll find the flail head plus
Full Plate Mail on his corpse.
12 - Lady Delcia's Room
Inside this room, you'll meet Lady Delcia Caan (Nalia's aunt) and her bodyguard Hendron. Delcia will go out of her way to insult everybody around her, including you. If you get tired of her antics, then you can attack her and her bodyguard, but this will cost you some Reputation points. Otherwise, at the end of the conversation, Declia will make her escape from the keep, and you'll only ever see her again (briefly) if the keep becomes your stronghold.
13 - Treasure Room
Inside this room, you'll find three statues holding treasure items -- which sounds good except for the fact that each statue is being guarded by a pair of golems, as summarized in the table below:
Note: The golems won't care if you loot the flail head, so you should grab it first and then use the
Flail of Ages +3 (see #5) during the fights.
Looting the left and right statues should be straightforward. You'll need +3 weapons to damage the stone golems, but otherwise they're not especially powerful, and you should be able to wear them down using the
Flail of Ages +3 and
Frostreaver +3, plus whatever other +3 weapons you might be carrying.
But the center statue might be difficult. You'll need +3 weapons for the iron golem, just like with the stone golems, but the iron golem will also hit you hard and resist most of the damage you do to it. Plus, the clay golem is immune to cold, piercing and slashing damage, possibly making it difficult to deal with as well.
Note: To make the battles easier, you can force-attack the golems. Only the golem you attack will turn hostile, allowing you to fight them one at a time.
Another Note: The golems can't fit through the doorway to the treasure room, so you can always grab what you want and then run out.
If you want to kill the iron golem, we'd recommend killing all of the other golems first, and then parking your tank next to the golem, with your other characters slightly farther away. If you have the belt
Destroyer of the Hills, put that on your tank (for extra crushing armor). Then buff everybody up (with haste, bless, defensive harmony, and whatever else you have), and then loot the middle statue. The iron golem should attack your tank, and from there it'll just be a matter of you killing the golem before it can kill your tank. Since you'll have healing potions and healing characters on your side, you should be able to win.
You'll earn 8000 xp for defeating the clay golem, 2000 xp each for the flesh golems, 13,000 xp for the iron golem, and 8000 xp each for the stone golems -- for 41,000 xp total.
14 - Umber Hulk Room
In this room, you'll encounter five umber hulks worth 4000 xp each. If you don't want to fight them, then you can drop off the Dog Stew (from #3 and #8) at their tunnel (#15). This will cause them to vacate their post and race to the food, and earn you 18,750 xp. You can also feed the umber hulks and then kill them to get both xp rewards. To get a character to the tunnel safely, you should either use invisibility or sanctuary.
In one of the chests in this room, you'll find
Orc Leather +3.
15 - Umber Hulk Tunnel
16 - Shrine to Tyr
In this room, you'll encounter the troll boss TorGal plus a couple of other trolls. No matter what you say to them, they'll attack you, so for an easier fight, you should buff up before entering the room. TorGal will hit you hard, so throw your best spells at him and try to kill him quickly. Then mop up the rest. You'll earn 15,000 for defeating TorGal.
Also in the room, you'll find the remains of Lord de'Arnise (Nalia's father) and some gems and over 2000 gp in the statue of Tyr.
Exits
- Secret entrance to the keep. You'll need to detect this entrance before you can use it.
- Main entrance to the keep.
- Passage between the battlements and the roof.
- Stairs between the Main Level and the Upper Level.
- Exit between the Upper Level and the roof.
- Exit between the Upper Level and the roof.
- Stairs between the Upper Level and the Cellar. Near this exit in the Cellar, you'll find a
Shield Amulet in a chest.


