 Did we miss anything in this location? Is there something we didn't discover? Let us know!
Overview
1 - Gaelan Bayle / House
Did we miss anything in this location? Is there something we didn't discover? Let us know!
Overview
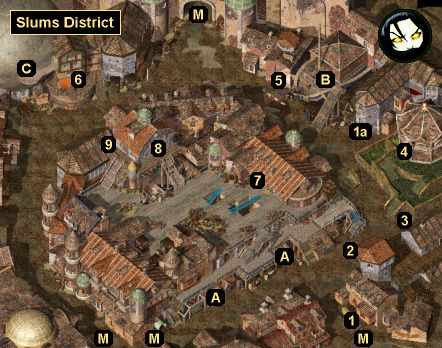
1 - Gaelan Bayle / House
The first time you enter the Slums District, you'll meet Gaelan Bayle here (#1). No matter what you say to him, he'll take you to his house (#1a), and he'll make you a deal. For the low, low price of 20,000 gp, he'll offer you the help of a "powerful group" who can find out where the Cowled Wizards took Imoen, and help you to rescue her. You won't be able to refuse this offer. It'll be your main quest for Chapter 2.
Upstairs in Bayle's house, you'll meet Arledrian. He'll have a little bit of everything for sale, including
Glasses of Identification and several +1 items.
Note:
Glasses of Identification aren't worn or hotkeyed like other items. They're just carried in your inventory, and they count as a "scroll" when you attempt to identify something.
The first time you leave the house, you'll meet Gaelan's nephew Brus outside. He'll tell you about some work that might be suitable for you -- that is, the quest that'll lead to you earning a stronghold -- and he'll either lead you to the
Copper Coronet (if that's where the quest giver is stationed) or the edge of the district (if not).
2 - Cohrvale and Bregg
No matter what you say to this duo, they'll attack you. You'll earn 10,000 xp for defeating them.
3 - Storekeep
This storekeep will only appear here at night. She'll have a variety of weapons and armor available, including
Arrows of Fire,
Full Plate Mail, and a
Sling +2.
4 - The Jansen Home
Inside and outside this house, you'll meet relatives of Jan Jansen -- Cousin Kylie, Uncle Gerhardt, Ma, Tat, and Tot -- but you'll have to travel to the
Government District to find Jan himself. You'll need to visit Jan's home during
his companion quest.
5 - Derelict House
This is the house where Baron Ployer is staying. Inside, you'll find a note from Terrece to Ployer indicating that he and his fellows "will strike when you have located her." This is all a part of
Jaheira's companion quest.
6 - Sheared House
To reach the Planar Sphere (Exit C), you'll have to walk through what remains of this house.
7 - Borinall's House
This house will start out locked. Inside, you'll find a
War Hammer +1 on a table. Borinall will only appear here during the Dawn Ring quest from the
Temple District.
8 - Temple of Ilmater
9 - Black Market Thief
This merchant will only appear here at night. He'll have weapons and armor available, including a
Buckler of the Fist +2 (if imported from Siege of Dragonspear), a
Dagger +2, a
Martial Staff +3, and a
Shortbow +2.
Exits
- Entrances to the
Copper Coronet.
- Front entrance to the
Slaver Stockade.
- Entrance to the
Planar Sphere. You'll need Valygar (or his body) with you to enter the sphere. You'll meet Valygar while tracking him down for Tolgerias in the
Government District.
- Map exit.


