 Did we miss anything in this location? Is there something we didn't discover? Let us know!
Overview
Did we miss anything in this location? Is there something we didn't discover? Let us know!
Overview
The silver dragon Adalon will send you to this city to retrieve her eggs. If you complete all of the quests detailed below, then you'll eventually come in contact with those eggs. But completing the quests isn't required. You can also just kill all of the drow and then pick up the eggs from the Temple of Lolth (#13). Skipping the quests is quicker, but doing so will cost you lots of equipment and xp.
Rescuing Phaere
When you enter Ust Natha for the first time (via Exit A), the gate guard will tell you that you're late, and he'll order you to meet with Solaufein in front of the Male Fighters' Society (#10). When you comply, Solaufein will inform you that Matron Mother Ardulace has taken an interest in you, and that you should meet with one of her handmaidens back at the entrance platform. He'll also recommend that you don't delay, and you should heed his words. Almost all of the quests in Ust Natha are timed, and if you take too long to complete a stage (usually more than a day), then you'll fail the quest, and all of the drow in the city will turn hostile.
At the entrance platform (#1), you'll meet Solaufein and Imrae the handmaiden. They'll inform you that Ardulace's eldest daughter Phaere was captured by mind flayers, and that you and Solaufein have been chosen to rescue her. To start the rescue, you'll need to meet with Solaufein in front of the
Mind Flayer Tunnels in the
Underdark.
On your way to the
Mind Flayer Tunnels, you'll get ambushed by an adventuring band: Boz (ogre fighter), Chandrilla (cleric), Damien (thief), N'ashtar (conjurer), Pitch (mephit), and Simbja (hobgoblin). The battle against them shouldn't be too tough, especially if you buff up first. You'll earn over 20,000 xp for defeating the adventurers, and you'll find the halberd
Dragon's Breath +4 on Boz's corpse.
When you talk to Solaufein in front of the
Mind Flayer Tunnels, he'll use a "blessed item of Lolth" to pull Phaere and her mind flayer kidnappers out of the Astral Plane. This will trigger a fight with you, Phaere and Solaufein against three mind flayers and three umber hulks. The battle can be sort of annoying since the enemies will probably appear right in the middle of your party, but as long as you kill the mind flayers quickly, it shouldn't be too bad. You'll earn 39,000 xp for winning the battle and then 20,000 xp more when you talk to Solaufein. Afterwards, Phaere will head back to Ust Natha, and Solaufein will follow her.
Killing a Beholder
When you return to the city, you'll find Solaufein and Imrae on the entrance platform (#1), at the same place where you spoke to them before. Imrae will congratulate you for your successful rescue, and she'll order you and Solaufein to meet with Phaere inside the tavern (#5). Once there, Phaere will tell you that she has another task for you and Solaufein, and that you should meet with her back at the entrance platform so she can tell you about it. It won't make any difference if you flirt with Phaere during this conversation, although if you're romancing one of your companions, they might not appreciate it.
On the entrance platform, Phaere will tell you that a beholder has been caught smuggling adamantite out of the city, and that you, she, and Solaufein have been tasked with killing it. To deal with the beholder, you'll need to meet with Phaere and Solaufein on the docking platform in the southeastern part of the city (#14). When you talk to Phaere there, the beholder will arrive. It'll be alone, and you'll have help against it, so the battle shouldn't be too difficult. You'll earn 14,000 for defeating the beholder plus 20,000 xp more for completing the quest.
After the battle, Phaere will warn you to leave the beholder's corpse alone because "several acolytes are coming to deal with it." This won't make any sense given what you were told about your task, and Solaufein will question Phaere's motives, but nothing will come of it -- yet. Phaere will simply tell Solaufein to shut up, and she'll ask the two of you to meet her in the tavern.
Slaughtering a Svirfneblin Patrol
Back in the tavern (#5), Phaere will order you and Solaufein to put some fear into the local svirfneblin. In particular, she'll tell you to approach the svirfneblin settlement in the
Underdark, wait for one of their patrols to pass by, and slaughter it. Solaufein will leave immediately and wait for you there.
You'll find Solaufein well to the south of the bridge leading to the svirfneblin settlement. When you talk to him, you'll have two choices:
- You can kill the svirfneblin patrol, with or without Solaufein's help. The patrol will pass by soon after you've spoken to him. It shouldn't cause you any problems, and you'll earn 9000 xp for defeating it. If Solaufein is with you, then he'll return to the city right after the battle. You'll then just need to loot the Patrol Leader's Helmet before returning yourself.
- You can spare the svirfneblin patrol. For this, you'll need to tell Solaufein that you can handle the patrol by yourself. He'll leave, and when the patrol passes by, you can explain the situation to them. The patrol leader will happily give you his helmet, and he'll promise to do more bowing and scraping in the future.
When you deliver the Patrol Leader's Helmet to Phaere in the tavern, each character in your party will earn 28,000 xp. Phaere won't notice any difference if the patrol is still alive. However, the bickering between Phaere and Solaufein will grow to a crescendo, and Phaere will order you -- without Solaufein -- to meet her inside the Female Fighters' Society right away.
Assassinating Solaufein
Inside the Female Fighters' Society (#7), Phaere will tell you that she's fed up with Solaufein, and she'll order you to kill him. You'll find your quarry inside the Male Fighters' Society (#10). You'll have two ways to deal with him:
- You can kill Solaufein. You'll earn 6000 xp for doing this, and you'll find his
Drow Piwafwi Cloak on his corpse.
- You can let Solaufein live. He'll give you his cloak, and he'll reveal that he and Phaere were once lovers. He might also figure out that you're not drow, but he won't mind, and he'll disappear into the shadows so nobody will notice that he's still alive.
Note: Keeping Solaufein alive will give you an extra option during the final quests (see below).
When you deliver Solaufein's cloak to Phaere, each character in your party will earn 30,000 xp. If you're playing a male character, then Phaere will invite you into her bedroom so you can please her. You can get out of this by claiming that you're a eunuch. If you sleep with Phaere, then you might have problems with the companion that you're romancing. Regardless, afterwards Phaere will tell you that it's finally time for you to meet with Matron Mother Ardulace.
Acquiring Noble Blood
You'll find Phaere and Ardulace waiting for you in the Temple of Lolth (#13). Ardulace will be far less impressed by you than Phaere, but she'll still give you a task -- to retrieve the blood from a noble member of one of the "neighbor races." You'll also learn that the beholder you killed earlier was supposed to have supplied this blood, but that Phaere screwed up and targeted a regular beholder instead of a noble one.
You'll have three options for acquiring the noble blood: the Elder Orb in the
Beholder Tunnels, the Kuo-toan Prince in the
Kuo-toan Tunnels, or the Master Brain in the
Mind Flayer Tunnels. Really, it's best to thoroughly explore all of the tunnels and acquire all three blood samples. When you deliver the Elder Brain Blood, the Eyestalk of the Elder Orb, or the Kuo-toa's Blood to Ardulace, each character in your party will earn 28,000 xp followed by 22,000 xp for 50,000 xp total. Then Phaere will order you to meet her in her chambers again.
Stealing the Eggs
Back in the Female Fighters' Society (#7), Phaere will reveal that she wants to betray Matron Mother Ardulace. As long as you're agreeable to this, she'll detail her plan. She'll tell you that Ardulace is planning to use the noble blood and the silver dragon Adolan's eggs to summon a demon, and then use the demon to assault the surface. However, Phaere will ask you to replace Adalon's eggs with some fake ones, so the demon kills Ardulace and Phaere becomes Matron Mother. She'll then give you Fake Dragon Eggs and the Despana Treasury Key.
You'll find Adalon's eggs in a locked vault inside the Temple of Lolth (#13). However, when you reach the temple, if Solaufein is still alive, then he'll give you another set of Fake Dragon Eggs. These eggs will give you an extra option during the final quests (see below).
There are two basic ways to steal Adalon's eggs:
- The violent approach. For this option, you'll have to kill the two egg guards in front of the temple's vault, plus three stone golems and two clay golems inside the vault.
The two egg guards combined only have 15 hp, so they'll go down quickly. If you one-shot both guards, then the matron's guards to the south peobably won't notice. If the matron's guards do notice, then all of the drow in the city will turn hostile, and you'll need to load your game and try again. So to be safe, you should position your party in between the egg guards and the vault door, out of view of the matron's guards.
For the golems, they'll provide you with a tougher battle, but you won't have to worry about being seen with them. Just make sure you have magical crushing weapons for the clay golems and +2 weapons for the stone golems. You'll earn 40,000 xp for defeating the golems, plus 200 xp for defeating the egg guards.
- The peaceful approach. No matter what spells you have, or how stealthy you are, when you open the door to the temple's vault, the egg guards next to it will turn hostile, and when you swap the eggs inside the vault, the vault golems will turn hostile. The trick is, as long as they can't see you or attack you, then you'll be able to walk out scot-free, and nobody will notice. You can do this by quaffing a
Potion of Invisibility right after opening the door and then again right after swapping the eggs, or you can cast Sanctuary on a character first. Just make sure that your egg-stealing character is all alone, and the rest of your party is somewhere out of view.
Either way, you'll end up with the real Dragon Eggs, and you'll have to decide what to do with them. You'll have two main options for this:
- You can betray Phaere. For this option, you'll need to talk to Matron Mother Ardulace on the western side of the temple, and reveal Phaere's plan. When Ardulace demands proof, you can give her the real eggs, or you can give her Phaere's fake eggs followed by either the real eggs or Solaufein's fake eggs. Regardless, Ardulace will see the truth of your accusation, and she'll kill Phaere. Then she'll leave to prepare for the ritual. After she leaves, an imp from Adalon will teleport in and warn you about the ritual, and then a guard will show up and escort you to the ritual.
- You can work with Phaere (or not). For this option, you'll need to replace the real eggs in the temple vault with Phaere's fake eggs or Solaufein's fake eggs. Then when you report in to Phaere in the Female Fighters' Society (#7), you'll need to give her the real eggs or Solaufein's fake eggs. The former will earn you 10,000 xp, while the latter will earn you 20,000 xp.
Either way, Phaere will think that you're following her plan, and she'll leave for the Temple of Lolth (#13). When she's out of sight, an imp from Adalon will show up and warn you about the ritual. After this, you'll need to head over to the temple yourself. When you enter, Phaere will take you to the ritual.
Note: If your goal is to help Adalon and hurt the drow, then you should put Phaere's fake eggs into the temple vault and then meet with Phaere and give her Solaufein's fake eggs. This will get Matron Mother Ardulace and Phaere killed, and leave you with Adalon's eggs.
Summoning a Demon
You'll arrive in the ritual chamber just in time for Matron Mother Ardulace to start the ritual. Once again, you'll have to decide how to proceed:
- You can attack Ardulace before she summons the demon. This will stop the ritual, but Ardulace will expose who you are, which will turn the city hostile. Then she (and perhaps Phaere) will attack you. If Ardulace has the real eggs, then this is the only way to keep them from becoming tainted. You'll only be able to complete Adalon's quest if her eggs remain pure.
- You can allow Ardulace to give the real eggs to the demon. The demon will expose who you are, and then Ardulace and the demon (and perhaps Phaere) will attack you, and the city will turn hostile. The demon will also taint Adalon's eggs. This will prevent you from completing Adalon's quest, which will cost you 78,500 xp per character in your party.
- You can allow Ardulace to give the fake eggs to the demon. The demon won't be amused, and it will kill Ardulace. If Phaere is still alive, and if she has eggs, then she'll try to give her eggs to the demon as well, and you'll be able to allow her or attack her, just like her mother. Phaere will then have the same luck as Ardulace, with fake eggs getting her killed and the real eggs getting you attacked and exposed.
If you kill Matron Mother Ardulace, then you'll earn 16,000 xp, and you'll find
Gorgon Plate +4 and a
Ring of Spell Turning on her corpse. If you kill Phaere, then you'll earn 12,000 xp, and you'll find the
Drow Piwafwi Cloak on her corpse. If you kill the demon (which requires +5 weapons), then you'll earn 26,000 xp, and you'll find Adalon's tainted eggs on its corpse.
If the demon doesn't attack you -- meaning it killed Ardulace (and perhaps Phaere) for giving it fake eggs -- then you'll get a chance to talk to it before it leaves. If you don't say anything, or if you tell it to begone, then each character in your party will earn 25,000 xp, and it will depart. You'll then have a couple of minutes to leave the city before the alarm is raised (or you can just kill everyone on your way out and earn lots of extra xp).
But if your alignment is evil, then you can trade Adalon's eggs to the demon. If you ask for "a powerful magic item," then it will give you
Blackmist +4. If you ask for a safe exit, then it will lead you to safety and kill a lot of enemies for you along the way (which will cost you xp). If you ask for anything else, or if you change your mind, then it will kill you. Obviously, trading away Adalon's eggs will prevent you from completing her quest, which will cost you 78,500 xp per character in your party.
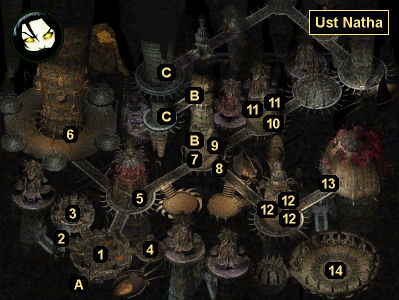
1 - Entrance Platform
You'll meet three drow shopkeepers in this part of the city. The one to the upper left will have weapons and armor for sale, including
Firetooth +3,
Sentinel +4, a
Robe of the Evil Archmagi, a
Spear of Withering +4, and a
Staff of Earth +2. The one to the upper right will have potions for sale, plus
Kaligun's Amulet of Magic Resistance and a
Belt of the Skillful Blade (if imported from Siege of Dragonspear). The one to the lower right will have spell scrolls for sale.
2 - "Fish" Tank
After rescuing Phaere from the mind flayers (see the Overview text above), you'll meet a duergar in front of the tank here. He'll invite you to talk to his master Aboleth, the creature inside the tank. When you do, Aboleth will reveal that he can read your mind -- and thus knows that you're not a drow -- and he'll demand that you kill the priestess Qilue for him, and bring back her brain for him to examine. You'll have two ways to respond:
- When Aboleth threatens to expose you, you can threaten to expose him back. Aboleth will concede, and you'll earn 12,000 xp.
- You can perform Aboleth's task. You'll find Qilue in her home to the east (#9). When you enter, Qilue and her five servants -- all spellcasters -- will turn hostile, which means it's a good idea to buff up before going in. You'll earn 57,000 xp for winning the battle, and you'll find a
Boneblade +4 and Qilue's Brain on Qilue's corpse. When you deliver the brain to Aboleth, you'll earn 10,000 xp.
3 - Pet Shop
You can buy a handful of pets here: a gnoll for 500 gp, a troll for 750 gp, a spirit troll for 1000 gp, or an umber hulk for 1500 gp. Any pet you buy will remain under your control while you're in the city, but it won't follow you into interior locations or the Underdark. The pet will also turn against you eventually. In other words, unless you're desperate for extra combat help, pets are only useful for killing, if you want to trade gp for xp.
Note: If you later kill the pet shop owner, then you'll get your money back.
4 - Torture Chamber
In this chamber, a quartet of drow torturers will repeatedly damage and heal a djinni named Dola Fadoon. If you kill Fadoon to end its suffering, then you'll earn 5000 xp, but you'll upset an overseer handmaiden, who will demand compensation from you. At the start of your stay in Ust Natha, the handmaiden will demand 4000 gp, but once you've started working for Matron Mother Ardulace (see the Overview text above), she'll only charge you 2000 gp. The handmaiden will give you 24 hours to make the payment. If you refuse to pay or take too long to pay, then the entire city will turn hostile to you. You won't gain anything for helping Fadoon, so just like the pet shop (#3), this is a place where you can trade gp for xp.
Note: If you later kill the overseer handmaiden, then you'll get your money back.
5 - Tavern
You'll meet several named NPCs on the main floor of this tavern. Most are storytellers who will give you some background information about the drow, but a few are involved in other activities:
- Drow bartender. He'll provide you with inn services. You can also rest for free upstairs in one of the "lust chambers."
- Sondal. He'll allow you to fight drow opponents in the dueling arena: Lasaonar (30,000 xp,
Blade of Searing +3), Chalinthra (12,000 xp), a drow mage (6000 xp), another drow mage (8000 xp), and finally a last drow mage (11,000 xp). These are all solo battles, and to fight the mages you'll have to use a mage character. After completing the duels, the door to the dueling arena will open, allowing you to loot anybody who died inside.
- Szordrin. He'll allow you to fight creatures in the fighting pit: an umber hulk (4000 xp, 250 gp), a nabassu (16,000 xp, 500 gp), a sahuagin prince (2000 xp, 750 gp), and finally a beholder (14,000 xp, 1000 gp). The dialogue makes it sound like you're supposed to fight these battles solo, but there isn't any downside to using your entire party.
Upstairs in the tavern, you can visit the lust chambers, you can watch some members of House DeVir being imprisoned for sneaking into the city (surprisingly, Viconia won't comment on this), and you can watch slaves get blown up for your amusement, at a cost of 100 gp and -1 Reputation for each slave.
6 - Slave Market
At the shave market here, you'll meet a drow slave trader. Once you've started working for Matron Mother Ardulace (see the Overview text above), he'll offer to sell you his slaves. He'll charge you 2000 gp for the slaves with equipment, or 1000 gp for the slaves without equipment. If you make the former deal, then you'll earn 7500 xp and +1 Reputation, and the slaves will have a chance to escape. If you make the latter deal, then you'll earn 5000 xp, and the slaves will probably die. Either way, you won't see the slaves again.
7 - Female Fighters' Society
After accepting Matron Mother Ardulace's quest to retrieve some noble blood (see the Overview text above), you'll meet Taso Kala just outside the entrance here. She'll inform you that "a sect of blasphemous Ghaunadaur worshippers" has fled to the loading platform in the southeastern part of the city, and she'll order you to eradicate them. You won't be able to refuse.
On the platform (#14), you'll encounter Relonar, a Ghaunadaur priest, a Ghaunadaur priest leader, two oyughs, and a bunch of jellies, oozes, and slimes. Be careful when fighting them. If you use area effect spells and hit an innocent bystander by mistake, then you'll turn the entire city against you. You'll earn over 30,000 xp for defeating the menagerie on the platform, and when you return to Taso, you'll receive absolutely nothing for your work.
8 - Elven Mage
When you approach this spot, you'll witness an elven mage fleeing to the east. Shortly thereafter, a drow leader will arrive and ask you which way she went. If you tell the truth, then the drow will kill the mage and leave her corpse behind. If you lie, then (presumably) the mage will get away. This encounter won't lead to anything, so feel free to answer however you want.
9 - Qilue's Home
This home is involved in Aboleth's quest (#2).
10 - Male Fighters' Society
11 - House Jae'llat
This house will start out magically warded. To enter it, you'll need the Jae'llat Wardstone from Jarlaxle's quest (#12).
Inside the house, you'll have to fight two major battles. Near the entrance, you'll encounter Rilloa Jae'llat and several guards, and in the back, you'll encounter Hindra Jae'llat, Ist'tar Jae'llat, and even more guards. In total, you'll earn over 116,000 xp for defeating the enemies, and when you rifle through the house's cabinets, you'll find
Water's Edge +3 plus some gold and gems. Nobody in the rest of the city will notice you decimating the inhabitants of the house.
In the alcove between the two entrances to the house, you'll find the cursed
Bracers of Binding.
12 - Deirex's Tower
After accepting Matron Mother Ardulace's quest to retrieve some noble blood (see the Overview text above), a "merchant" named Visaj will appear in between this tower and the Female Fighters' Society (#7). He'll tell you about Jarlaxle, House Jae'llat, and Deirex the lich, and he'll offer you a Gilded Rope, which will supposedly negate some of Deirex's power. Visaj will only ask you 1000 gp for the rope, but with 15 Charisma you can negotiate that price down to 500 gp, or you can threaten Visaj and get the rope for free.
With rope in hand, you'll be able to enter the lower level of Deirex's tower. However, when you get inside, Deirex will spot you right away, and he'll cast Imprisonment on you, which will send you to Jarlaxle in his own private pocket plane. When you talk to Jarlaxle, he'll explain that he set up this ruse with his lieutenant Visaj to see if you'd really face a lich, and then he'll make you a deal: if you retrieve his gems from the lich's tower, then he won't tell the drow who you really are. You won't have a choice in the matter; you'll have to accept the deal. When you do, Jarlaxle will teleport you back to the tower.
Note: Jarlaxle will tell you that you only have one day to complete his task, but in reality there isn't a time limit. You can take as long as you want.
When you enter the tower a second time, you'll fight Deirex for real. Deirex is a regular lich, so whatever strategy you used with other liches will probably work with him as well. You'll earn 22,000 xp when Deirex dies, and you'll find the Lich's Tooth and the Jae'llat Wardstone on his corpse. The tooth is a key that will unlock the upper level of the tower. The wardstone will get you into House Jae'llat (#11).
When you explore your surroundings, you'll find lots of spell scrolls plus
Armor of the Viper +5. You'll also find Deirex's Gems. When you take the gems, you'll be teleported back to Jarlaxle, who will explain that he was lying to you once again, and that you just did his dirty work for him. This will give you two ways to proceed:
- If you accept what Jarlaxle did to you, then he'll buy back the Gilded Rope for 2500 gp, and you'll also earn 10,000 xp. If you demand a reward during this time, then Jarlaxle will throw in 2500 gp extra. Then he'll teleport you back to the tower.
- If you angrily threaten Jarlaxle, then you'll end up fighting him and Visaj, which will earn you 26,000 xp total. Immediately after winning the battle, you'll get teleported back to the tower. That means you'll only get a chance to loot one of the corpses, but you won't find much on them. Visaj will have a
Quarterstaff +1 and Jarlaxle will have a
Dagger +2.
Back at Deirex's tower, don't forget to visit the upper level where you'll find a
Crossbow of Affliction +4, a
Ring of Clumsiness: The Jester's Folly, a
Short Sword +2, a
Spear +3, and a
Two-Handed Sword +2, plus a collection of gems, spell scrolls, and wands, and over 1000 gp.
13 - Temple of Lolth
This is where you'll find Adalon's eggs.
14 - Docking Platform
Exits
- Exit to the
Underdark.
- Stairs.
- Stairs.


